License and Warranty Activation
THE T1000 TOOL IS WARRANTED FOR 90 DAYS FROM DATE OF PURCHASE.
I certify that I have read and understand the T1000 Tool Operating Instruction Manual and have taken the Operator’s exam. I understand the
importance of following all safety procedures and that failure to read, comprehend, and follow the detailed rules and warnings regarding the
safe operation of powder actuated tools can result in serious injury or death to the tool operator or bystanders. I agree to conform to all the
rules and regulations regarding the use of powder actuated tools.
(Please print clearly)
THE SERIAL NUMBER ON MY TOOL IS:
PLEASE SEND MY TOOL LICENSE TO:
NAME
ADDRESS
CITY STATE ZIP PHONE
MAIL TO:
Tool License Coordinator • Powers Fasteners, Inc.• 2 Powers Lane • Brewster, NY 10509
Fold along dotted line and tape shut before mailing
Tool License Coordinator
Powers Fasteners, Inc.
2 Powers Lane
Brewster, NY 10509
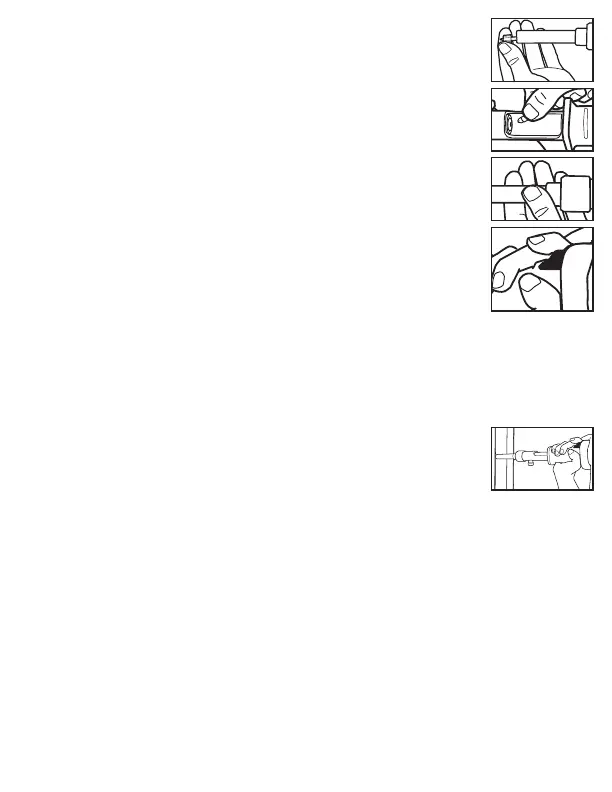
fastener. If excessive force is required, stop and determine why the fastener can not be
inserted. Correct the problem before proceeding.
NOTE: Do not use fasteners longer than 3" as listed in the fastener selection section of
this manual.
3. Make sure the breech is clear. Insert the powder load starting with the lowest power
level. If this Load does not fully set the fastener, try the next higher power level until
the proper level is found.
NOTE: Over driving or over powering a fastener can cause a safety hazard.
4. Pull the barrel all the way back to close the tool. Do not attempt to close the tool by
exerting force on the front of the nose piece. Never place your fingers or hands over
muzzle bushing. The safe position for hands and fingers are as shown in the diagram.
Hands must never be placed in front of the tool muzzle or nose piece. In the event of an
accidental discharge, the piston and/or fastener can pass through the operators hand.
5. Once the tool is in the closed position, place it against the work surface. Hold the
tool firmly with two hands and completely depress the barrel. Then squeeze the trigger.
Always hold the tool perpendicular to the work surface. Hold the tool firmly against the
work surface to avoid excessive recoil. Never depress the tool against anything except
the work surface
NOTE: In the event that the load does not discharge continue to hold the tool de-pressed against the work
surface for at least 30 (thirty) seconds in case of a delayed load discharge. Then carefully remove the load and
dispose of in a can of water or other non flammable liquid. Never attempt to force or pry a load out of a tool
chamber. Do not discard unfired loads into a trash container.
6. To prepare for the next fastening, point the tool in a safe direction. Snap the barrel forward as described
in step 1. This action will eject the spent powder load and properly reset the piston. Always insert a new
fastener before loading powder load in the chamber. Do not attempt to unload or
disassemble a jammed, stuck or broken tool as improper handling may cause it to
discharge and strike operator and/or bystander. A jammed tool must be pointed in a
safe direction at all times. Tag the tool and lock it up. Call your Powers Fasteners
representative for proper assistance.
Safety Precautions
Safety is your primary responsibility when operating any powder actuated tool. You must read and under-
stand the contents of this manual. You must be familiar with all functional and safety requirements of the tool.
It is your responsibility to obtain proper training and a Powers Fasteners operator card prior to using this tool in
compliance with the current American National Standard A10.3 Safety Requirements for Powder Actuated
Fastening Systems and the Federal Occupational Safety and Health Administration Standards (OSHA). Existing
state or local regulations should also be followed. When using this tool, you must have the qualified operators
card in your possession.
Revocation of card - Failure to comply with any of the rules and regulations for safe operation of powder
actuated tools shall be cause for the immediate revocation of your qualified operator card.
The following is a summary of safety precautions to be followed when operating a Powers Fasteners
powder actuated tool. Failure to follow these safety instructions can result in serious injury or death to
operators or bystanders.
PRIOR TO OPERATING THE TOOL
1. Warning signs should always be posted within the area in which a powder actuated tool is to be used. These
signs should be at least 8" x 10" in size with boldface type that is not less than 1" in height. The sign should state
"Powder Actuated Tool In Use".
2. Approved safety goggles should always be worn by operator or bystander, to protect their eyes from flying
particles. Hearing protection should always be worn by the operator and bystanders when using a powder actu-
ated tool. Other personal safety protection as required should also be used.
3. Never modify or fabricate parts for use in your Powers tool. Use only Powers Fasteners, loads, and tool parts.
4. Hands or other body parts must never be placed in front of muzzle/barrel. Accidental discharge can cause piston
and/or fastener to pass through the operator’s hand.
5. Never compress the tool against any part of the body. Serious injury or death may result in the event of an
accidental discharge.
6. Always point tool in a safe direction at all times.
7. Use the tool for its intended purpose only.
PREPARATION FOR LOADING THE TOOL
1. Tools must be checked prior to operating to make sure they are not fully or partially loaded with a powder
load or fastener.
2. To insure safe operation, perform the daily function test described in this manual. Be sure the tool is not
loaded prior to performing this test.
3. Do not operate this tool unless all its parts are in place and operating appropriately. Never attempt to use a mal-
functioning tool. Call 1-800-524-3244 for assistance.
4. Never guess about the suitability of a base material. If you are uncertain about the suitability of a base
material, perform a center punch test.
5. Do not operate the tool until you learn and understand the color code / numbering system used to identify
the power level of powder loads.
OPERATING THE TOOL
1. Only use fasteners and powder loads designed for this tool as supplied by Powers Fasteners.
2. Do not use powder actuated tools in a flammable or an explosive atmosphere.
3. Do not fire a tool without a fastener. The piston will impact the work surface possibly causing serious injury
to the operator or bystanders along with damage to the tool.
4. Do not load the tool until you are ready to make a fastening. Check the power load level before inserting it into
the tool chamber.
5. Fastener must be loaded prior to loading the powder load, to prevent injury to operator or bystander in the
event of an accidental discharge.
6. Do not close tool against work surface. The tool should be manually closed, with hand away from muz-
zle/barrel to prevent accidental discharge.
7. Hold the tool perpendicular to the work surface at all times. Use a spall guard wherever possible. This will limit
the possibility of fastener ricochet which could cause serious injury or death to the operator or bystanders.
8. Always perform a test fastening with the lightest load level designed for use in the tool. If the lightest load
fails to set the fastener, try the next highest load until the proper level is attained. Failure to follow this proce-
dure may cause the fastener to be overpowered. If this occurs, the fastener may fully penetrate the base materi-
al causing serious injury or death to someone. Overpowering the fastener can also damage the tool, creating a
safety hazard to both the operator or bystanders.
9. Do not fasten into cast iron, tile, glass, or other types of brittle materials. These materials can shatter and
create sharp fragments which may cause injury.
10. Do not fire tool within 3" (three inches) of the edge of a concrete base material or within 1/2" (one-half
inch) of the edge of a steel base material.
11. Do not attempt to install a fastener closer than 3" (three inches) to another previously inserted fastener in
concrete or 1-1/2" (one and one-half inch) in steel.
12. Do not fasten into a concrete base material less than 3 times as thick as the fastener penetration or into a
steel base material thinner than 1/8”.
13. Never attempt to install a fastener in a cracked or spalled area in concrete. Place fastener at least 3” (three
inches) away from a spalled area to prevent the possibility of the fastener bending and striking an operator or
bystander.
14. Do not attempt to install fasteners in areas that have been welded or cut with a torch as these procedures
may have caused local hardening of the steel.
15. Do not fasten through a predrilled hole unless proper guidance is provided.
16. If you decide not to make a fastening after the tool has been loaded, you must always remove the powder
load first followed by the fastener.
17.Never attempt to override the safety features of this tool.
HANDLING THE TOOL AND POWDER LOADS
1. Never leave a loaded tool unattended. Once the tool is loaded, make the fastening immediately or
unload the tool.
2. Always unload the tool before work breaks, changing parts, cleaning or servicing, and when storing.
3. To prevent accidental discharge of loads, never carry the powder loads in the same container as the fasteners or
other hard objects.
4. Always store the powder loads in the containers provided or in an enclosure provided for them. Never intermix
the various power levels. Keep them segregated in clearly identified containers.
5. Powder loads should never be used in firearms. They are normally more powerful that the cartridges supplied
with the firearms.
6. Powder actuated tools and powder loads should always be stored under lock and key. Tools must be unloaded
when not in use.
TOOL MALFUNCTION
1. In the event that a load fails to discharge after the trigger is pulled, the tool must be kept depressed against
the work surface for a minimum of 30 (thirty) seconds in case of a delayed load discharge. Then carefully
remove the entire load strip. and dispose of it in a can of water or other nonflammable liquid. Never attempt to
force or pry a load out of a tool chamber.
2. Never discard unfired powder loads into a trash container.
3. Do not attempt to unload or disassemble a jammed, stuck or broken tool as improper handling may cause it
to discharge and strike operator and/or bystander. A jammed tool must be pointed in a safe direction at all
times. Tag the tool and lock it up. Call your Powers Fasteners representative for proper assistance.
Troubleshooting
ALWAYS CHECK INSTRUCTION MANUAL FOR PROPER ASSEMBLY OF PARTS
PROBLEM POSSIBLE CAUSE SOLUTION
Fastener Overdriving Power level too high / Pin too short Use a lower powder load level number
or a longer pin
Soft base material Check base material suitability section
Tool does not fire Tool not depressed completely See "Tool does not depress completely"
section below
Firing pin damaged Replace damaged part(s)
Tool doesn't depress completely Damaged firing pin parts, ejector, Check the parts for dam
etc. Parts assembled improperly age or improper assembly
Power reduction or inconsistent Barrel is not pulled fully Barrel must be pulled out completely to
fastener penetra tion forward when cycling tool. properly reset the piston
Worn or damaged piston Replace piston or piston ring
or piston ring
Powder load will not eject Barrel is not pulled forward Firmly snap the tool open.
after firing tool completely when the tool is cycled If necessary dismantle and clean
Bent piston or damaged piston ring Remove and replace piston or piston ring
Build-up of dirt in breech Clean breech area
Powder load will not Stuck powder load Remove barrel assembly from tool and
eject after firing tool carefully unthread nosepiece. Carefully
pull the piston out of the barrel. Use
brass or aluminum rod to gently push
load out of chamber. DANGER: If the
load has not been fired use extreme care
when removing to avoid discharging
load. If load does not come out very
easily, call your Powers Fasteners
Authorized representative
Tool cannot be opened or cycled Lack of proper cleaning Clean tool thoroughly
Damaged or bent piston Remove and replace piston
Broken or damaged parts Tag tool with warning "Defective - Do
Not Use" place in locked container and
contact your Powers Fasteners
Authorized representative for service
Piston stuck in the forward Piston has been overdriven and is Tap the piston against a hard surface
position jammed against piston reset pin
Chipped or damaged piston Tool not held on work surface Machine piston as shown on page ??
squarely. This allows the piston to Piston regrinding may be performed only
slip off the head of the pin and by qualified individuals
cause damage to the piston
Barrel will not open easily Bent piston Remove and replace piston
Excessive build-up of dirt Disassemble and clean tool
Piston reset pin is damaged Replace piston reset pin
Foreign material jammed between Disassemble and remove foreign particles
the barrel and housing
Barrel opens too easily Reset pin spring has worn Remove and replace with a new spring
Fastener Selection Guide
.300 HEAD DIAMETER DRIVE PINS
CAT. SHANK STD. STD. HEAD SHANK WT./
NO. LENGTH BOX CTN. DIA. DIA. 100
50012 1/2" K 100 5000 .300 .143 .5
50016 5/8" K 100 5000 .300 .143 .5
50022 3/4" 100 5000 .300 .143 .5
50026 1" 100 5000 .300 .143 .6
50030 1-1/8" 100 1000 .300 .143 .7
50032 1-1/4" 100 1000 .300 .143 .8
50034 1-1/2" 100 1000 .300 .143 .9
50036 1-3/4" 100 1000 .300 .143 1.1
50038 2" 100 1000 .300 .143 1.2
50040 2-1/4" 100 1000 .300 .143 1.2
50042 2-3/8" 100 1000 .300 .143 1.3
50044 2-1/2" 100 1000 .300 .143 1.4
50046 2-3/4" 100 1000 .300 .143 1.6
50048 3" 100 1000 .300 .143 1.9
.300 HEAD DIAMETER DRIVE PINS WITH TOP HAT
CAT. SHANK STD. STD. HEAD SHANK WT./
NO. LENGTH BOX CTN. DIA. DIA. 100
50136 1/2" K 100 5000 .300 .143 .5
50138 5/8" K 100 5000 .300 .143 .5
40140 3/4" 100 5000 .300 .143 .5
50144 1" 100 5000 .300 .143 .6
.300 HEAD DIAMETER STEP SHANK PINS
CAT. SHANK STD. STD. HEAD SHANK WT./
NO. LENGTH BOX CTN. DIA. DIA. 100
50158 3/4" Step Shank 100 1000 .300 .143/130 .5
50159 1" Step Shank 100 1000 .300 .143/130 .6
.300 HEAD DIAMETER DRIVE PINS WITH 3/4" WASHER
CAT. SHANK STD. STD. HEAD SHANK WT./
NO. LENGTH BOX CTN. DIA. DIA. 100
50070 3/4" 100 1000 .300 .143 1.6
50080 2-1/2" 100 1000 .300 .143 2.5
50082 3" 100 1000 .300 .143 2.8
.300 HEAD DIAMETER DRIVE PINS WITH 7/8" WASHER
CAT. SHANK STD. STD. HEAD SHANK WT./
NO. LENGTH BOX CTN. DIA. DIA. 100
50090 1" 100 1000 .300 .143 1.9
50092 1-1/4" 100 1000 .300 .143 2.0
50094 1-1/2" 100 1000 .300 .143 2.1
50096 2" 100 1000 .300 .143 2.4
50098 2-1/2" 100 1000 .300 .143 2.7
50100 3" 100 1000 .300 .143 3.0
.300 HEAD DIAMETER DRIVE PINS WITH 1" WASHER
CAT. SHANK STD. STD. HEAD SHANK WT./
NO. LENGTH BOX CTN. DIA. DIA. 100
50108 1-1/4" 100 1000 .300 .143 2.2
50110 1-1/2" 100 1000 .300 .143 2.3
50112 2" 100 1000 .300 .143 2.6
50114 2-1/2" 100 1000 .300 .143 2.9
50116 3" 100 1000 .300 .143 3.2
.300 HEAD DIA. DRIVE PINS W. 1-7/16" INSULATION WASHER
CAT. SHANK STD. STD. HEAD SHANK WT./
NO. LENGTH BOX CTN. DIA. DIA. 100
50122 1-1/2" 100 1000 .300 .143 2.1
50126 2-1/2" 50 500 .300 .143 2.7
50132 3" 50 500 .300 .143 3.0
1/4"-20 THREADED STUDS
CAT. THREAD SHANK STD. STD. HEAD SHANK WT./
NO. LENGTH LENGTH BOX CTN. DIA. DIA. 100
50320 1/2" 1/2"K 100 5000 1/4" .143 .8
50322 3/4" 1/2"K 100 1000 1/4" .143 1.1
50326 3/4" 3/4" 100 1000 1/4" .143 1.2
50328 1/2" 1" 100 1000 1/4" .143 1.2
50330 3/4" 1" 100 1000 1/4" .143 1.4
50334 1/2" 1-1/4" 100 1000 1/4" .143 1.4
50336 3/4" 1-1/4" 100 1000 1/4" .143 1.5
50338 1-1/4" 1-1/4" 100 1000 1/4" .143 1.7
.300 HEAD DIAMETER PINS WITH CEILING CLIPS
CAT. SHANK STD. STD. HEAD SHANK WIRE WT./
NO. LENGTH BOX CTN. DIA. DIA. HOLE 100
50363 1" 100 1000 .300 .143 0.278" 3.4
50364 1" 100 1000 .300 .143 0.278" 3.5
50368 1" 100 1000 .300 .143 0.278" 3.0
50370 1-1/4" 100 1000 .300 .143 0.278" 3.7
50374 1-1/4" 100 1000 .300 .143 0.278" 3.2
.300 DIAMETER HEAD DRIVE PINS WITH
BX CABLE STRAPS AND CONDUIT CLIPS
CAT. STD. STD. HEAD SHANK WT./
NO. DESCRIPTION BOX CTN. DIA. DIA. 100
50150 1" 100 1000 .300 .143 3.5
50152 1-1/4" 100 1000 .300 .143 3.7
50380 1/2" EMT 1-1/4" pin 100 1000 .300 .143 3.4
50381 1/2" EMT 1" pin TH 100 1000 .300 .143 3.3
50382 1/2" EMT 1" pin 100 1000 .300 .143 3.3
50384 3/4" EMT 1-1/4"pin 100 1000 .300 .143 3.5
50385 3/4" EMT 1" pin TH 100 500 .300 .143 3.4
50386 3/4" EMT 1" pin 100 1000 .300 .143 3.3
50388 1" EMT 1" pin TH 25 250 .300 .143 3.2
300 HEAD DIAMETER PIN WITH REBAR BASKET CLIP
CAT. STD. STD. HEAD SHANK WT./
NO. DESCRIPTION BOX CTN. DIA. DIA. 100
50702 32mm w/ basket clip 100 100 8mm .143 4.0
50704 37mm w/ basket clip 100 100 8mm .143 4.1
50710 37mm w/ basket clip 100 100 8mm .143 4.3
50712 37mm w/ basket clip 100 100 8mm .143 4.4
50716 37mm w/ basket clip 100 100 8mm .143 4.6
50718 37mm w/ basket clip 100 100 8mm .143 4.8
Powder Load Selection
Guide
CAT. POWER LOAD STD. STD. MASTER WT./
NO. LEVEL COLOR SIZE BOX CTN. CTN. 100
50500 1 Gray .22A 100 1000 20000 .33
50502 2 Brown .22A 100 1000 20000 .33
50504 3 Green .22A 100 1000 20000 .33
50506 4 Yellow .22A 100 1000 20000 .33
 Loading...