CHICKEN COOP
HEATER & BROODER
INSTRUCTION
Model No.1299682
CAUTION: Read all instructions and warnings before Operating!
SAVE THESE INSTRUCTIONS! READ ALL INSTRUCTIONS!
E333126
HEATER CONFIGURATION
BROODER CONFIGURATION
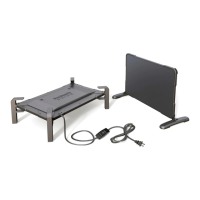
two Legs for Heater
The Producers Pride Chicken Coop Heater and Brooder has
been designed to stand in a vertical and horizontal position.
Simply insert the provided legs as seen below into the
bottom or end of the heater panel to best fit your coop needs.
NOTE: To avoid damage to the legs, do not use exces-
sive pressure to push legs into panel.
The Producers Pride coop heater / brooder has been
designed for an optional wall mount configuration. To install
using this method, locate the mounting screw holes on the
back of the heater (see illustration below for reference.).
Measure the distance from the center of each hole. Next,
locate a solid mounting surface on the wall and mark
location using the measurements taken from the mounting
screw holes on the back of the panel. Install two screws or
nails and then hang panel on screws or nails.
When using as a brooder, four separate legs have been
provided in kit.
NOTE: Each leg for the brooder configuration has three
levels providing a height adjustment to meet your
different needs. Select the height that best suits the size
of your baby chicks and your coop or containment
requirements. The height for baby chicks should allow
them to walk under the brooder heater without touching
the heater panel.
As shown below, determine the best height for your baby
chicks and coop or containment requirements and then
insert one leg into each corner of the panel. Make sure all
four legs are inserted at the same height level so that panel
sets flat and level.
As an optional brooder configuration, the Producers Pride
coop heater / brooder has been designed to hang as shown
in the illustration below.
NOTE: Chains are not included with this kit.
To use in this configuration, purchase a small chain and
connect one end to all four corners of the panel as shown in
the illustration below. Connect the other ends of all four
chains to a single connector. Then connect to a secure
location above the area where you want to use the brooder
heater.
NOTE: Height adjustment will need to be made by
adjusting the length of the chain.
Four Legs for Brooder