EasyManua.ls Logo

Project Source 40000 - User Manual

Project Source 40000
5 pages
Print Icon
To Next Page IconTo Next Page
Loading...
PACKAGE CONTENTS/CONTENU DE L’EMBALLAGE/CONTENIDO DEL PAQUETE
HARDWARE CONTENTS/QUINCAILLERIE INCLUSE/ADITAMENTOS
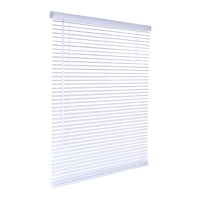
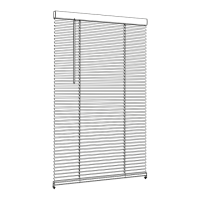
1 INCH VINYL MINI BLIND
STORE À MINI-LAMELLES EN VINYLE DE 2,54 CM
MINIPERSIANA DE VINILO DE 2,54 CM
ITEM/ARTICLE/ARTÍCULO #0014378, 0014426, 0014578, 0014845, 0014920,
0014933, 0014937, 0018985, 0019333, 0039013, 0039015, 0039017, 0039028,
0039775, 0040446, 0040709, 0040855, 0040900, 0041062, 0041257, 0048128,
0049783, 0049834, 0049896, 0352967
MODEL/MODÈLE/MODELO
#40000 - 40018, 40020 - 40021,
40023 - 40025, 70767
Item Number/Numéro d’article/
Número de artículo
Purchase Date/Date d’achat/
Fecha de compra
Questions/Des questions?/¿Preguntas?
Call customer service at 1-866-389-8827,
8 a.m. - 8 p.m., EST, Monday - Friday.
Communiquez avec notre service à la clientèle
au 1 866 389-8827, entre 8 h et 20 h (HNE),
du lundi au vendredi.
Llame al Departamento de Servicio al Cliente
al 1-866-389-8827, de lunes a viernes de
8 a.m. a 8 p.m., hora estándar del Este.
ATTACH YOUR RECEIPT HERE
JOIGNEZ VOTRE REÇU ICI
ADJUNTE SU RECIBO AQUÍ
Blind
Store
Persiana
Wand
Baguette
Vara
Valance
Cantonnière
Cenefa
Mounting Bracket/Support de xation/
Abrazadera de montaje Center Bracket/Support central/Abrazadera
central
30 in. - 47 in./76,20 cm - 191,38 cm = x 1
48 in. - 72 in./121,92 cm - 182,88 cm = x 2
Valance Clip/Attache de cantonnière/
Sujetador de la cenefa
23 in. - 29 in./58,42 cm - 73,66 cm = x 2
30 in. - 59 in./76,20 cm - 149,86 cm = x 3
70 in. - 72 in. /177,80 cm - 182,88 cm = x 4
Small Screw/Petite vis/Tornillo pequeño
Hold Down Bracket/Support de retenue/
Abrazadera de jación inferior
Cap/Capuchon/Tapa
Cord Cleat/Taquet de cordon/Soporte del
cordón
Medium Screw/Vis moyenne/Tornillo
mediano
Large Screw/Grande vis/Tornillo grande
23 in. - 29 in./58,42 cm - 73,66 cm = x 8
30 in. - 47 in./76,20 cm - 76,20 cm = x 11
48 in. - 72 in./121,92 cm - 182,88 cm = x 14
x 1
x 2
x 2
x 2
x 2
x 4
x 1
x 1
x 1
A
AA
GG
DD
BB
HH
II
EE
CC
FF
B
C
AB15219
Lowes.com
1

Questions and Answers

Summary

Safety Information

Warning

Highlights risks of strangulation from inner cords and cord loops, advising to keep cords out of reach.

Preparation and Assembly Instructions

Preparation

Ensures all parts are present before assembly, lists required and helpful tools, and estimates assembly time.

Step 1: Mark Window Center

Mark the center of the window opening and the blind headrail with a pencil.

Step 2: Install Mounting Brackets

Attach mounting brackets to the blind headrail and position them in the window, marking their locations.

Step 3: Attach Brackets to Frame

Securely attach the mounting brackets to the window frame or wall using large screws.

Step 4: Position Center Bracket

For wider blinds, position and mark the center bracket on the headrail before removing the blind.

Step 5: Install Center Bracket

Align and attach the center bracket to the window frame using large screws.

Step 6: Hang Blind and Add Caps

Hang the mini blind on the installed brackets and snap on the bracket caps.

Step 7: Install Wand

Attach the wand to the wand hook on the blind's headrail.

Step 8: Install Valance (Optional)

Clip valance clips onto the headrail and slide the valance into place.

Step 9: Position Cord Cleat (Optional)

Mount the cord cleat to the wall at a minimum height of 64 inches.

Step 10: Install Hold Down Brackets (Optional)

Install hold down brackets and snap them onto the lower rail caps.

Cord Stop Position

Guides on positioning the cord stop for child safety, about 1-2 inches from the headrail.

Shorten Blind Length

Step 1-3: Prepare for shortening

Lower blind, remove bottom rail caps, untie cord knot, and remove bottom rail and extra slats.

Step 4-6: Reassemble and finish

Thread cord, re-tie knot, cut excess cord, tuck ends, and replace caps.

Operation and Maintenance

How to Operate

Instructions on raising/lowering the blind using the pull cord and opening/closing slats with the wand.

Care and Maintenance

Guidance on cleaning the blind using a damp cloth or vacuum.

Troubleshooting: Stuck Cord Lock

Addresses issues with the cord lock being stuck and provides corrective actions.

Warranty and Replacement Parts

Warranty Information

Details the one-year limited warranty, exclusions, and how to obtain service.

Replacement Parts

Provides contact information for ordering replacement parts and lists available hardware pack contents.

Project Source 40000 Specifications

General IconGeneral
BrandProject Source
Model40000
CategoryWindow Blinds
LanguageEnglish

Related product manuals