EasyManua.ls Logo

Proslat HEAVY DUTY HOIST User Manual

Proslat HEAVY DUTY HOIST
6 pages
To Next Page IconTo Next Page
Page #1 background imageLoading...
Page #1 background image
295 D, boul. Industriel, Châteauguay (QC) J6J 4Z2
proslat.com 1-888-691-2944 // 450-691-294 4 info@proslat.com
Installation guide
HEAVY DUTY HOIST
TOOLS REQUIRED
BOX CONTAINS
WARNING
1 x
2 x
1 x 1 x 1 x 2 x
2 x
4 x
4 x
4 x
4 x
1 x
Measure the distance between the handle
bars and seat of the bike. Most adult bikes
are between 32” and 36”, we suggest install-
ing your hoist a maximum of 48” apart.
For kayaks or similar items, we suggest 6’ apart.
Drill
1/8’ Drill bit
Star screwdriver
Tape measure
Please read installation carefully prior to installing. Before using the product thoroughly
test the fully-weighted product (with equipment in place) to ensure the product has been
installed properly. Do not allow children to play on product. Proslat is not responsible for
any damage resulting from improper installation, overloading or product failure.
STEP 1
Adjustable wrench
01— 08-12-2014
Question and Answer IconNeed help?

Do you have a question about the Proslat HEAVY DUTY HOIST and is the answer not in the manual?

Proslat HEAVY DUTY HOIST Specifications

General IconGeneral
BrandProslat
ModelHEAVY DUTY HOIST
CategoryLifting Systems
LanguageEnglish

Summary

Tools and Components

Tools Required for Installation

Lists the essential tools needed for the hoist installation process.

Box Contents Overview

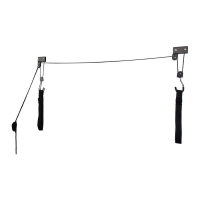
Details all the parts and hardware included in the hoist package.

Critical Safety Warnings

General Installation Safety

Read installation carefully before use; test thoroughly. Proslat not liable for damage.

Ceiling Joist Requirement

Hoist must be attached to a solid wood ceiling joist, minimum 2" x 4".

Overhead Operation Warning

Ensure no obstructions restrict the operation of the bike lift.

Installation Steps

Step 1: Initial Measurement

Measure distance for bike or kayak mounting points (32-36" for bikes, 6' for kayaks).

Step 2: Mount Pulleys

Attach hoist brackets to ceiling joists, parallel or perpendicular, matching Step 1 distance.

Step 3: Attach Pulley Brackets

Secure the pulley brackets to the previously mounted ceiling mounts.

Step 4: Rope Installation

Thread rope through pulleys and secure with figure eight and double knots.

Step 5: Mount Rope Cleat

Attach rope cleat to the wall for securing the rope when the item is raised.

Using the Hoist

Instructions for raising and lowering items, including safety tips.

Kayak Application

Guidance for using the hoist with kayaks or similar items.

Warranty and Liability

Proslat Hoist Warranty Terms

Covers material/workmanship defects for 5 years, not exceeding 100 lbs load.

Disclaimer of Liability

Proslat Inc. is not responsible for product use, installation, or personal injury.

Related product manuals