EasyManua.ls Logo

Proto MATRIX RAIL - User Manual

Proto MATRIX RAIL
11 pages
Print Icon
To Next Page IconTo Next Page
Loading...
Proto Paintball
USA 10637 Scripps Summit Ct. San Diego, CA 92131
P 858-536-5183 F 858-536-5191
EUROPE Unit 1, ZK Park, 23 Commerce Way
Croydon, Surrey CRO 4ZS United Kingdom
P +44 (0) 20-8649-6330 F +44 (0) 20-8649-6339
ASIA 3F-2, No. 287, Jung Jeng Rd., Luju Hsiang
Taoyuan 338, Taiwan (R.O.C.)
P +886-3-312-6540 F +886-3-311-8723
www.protopaintball.com
www.dyematrix.com
Copyright ©2006 DYE Precision, Inc. The stylized “proto” logo and the “P” logo are either registered trademarks, trademarks, or
design trademarks of DYE Precision, Inc.
DYE Precision, Inc. U.S. Patent # 5,613,483 and additional patents pending.
Question and Answer IconNeed help?

Do you have a question about the Proto MATRIX RAIL and is the answer not in the manual?

Summary

QUICK START UP GUIDE

IMPORTANT SAFETY INSTRUCTIONS AND GUIDELINES

Critical safety rules for operating the paintball marker.

PMR BOARD SETTINGS AND FUNCTIONS

CONTROL PANEL OVERVIEW

Explanation of marker control buttons, LED indicators, and basic settings.

CONFIGURATION MODE AND SETTINGS

Details on accessing configuration and adjusting trigger, dwell, fire mode, and ABS.

BATTERY MANAGEMENT AND WARNINGS

Installation, life, and critical warnings for the 9V battery.

RAIL BOLT ASSEMBLY AND MAINTENANCE

BOLT MAINTENANCE AND FUNCTIONALITY

Cleaning, lubrication, and how the RAIL™ BOLT system operates.

RAIL BOLT O-RING LIST

A list of O-rings used in the RAIL™ BOLT assembly.

SERVICE SAFETY PRECAUTIONS

Essential safety steps before servicing the paintball marker.

LOADERS AND FEED NECK

LOADER ATTACHMENT AND FEED NECK MAINTENANCE

How to attach and secure a loader, and maintain the feed neck.

AIRPORT AND AIR SYSTEM INSTALLATION

AIR;NITROGEN TANK CONNECTION AND ADJUSTMENT

Connecting tanks, adjusting airport position, and pin depressor.

HYPER2 IN-LINE REGULATOR

VELOCITY ADJUSTMENT AND MAINTENANCE

Fine-tuning marker velocity and servicing the Hyper2 regulator.

REGULATOR DISASSEMBLY AND O-RINGS

Step-by-step guide for disassembling the regulator and identifying O-rings.

ANTI CHOP EYES AND BALL DETENTS

EYE SYSTEM FUNCTION AND CLEANING

Explanation of the eye system's role and how to clean it.

BALL DETENT REPLACEMENT AND LOW BATTERY IMPACT

Replacing ball detents and how low battery affects eye function.

TROUBLESHOOTING GUIDE

AIR LEAK DIAGNOSIS AND REPAIR

Identifying and fixing air leaks from various marker components.

ELECTRONICS, SOLENOID, AND TRIGGER ISSUES

Troubleshooting power, trigger, and solenoid activation problems.

FIRING AND VELOCITY MALFUNCTIONS

Addressing trigger bounce, erratic velocity, and firing failures.

COMMON OPERATIONAL PROBLEMS

Solutions for double feeding and paint breaking during operation.

MATRIX EXPLODED VIEW

EXPLODED DIAGRAM AND PARTS LIST

Visual breakdown of the marker with a list of all components.

MATRIX WARRANTY INFORMATION

WARRANTY TERMS AND TECHNICAL SUPPORT

Details of the manufacturer's warranty, support, and disclaimers.

Overview

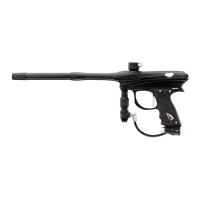
The Proto Matrix Rail (PMR) is a .68 caliber paintball marker designed for recreational and tournament play. It utilizes compressed air or nitrogen gas (DO NOT USE CO2) with an input pressure between 400-850 psi. The marker is not a toy and misuse can cause serious injury or death. Users are recommended to be 18 years or older, or have adult supervision if under 18. Eye protection meeting ASTM/CE standards is mandatory for users and persons within range. The PMR should always be treated as if loaded and able to fire, and never pointed at anything not intended to be shot. Velocity should not exceed 300 feet per second or local/national laws.

Function Description:

The PMR operates using a patented Boost™ forward technology for its bolt system, which ensures fast and efficient valve opening while gently pushing paintballs to reduce breakage. The marker features an Anti Chop Eye (ACE) system to prevent paint chopping by ensuring a paintball is fully seated before firing. It offers various firing modes, including semi-automatic (factory default), PSP, and Millennium modes, which adhere to paintball tournament series rules. The electronic board allows for adjustable settings such as rate of fire, trigger sensitivity, and dwell.

Important Technical Specifications:

  • Ammunition: .68 caliber paintballs (ASTM/CE standards).
  • Power Source: Compressed air or nitrogen gas (400-850 psi input pressure).
  • Battery: 9V battery (alkaline or lithium-ion recommended for maximum life). Battery life is approximately 40,000 shots.
  • Velocity: Adjustable, factory set to approximately 285 FPS.
  • Rate of Fire (ROF): Adjustable from 10 BPS to 30 BPS (factory default 15, corresponding to 20 BPS).
  • Dwell: Adjustable from 1 to 40 (factory default 25).
  • Trigger Sensitivity: Adjustable from 1 to 20 (factory default 5).
  • Barrel: Stock barrel is .690 size.

Usage Features:

  • Quick Start-Up: Includes steps for battery installation, barrel attachment (with barrel sock), loader installation (force-feeding motorized loader recommended for maximum performance), and gas source attachment.
  • Battery Installation: The 9V battery is housed on the left side of the grip frame. Access requires removing two grip panel screws with a 3/32" allen key. Care must be taken not to pinch wires during reassembly.
  • Controls: Two buttons and an LED indicator on the back of the grip frame. The top button turns the PMR ON/OFF, and the bottom button toggles the Eye feature ON/OFF.
  • LED Indicator: Displays various states: Yellow (boot up), Red (no ball detected, eye on), Green (ball detected, eye on), Blinking Red (eye off), Blinking Green (eye blocked/dirty/low battery/bad connection).
  • Configuration Mode: Accessed by turning the marker off, setting DIP switch 2 to ON, and then turning the marker on. Allows adjustment of trigger sensitivity, dwell, ROF, and fire mode.
  • Trigger Adjustment: Fully adjustable forward and over travel using an .050 Allen key. The top front screw controls forward travel, and the back screw controls over travel. Adjustments should be made carefully to avoid accidental discharge or microswitch wear.
  • Feed Neck Adjustment: Adjustable with a 5/32" allen key to secure the loader.
  • Airport Adjustment: The airport adapter's position can be moved approximately 1½" back or forward using a 3/32" allen key.
  • Airport Pin Depressor: Adjustable to ensure proper gas flow from the air system. Adjustment involves removing the hose, turning a set screw with a 3/32" allen key, and testing for leaks.
  • Velocity Adjustment: Controlled by the Hyper2 regulator. A 3/16" allen key is used to turn the adjustment screw (clockwise to decrease, counter-clockwise to increase velocity). Chronograph testing is required after adjustments.
  • Anti Chop Eyes (ACE) System: Prevents chopping by ensuring a ball is in the breech. If eyes are dirty, the marker defaults to a reduced rate of fire. Eyes can be bypassed by turning them off.
  • Ball Detents: Located under the eye cover. Should be replaced if flat or heavily rounded to prevent double feeding or chopping.

Maintenance Features:

  • RAIL™ Bolt Maintenance: The main component, the RAIL™ Bolt, requires cleaning and re-lubrication every 10,000 shots or after breaking paint/severe conditions. It consists of four parts: Can, Bolt, Manifold, and Back Cap. Disassembly requires a 1/4" Allen key. DYE Slick Lube™ is the only authorized lubricant.
  • Hyper2™ Regulator Maintenance: Essential for consistent input pressure. Requires cleaning of dirt and debris. A more extensive service (every 12 months or if pressure is inconsistent) involves disassembling with 3/8" and 5/16" allen keys, lubricating moving parts, and changing seals/O-rings. The #020 O-ring on the piston and #007 urethane O-ring inside the body are critical. The shim stack around the piston must be reassembled in the correct order.
  • Anti Chop Eyes Cleaning: Often cleaned by swabbing the breech. For thorough cleaning, use canned air or an air hose. If needed, the eye cover can be removed with a 1/16" Allen wrench for detailed cleaning. Regular cleaning (every two months or 10,000 shots) is recommended.
  • O-Ring List: A detailed list of O-rings for the RAIL™ Bolt is provided, including BN 20, BN 17, BN 16, BN 15, BN 14, BN 14 x 2mm, BN 13, BN 09, BN 07, and BN 18.
  • Troubleshooting Guide: Comprehensive guide for common issues such as air leaks (from airport, Hyper2 regulator, ASA, between body and frame, back of PMR, front of PMR), electronics problems (PMR won't turn on, turns on/off by itself, eyes not working, solenoid not activating), trigger bounce, erratic velocity, and breaking paint.

Proto MATRIX RAIL Specifications

General IconGeneral
BrandProto
ModelMATRIX RAIL
CategoryPaintball equipment
LanguageEnglish

Related product manuals