Instruction Manual for
TracerJet with Gyro RC Helicopter
Close-up of Helicopter
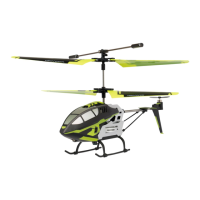
Parts Identification
Close-up of Remote Control
Thank you for your purchase of Protocol’s TracerJet with Gyro RC
Helicopter. You are about to experience the best of what remote control
flight has to offer. We strongly recommend that you take the time to read this
manual thoroughly. It contains many tips and instructions on how to get the
most of this aircraft, and maintain it for long life.
As with any aircraft, this is a precision flying machine. Treat it well and enjoy
all the fun it has to offer, flight after flight.
Charging the Helicopter
1. Pull out the cover and take out the charging wire (Fig. 3).
2. Turn off the power to the helicopter and turn the remote on. Insert the charging plug into the socket
on the helicopter (Fig. 4)
3. The power/charging indicator will turn from green to red while charging. The indicator will turn green
once charged.
4. The helicopter will have about 5-6 minutes of continuous flight time after approximately 30 minutes
charging.
Flight Environment
1. Choose a location that meets the following conditions.
2. Indoor environment with calm air conditions. Be aware of the air circulation from an air-conditioner.
3. Space area: It is recommended to have space area over 10ftW x 10ftH x 10ftL.
4. Safety area: It is highly recommended that there is no electric fan, air-conditioner, reading lamp or other
objects that could impair flying.
5. Do not operate the helicopter under the direct sun or strong lighting as it will affect the control system
of your helicopter.
6. Do not cover the lens of the transmitter. No signal will be released while you cover the lens.
7. Do not stick any other label onto the helicopter as it will interfere with the IR signal.
Flying the Helicopter
Lift-Off Procedure
1. Once the helicopter is on you can slowly increase the throttle.
2. DO NOT look at the transmitter but focus on the helicopter.
3. As soon as the helicopter leaves the ground, reduce the throttle slightly.
4. GENTLY add the throttle if the helicopter goes down too far.
5. GENTLY reduce the throttle if helicopter goes up too high.
6. For turning, give short and small inputs to the omni-directional control stick. (Most beginners will
over control the helicopter)
Hold the helicopter at a desired
height. Push the omni-directional
control stick toward the left to turn
the helicopter left (Fig. 8) and push
the omni-directional control stick
toward the right to turn the
helicopter right (Fig. 9).
Turning Left
and Right
Fig. 6
Fig. 7
When you push up the
omni-directional control stick, the
nose points down and the
helicopter is moving forward. When
you push down the omni-directional
control stick, the nose inclines up
and the helicopter is moving
backward. (Fig. 10 & 11)
Forward
and
Backward
Trimming the Helicopter
1. Gently push the throttle up to raise your helicopter about 3 feet high.
2. If the helicopter spirals left or right (Fig. 12), turn and release the left/right trim in the opposite direction
repeatedly until the balance is adjusted.
NOTE: If the helicopter is less than 1 foot from the ground, the vortex from the spinning blades can create
flying issues. Please make sure to fly the helicopter above this height.
NOTE: The tail blade may not always spin as you are flying. Please note that this is normal as long as you
are able to control the helicopter.
Caution:
Do not crash the helicopter from high altitude.
Replacement Parts:
Thank you for your purchase of Protocol’s TracerJet with Gyro RC Helicopter! We know that
accidents can sometimes happen which is why we offer a spare parts kit including the below
available on our website ProtocolNY.com.
• Main Propeller Blade Set A (2 pcs/set)
• Main Propeller Set B (2 pcs/set)
• Tail Rotor Blade
• Connector (dog bone shape)
• Rotor Head
• Pinion Gear
Troubleshooting
Fig. 12
14
+
Flight Control
When the helicopter flies steadily,
you can slowly push the throttle
stick up to make it fly higher or
release the stick a bit to make it fly
lower. Only small amounts of stick
position change are required for
smooth flight. (Fig. 6 & Fig. 7)
Hovering
Fig. 8
Fig. 9
Fig. 10
Fig. 11
Fig. 1 Fig. 2
6 ‘AA’ batteries
*Spare propellers A and B, 1 tail rotor, 1 connector,
and 2 pinion gears are included.
Stabilizer bar
Propeller A
Tail rotor blades
Tail motor
Landing gear
Motor
Main rotor shaft
Power switch
Propeller B
Connector
Throttle
Power switch
Trim Dial (adjust the balance
of the helicopter)
Power/charging indicator
Band Selector (A,B,C)
Omni-directional
control stick
Helicopter
Remote Control
Fig. 3 Fig. 4
Installing the Remote Control Batteries
1. Battery Installation
a. Make sure the power switch is off on the remote control before installing the batteries.
b. Using a Phillips screwdriver, unscrew the battery cover on the back of the remote control and insert 6
‘AA’ 1.5V alkaline batteries (not included) into the battery compartment (Fig. 1). Make sure to follow
indicated polarities (Fig. 2). Replace the battery cover and screw in. Do NOT over tighten.
c. When the power light remains on after the remote is turned on, the batteries are working. When the
power light begins blinking, the batteries are dying and need to be replaced.
Battery Notes: Do not mix old and new batteries. Do not mix different types of batteries. Only use ‘AA’ alkaline
batteries for this product. Remove batteries if this product not going to be used for a long time. Always remove
exhausted batteries from the product and dispose of safely.
Turning on the Helicopter
Fig. 5
1. Set the band on the transmitter to the same as the helicopter.
2. Turn on the power switch to the helicopter, set it on the ground, and step back at least 10 feet (Fig. 5).
3. Turn on the power switch to the remote control.
4. The helicopter may need a few seconds to sync with the remote control.
*Flying Multiple Helicopters
If flying more than one helicopter simultaneously, make sure that the
transmitters and helicopters are paired to ensure that they detect
different frequencies.
- The first pilot sets desired frequency on their transmitter and turns
it on.
- The first pilot then turns on their helicopter.
- The second pilot sets desired frequency on their transmitter and turns it on.
- The second pilot then turns on their helicopter.
- The third pilot sets desired frequency on their transmitter and turns it on;
- The third pilot then turns on their helicopter
Remote control has no
power/weak power.
Remote control has no
power/weak power.
LED light on remote control
is blinking
The helicopter doesn’t receive
a signal.
Helicopter does not lift.
Helicopter does not lift.
Helicopter lands too
quickly/hard.
Power switch is off.
Batteries are improperly
installed.
Batteries are weak.
Helicopter is not turned on.
Main rotor blades are rotating
too slowly.
Battery is not fully charged.
Loss of control on the throttle
or pulling down on the throttle
too quickly.
Turn power switch on.
Make sure batteries are
inserted according to
indicated polarity.
Replace old batteries with
fresh ones.
Make sure to turn the small
power switch on the side of
the helicopter on.
Push up on the throttle.
Make sure the battery is
completely charged.
Pull down the throttle slowly
until the helicopter lands
smoothly.