TOOLS REQUIRED
ASSEMBLY INSTRUCTIONS
• 1/2 in.
wrench, socket or an adjustable wrench
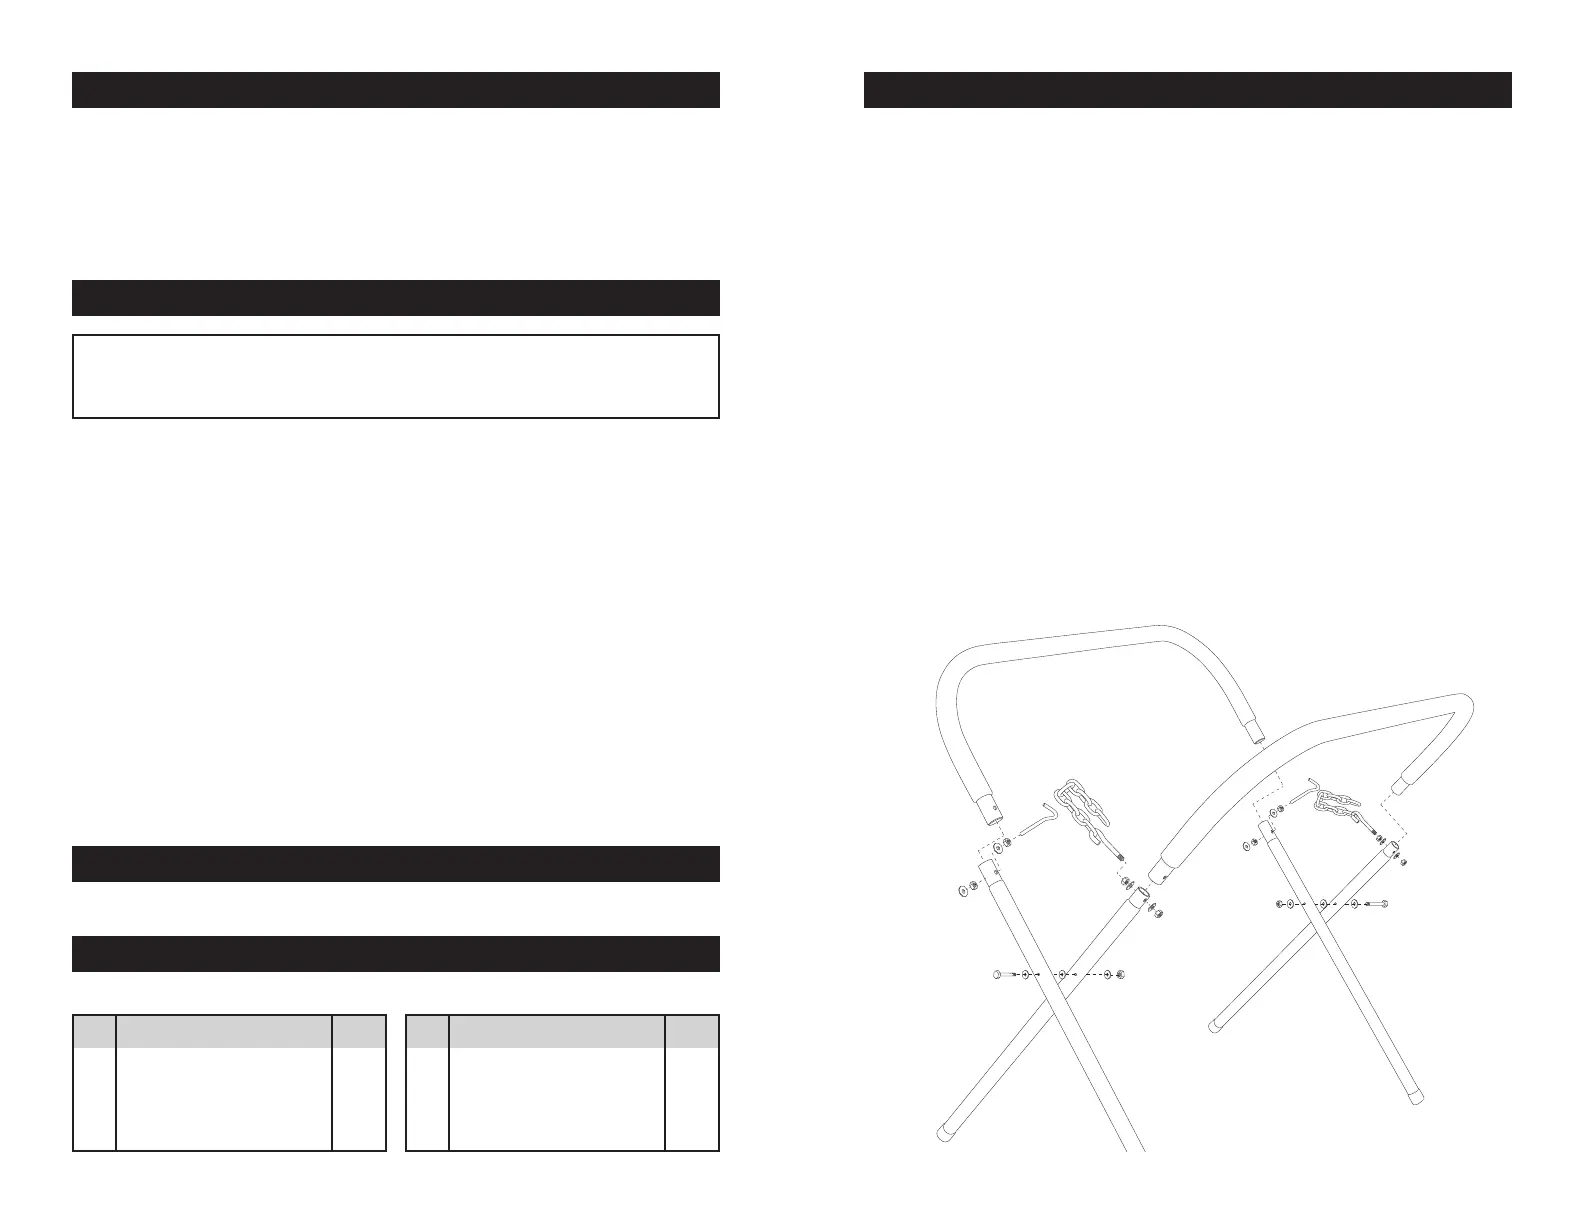
1.
Insert a leg into one of the top frame pieces.
2.
Thread a nut onto one of the J-bolts, then place a washer against the nut.
3.
Align the holes where the top frame and leg meet and insert the bolt into
the hole. Then place another washer and nut onto the exposed end of
the bolt.
4.
Repeat steps 1-3 for the other side of the top frame and a 2nd leg.
Make sure the the “J” portion of the bolts are on the same side.
5.
Repeat steps 1-4 for the other 2 legs and top frame using the chains
with eye hooks.
6.
You should now have two halves of the shop stand. Position each half
so the chain and J-bolts face each other.
7.
Offset the legs so the holes near the middle of each leg line up on each side.
8.
Place a washer on one of the hex bolts and insert through the outside
hole of one of the outer legs.
9.
Place a second washer between the two legs, insert the bolt through
the inside leg, then place a third washer and hex nut.
10.
Repeat for the other side. The thread portion of the bolts should face inward.
11.
Tighten all nuts and bolts with a 1/2 in. wrench, socket or an adjustable
wrench
.
SPECIFICATIONS
Capacity: ...................................................................................................500 lbs.
Steel Tubing: .............................................................................................1-1/8 in.
Weight: ........................................................................................................15 lbs.
Dimensions: ........................................................ 22 x 41.3 x 36.6 in. (assembled)
IMPORTANT SAFETY INFORMATION
WARNING! Read the entire manual to become familiar with the
unit BEFORE you use the workbench. Failure to do so may result
in personal injury and/or property damage and will void warranty.
Warnings:
• DO NOT EXCEED THE MAXIMUM WEIGHT CAPACITY OF 500 LBS.
• DO NOT STAND ON SHOP STAND OR USE AS A SCAFFOLDING
SUPPORT.
• Do not use the product if under the inuence of alcohol or drugs. Read
warning labels on prescriptions to determine if your judgment/reexes
might be impaired.
• Do not wear loose clothing or jewelry as they can be caught in moving
parts.
• Protective gloves and non-skid footwear is recommended.
• Wear restrictive hair covering to contain long hair.
• Use eye and ear protection. Always wear: ANSI-approved impact safety
goggles.
• Maintain proper footing and balance at all times.
NOTE: Specications are subject to change without notice.
PARTS LIST
• Remove all components from packaging and ensure you have all components
No. Description Qty.
1 Legs 4
2 Top Frame Pieces 2
3 Chains w/ Eye Hooks 2
4 J-Bolts 2
No. Description Qty.
5 5/16-18 Hex Nuts 10
6 Hex Bolts 2
7 Washers 14
Note: Read the entire manual to become familiar with the unit BEFORE you use the workbench
CAUTION: Metal edges can be sharp; please use extreme caution during assembly.
 Loading...