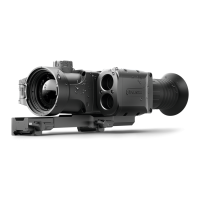
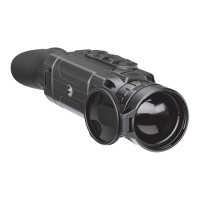
Pic. 1
Laser rangefinder
Button
MENU
Eyeshade
Navigation
button
DOWN
Recording
button
REC
Dioptre adjustment
ring
Battery Pack
lever
Navigation
button UP/
Rangefinder
Lens focusing ring
Power On/Off
button
Micro-USB port
Lens cover
1 2
TURNING ON AND IMAGE SETUP
Getting Started
џ Open the lens cover (1).
џ Turn the on with a short press of the ON/OFF (11) button.device
џ Rotate the (7) to see crisp image of the icons on the display.dioptre adjustment ring
џ Rotate the (2) to see a crisp image of the object observed.lens focusing ring
џ Select a preferable calibration mode - manual (M), semi-automatic (SA) or automatic (A) in
the main menu.
џ Calibrate the image with a short press of the 11 button (if calibration ON/OFF ( )
џ mode SA or M has been selected). Close the lens cover during manual calibration.
џ Set up display brightness, contrast and continuous zoom in the
џ QUICK MENU (button MENU - brief press).
џ Turn the device off with a long press of the ON/OFF (11) button.
Buttons and Components
Buttons Legend
Power ON/OFF
button (11)
Button MENU (4)
Navigation
button DOWN (5)
Recording
button REC (6)
Brief press:
M
Long press:
Power on sight /
Calibrate sensor
Start video recording /
Take a picture
Change step-up zoom
Power off sight /
Display
Photo mode ON /
Switch to Video mode
Quick menu access /
Confirm selection /
Switch between quick menu items
Main menu access / exit
PiP mode ON/OFF
220V socket
Lever
MicroUSB port
LED Indicator
USB cable
Charger
Continuous green LED - full battery
Continuous red LED - empty battery
џ Insert the Battery Pack (12) into the supplied charging base. Close the lever (14).
џ Connect one end of the micro USB cable (16) to the microUSB port (15) of the charging
base.
џ Connect the other end of the micro USB cable to the charger (17).
џ Connect the charger (17) to a 220V socket (18).
Charging the Battery Pack
џ Lift the lever (14). Remove the
Battery Pack (12) from the
charging base.
џ Insert the Battery Pack (12) into
the thermal imager as shown with
F element on the Battery Pack
facing downwards.
џ Fix the battery by clicking the
lever (13).
Installing The Battery Pack
Navigation
button UP (3)
Select color palette /
Start/stop SCAN mode
Battery Pack
Activate rangefinder /
Measure distance
14
16
12
15
17
18
 Loading...