EasyManua.ls Logo

Pyle PLMRBS10 - User Manual

Pyle PLMRBS10
4 pages
Print Icon
To Next Page IconTo Next Page
Loading...
PLMRBS10
Mounting
the
subwoofa.
1. Find a suitable location in the vehicle
in
which
to
mount the amplifier.
A typical location is shown below:
2.
Make
sure there
is
sufticient air circulation
around the
intended mounting location.
3. Mark the location
for
mounting hole screws
by
positioning
the
cabinet where you
wish to inst all
it. Make a small
mark
to
identify the position and remove the unit.
Thoroughly clean
the
area you plan to attach the subwoofar, using a vacuum cleaner.
Then attach the supplied double adhesive
tape, and put the subwoofer in the place
and press down on
it securely.
Trollbl_hootlnll
If you experience operation
or
perfonnance problems with this product, compare
your
installation with
the
electrical wiring diagram
on
the
previous
pages.
If problems
persist,
read
the
following troubleshooting tips which may help eliminate
the
problems.
PROBLEM
POSSIBLE REASON SOLUTION
NO+12..t
b
pDMII"
v.ia
Check
fuae8
and
connactions
to
"'_on.""'"
-
No
paMI'
b
remm
..wa
- Check remote on oonnections
to
head
unit
LED
I'd
'on'
.--
- Replace fuse
with
c:orrect
1M»
IWId
am
......
.--
- Replace
ruae
with
correct
1ype
IWId
Not
'MlI'king,
but
sIab.a
am
......
LED
'on'
-
fvb.te
unit
to
verrbed
area
-~mtd
-
Tum
heed
unit
cIcMIn
No
.,,',,"
.
....,
...
-
Check
heed
unit
volume
level
- Gail
oorrIroI
n:t
set
~
-
Ensure
you
have
set
up
the
amplifier
gain
level
control
-an-illS
- Check all
power,
remota on and ground
connections
www.pyleaudlo.com
PYLE®
HYDRA
10"
1000W
Low-Profile
Super
Slim
Acvtive
Amplified
Marine!
Waterproof
Subwoofer
System
...,
...
'"
"
.-u
.- . .
~
OWNER'S
MANUAL
Question and Answer IconNeed help?

Do you have a question about the Pyle PLMRBS10 and is the answer not in the manual?

Pyle PLMRBS10 Specifications

General IconGeneral
BrandPyle
ModelPLMRBS10
CategorySubwoofer
LanguageEnglish

Summary

Mounting the Subwoofer

Location and Airflow

Find a suitable location with sufficient air circulation for mounting.

Mounting Procedure

Marking mounting holes, cleaning the area, and securing the subwoofer.

Troubleshooting Common Issues

No Power or LED Off

Check fuses, battery connections, and remote wire connections.

Unit Not Working (LED On)

Ensure amplifier is not overheating and check head unit settings.

No Sound

Verify gain control, head unit volume, and all connections.

Power and Remote Connections

Ground and Battery Connections

Connect ground terminal to chassis and battery positive via fuse holder.

Remote Turn-On Connection

Connect the remote terminal to the head unit's remote output.

Remote Level Control Installation

Secure Remote Control Placement

Install the remote control securely under the dash for safe operation.

Audio Input Wiring

Low Level Input Wiring (RCA)

Recommended for best performance; use quality RCA cables.

High Level Input Wiring

Use speaker outputs if receiver lacks RCA outputs; observe polarity.

System Introduction and Features

Product Overview

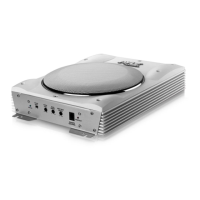
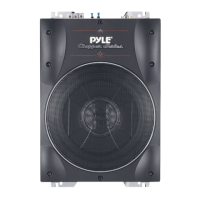
Introduction to the low-profile amplified subwoofer system.

Amplifier Capabilities

Features high/low pass crossovers and adjustable input sensitivity.

Input Options and Flexibility

Supports both high and low level inputs with variable bass boost.

Package Contents

Item Checklist

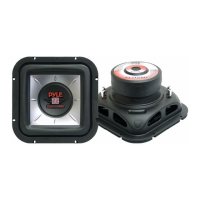
Verify all included items upon unpacking the subwoofer.

Front Panel Controls and Indicators

Power and Protection Indicators

LED indicators for power status and unit protection.

Audio Adjustments

Controls for Phase Shift, Input Gain, Bass Boost, and Low Pass Filter.

Remote Level Control Port

Port for connecting the external remote subwoofer volume control.

Rear Panel Connections and Features

Audio Signal Inputs

Low level RCA and High level speaker inputs for audio signal.

Power Terminals and Fuse

Terminals for power connection and location of the main fuse.

Related product manuals