LighTronic LT200
User Manul – v2.0 – 15/02/17
Introduction
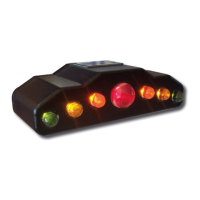
LighTronic is a shift light which is completely controlled by microprocessor, it can be installed on any vehicle with a electronic tachometer it enables the
rider to reach 5 different levels of engine revs. The led bar lights up from the lateral sides to the center according to the engine revs, showing 5 differents
levels.
IMPORTANT: For cars are necessary electronic coils.
IMPORTANT: All PZRacing products are water resistant but not waterproof, do not wash the product under water jet pressure, the
product could be irreparably damaged.
Installation
Led bar installation
The main module has to be positioned in a way as to benefit from optimal visibility. When you have found the ideal position, you can secure the indicator
by using the supplied adhesive material which can be found in the box or by using the two supplied screws to the two holes at the back of the device.
Electrical connections
Refer to the applications table for the most common motorcycles, in any other case use general instructions below:
Red: Ignition switched 12V - Brown: Ground – Blue: Tachometer – White: Not connected, just for calibration – Green: Not connected
Keep isolated the white wire until the moment of calibration.
Use
Turning on/off the device
LighTronic works completely automatically, the switching on and off of the device will operate using the key of the bike.
Set-up
It's necessary set the indicator before use, just set the rpm for the lights up of the lateral leds and the rpm for the central shiftlight; all the other rpm for
the other leds will be processed automatically.
1- Bring the white wire to “ground”; into a non painted point of the frame or to the negative of the battery.
2- Turns on the engine in “neutral” and wait for the end of the first check.
3- Remove white wire from “ground”; the green leds begin to flash.
4- Bring the engine up to the engine revs where you would like to set the green leds (first level); for example if you want to set 6000rpm simply bring the
engine to 6000rpm for a moment, the indicator will set the maximum rpm.
5- Bring the white wire to “ground”; the red led will begin to flash.
6- Bring the engine up to the engine revs where you would like to set the red led (fifth level).
7- Bring the white wire to “ground”; the red led will stop to flash and the set-up procedure ended.
Troubleshooting
If you are unable to enter set-up procedure (flashing green LED) be sure that the "ground" which were touching the white wire is a good "ground" (not a
coated frame, anodized triple clamps, etc ); to be sure try to touch the white wire directly to the negative battery of your vehicle or directly to the brown
wire of LighTronic.
If you experience any problems send an email to our customer service department at tech@pzracing.it
Specifications
- Temperature range: -20°C ~ +60°C - Storage temperature: -20°C ~ +60°C - Storage humidity: 45-75% RH - Protection degree: IP42
PZRacing Via de Gasperi 5 – 61032 Fano (PU) Italy - Tel: +39 0721 820434 – Email: tech@pzracing.it