EasyManua.ls Logo

Q5X Handheld MicCommander - User Manual

Q5X Handheld MicCommander
3 pages
Print Icon
To Next Page IconTo Next Page
Loading...
Quick Start Guide
www.Q5X.com 1-519-675-6999 info@Q5X.com
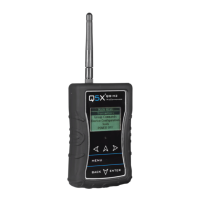
PREPARE: Handheld MicCommander Remote Control
Remove the rubber cover to access the battery
chamber.
Install 2 AA batteries. Lithium is recommended for best
performance. Alkaline or Ni-MH are acceptable when
battery type is changed in the device configuration
menu.
Replace the rubber cover and install the antenna on the
top.
NEVER power the unit without the antenna in place.
Turn on the unit by pressing the power button on the
top or by plugging the USB cable.
The MicCommander will automatically shut off after
two minutes.
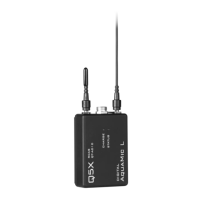
PREPARE: QT-AD10 Transmitter
Bring the transmitter out of storage mode (minimal
battery draw) and into standby mode (detectable but the
UHF radio is off) using either method below:
Hold the ON/OFF button until the flashes
change from rapid to slow, or
Plug and unplug a powered charging cable into
the side of the transmitter.
Connect the microphone by pushing the mic connector
ends together.
PAIR: MicCommander and Transmitter
The screen on the MicCommander displays the serial
number of paired transmitters. The serial number is on
the transmitter antenna or back.
If the desired transmitter is not listed, press the <MENU>
button to either scan for nearby transmitters or manually
add the serial number. Use the arrow buttons to navigate
the menu.
o Scan: Press <ENTER> to scan. Use the down arrow to
select the transmitter. Use the side arrows to
review information about the transmitter. Press
<ENTER> to toggle the selection “x”. Press <MENU>
to access additional search functionality. Press
<Back> to accept the addition of a transmitter to the
list.
o Add: Use the down arrow to select “Add” and press
<ENTER>. Use the navigation arrows to enter the
serial number. Hold the arrow key for rapid scroll.
Press <ENTER> to save.
Select the desired transmitter and press <ENTER> to go
to the transmitter menu.
Transmitters: 1 Power
20678 OFF
Scan
Remove
Remove ALL
Link
Add
This Quick Start Guide is an overview. Users are asked to
review the manual for detailed instructions.
The carrying pouch contains two parts.
Handheld MicCommander remote control (QG-H2)
Antenna
Users also need:
Q5X Digital transmitter
Microphone with special Lemo connector
Shure Axient Digital receiver
2 AA batteries
Visit www.Q5X.com/support to:
update the firmware
register the warranty
download the manuals
Quick Start Guide part number 55-0175
ADJUST: Set the functions in the two transmitter menus of
the MicCommander. Screen one includes: frequency, power
on/off, battery level, mic mute/live and mic offset. To access
screen two, navigate to NEXT> and press <ENTER> to adjust
transmitter name, group, RF power, 2.4GHz channel, storage
and reboot.
Frequency: Highlight the frequency and press <ENTER>.
Use the directional arrows to choose the desired
frequency. Hold the arrow for rapid scroll. Press <ENTER>.
Mic-offset: If using a single transmitter, set Offset to 0 dB.
If there is an audible difference in the sound level
between multiple transmitters, navigate to the Offset
menu (Audio > Offset) in the transmitter to increase or
decrease the Offset in real time to match the audio levels.
RF Power: Select between 2, 10 and 20mW. A lower
power level will conserve battery life.
Storage: Navigate to NEXT> and <ENTER>. Use the down
arrow to go to STORAGE and press <ENTER>. Navigate to
highlight CONTINUE on the warning screen and <ENTER>.
Frequency: 536.500MHz
Power: OFF ON OFF
Battery: 74%
Mic: OFF MUTE LIVE
Mic-offset: 0dB
NEXT>
25140:QT-AD10 x M:0 Name: QT-AD10 M:0
Group: 0
RF Power: 10 mW
2.4 GHz Ch: 25
<BACK STORAGE REBOOT
QT-AD10
Handheld MicCommander
Question and Answer IconNeed help?

Do you have a question about the Q5X Handheld MicCommander and is the answer not in the manual?

Overview

The Q5X system encompasses a range of wireless audio devices, including the Handheld MicCommander, Digital PlayerMic, and Digital AquaMic, all designed for professional audio applications requiring remote control and robust performance.

Q5X Handheld MicCommander

The Handheld MicCommander (QG-H2) serves as a remote control for Q5X digital transmitters.

Function Description:

The MicCommander allows users to remotely control and configure Q5X transmitters. It displays the serial numbers of paired transmitters, enables scanning for nearby transmitters, and facilitates manual addition of transmitters to its list. Once a transmitter is selected, users can access a menu to adjust various parameters.

Usage Features:

  • Transmitter Pairing: The device displays paired transmitter serial numbers. Users can scan for nearby transmitters or manually add them by entering the serial number. The "Scan" function allows selection of a transmitter from a list, with options to review information and toggle selection. The "Add" function allows manual entry of a serial number using navigation arrows, with rapid scroll by holding an arrow key.
  • Transmitter Menu Access: After selecting a transmitter, pressing grants access to its configuration menu.
  • Parameter Adjustment: The MicCommander features two main transmitter menus.
    • Screen One: Allows adjustment of frequency, power on/off, battery level, mic mute/live status, and mic offset.
      • Frequency: Highlight the frequency and press . Use directional arrows for selection, with rapid scroll available.
      • Mic-offset: For single transmitters, set to 0 dB. For multiple transmitters, the Offset menu (Audio > Offset) can be used to increase or decrease the offset in real-time to match audio levels, addressing audible sound level differences.
      • RF Power: Selectable between 2, 10, and 20mW. Lower power settings conserve battery life.
    • Screen Two (accessed via NEXT>): Allows adjustment of transmitter name, group, RF power, 2.4GHz channel, storage, and reboot.
      • Storage: Navigate to STORAGE and press . To exit storage mode, navigate to CONTINUE on the warning screen and press .
  • Power Control: The unit can be turned on by pressing the power button on top or by plugging in a USB cable. It automatically shuts off after two minutes of inactivity.

Important Technical Specifications:

  • Requires 2 AA batteries. Lithium batteries are recommended for best performance, but Alkaline or Ni-MH are acceptable if the battery type is configured in the device menu.
  • Must have the antenna installed before powering on.

Maintenance Features:

  • Battery Installation: Remove the rubber cover to access the battery chamber, install 2 AA batteries, and replace the cover.
  • Antenna Installation: Install the antenna on top.

Q5X Digital PlayerMic®

The Digital PlayerMic (QT-AD10P or PS) is a compact digital transmitter designed for discreet wear and robust performance.

Function Description:

The PlayerMic transmits audio wirelessly and can be remotely controlled by a Q5X Gateway (Handheld MicCommander or Network Gateway). It supports IR Sync for establishing an audio channel with a receiver and features various configurable parameters.

Usage Features:

  • Standby/Storage Mode: To bring the transmitter out of storage (minimal battery draw) and into standby mode (UHF radio off but detectable), either hold the ON/OFF button until the status LED flashes from rapid to slow, or plug and unplug a powered micro USB charging cable into the side of the transmitter.
  • Microphone Connection: Connect the 1-pin Lemo microphone by pushing the connector ends together.
  • Remote Control (via Gateway):
    • Transmitter Pairing: The Gateway screen displays serial numbers of paired transmitters. Users can press to scan for transmitters or manually add the serial number found on the PlayerMic antenna.
    • Parameter Adjustment: The Gateway allows adjustment of frequency, power on/off, battery level, mic mute/live status, and mic offset (Screen One). Screen Two (accessed via NEXT>) allows adjustment of transmitter name, group, RF power, 2.4GHz channel, storage, and reboot.
  • IR Sync:
    • Select a receiver channel and tune it to an available frequency (group scan or manual tuning).
    • Ensure the transmitter is in standby or on mode.
    • Press the SYNC button on the receiver.
    • Align the IR windows between the transmitter and receiver until the IR LED illuminates red.
    • "Sync Success!" appears on the receiver upon completion.
  • Power Control: The On/Off button provides manual power control between on, standby, and storage modes.

Important Technical Specifications:

  • Battery Life:
    • PlayerMic S: 4 hours @ 2/10mW, 2 hours @ 20mW
    • PlayerMic: 8 hours @ 2/10mW, 4 hours @ 20mW
  • Connectors:
    • 2.4 G antenna for RCAS control channel.
    • Audio input for 1-pin Lemo microphone.
    • UHF antenna for RF signal transmission.
    • Micro USB port for charging the battery.
  • Indicators:
    • Serial number (on the antenna) for RCAS identification and control.
    • IR port for infrared sync, encryption, and firmware updates.
    • Status LED (refer to manual for patterns and colors).
    • Charge LED: Red = charging, Green = charged, Flashing Red/Green = error.

Maintenance Features:

  • Charging: Use the micro USB charging cable.
  • Strain Relief: It is recommended to use a strain relief method for the microphone connector to prevent direct pulling force during use or removal. Looping the microphone cable back and taping the connector to the transmitter's edge is suggested.

Q5X Digital AquaMic

The Digital AquaMic (QT-AD10A or AL) is a waterproof digital transmitter designed for use in challenging environments.

Function Description:

The AquaMic transmits audio wirelessly and is designed to withstand submersion up to 10 meters. It can be remotely controlled by a Q5X Gateway (Handheld MicCommander or Network Gateway) and supports IR Sync for establishing an audio channel with a receiver.

Usage Features:

  • Antenna Connection: Connect the antennas to the labeled ports.
  • Standby/Storage Mode: To bring the transmitter out of storage (minimal battery draw) and into standby mode (UHF radio off but detectable), use the charging dongle screwed into the charging port. Plug and unplug a powered micro USB charging cable into the charging dongle.
  • Microphone Connection: Replace the charging dongle with the 6-pin Lemo microphone. Avoid overtightening the microphone or antenna to prevent damage to o-rings.
  • Remote Control (via Gateway):
    • Transmitter Pairing: The Gateway screen displays serial numbers of paired transmitters. Users can press to scan for transmitters or manually add the serial number found on the back of the AquaMic.
    • Parameter Adjustment: The Gateway allows adjustment of frequency, power on/off, battery level, mic mute/live status, and mic offset (Screen One). Screen Two (accessed via NEXT>) allows adjustment of transmitter name, group, RF power, 2.4GHz channel, storage, and reboot.
  • IR Sync:
    • Select a receiver channel and tune it to an available frequency (group scan or manual tuning).
    • Ensure the transmitter is in standby or on mode.
    • Press the SYNC button on the receiver.
    • Align the IR windows between the transmitter and receiver until the IR LED illuminates red.
    • "Sync Success!" appears on the receiver upon completion.
  • Power Control: The AquaMic does not have a manual power control button to maintain its waterproof seal. Power is controlled via the charging dongle.

Important Technical Specifications:

  • Waterproof Rating: Waterproof to 10 meters.
  • Battery Life:
    • AquaMic: 8 hours @ 2/10mW, 4 hours @ 20mW
    • AquaMic L: 16 hours @ 2/10mW, 8 hours @ 20mW
  • Connectors:
    • 2.4 G antenna for RCAS control channel.
    • Audio input for waterproof 6-pin Lemo microphone.
    • UHF antenna for RF signal transmission.
    • Charging port (same connector as audio input, used with charging dongle).
  • Indicators:
    • Serial number (on the back) for RCAS identification and control.
    • IR port for infrared sync, encryption, and firmware updates.
    • Status LED (refer to manual for patterns and colors).
    • Charge LED: Red = charging, Green = charged, Flashing Red/Green = error.
  • Mounting: Belt clip holes allow vertical and horizontal placement.

Maintenance Features:

  • Charging: The AquaMic charges through the same connector as the audio input using the charging dongle.
  • Cleaning: Rinse the AquaMic with fresh water after use, especially if used in saltwater, to maintain top condition.
  • Connector Care: Audio quality and RF performance may be impacted if water penetrates a loose-fitting connector.

Q5X Handheld MicCommander Specifications

General IconGeneral
BrandQ5X
ModelHandheld MicCommander
CategoryTransmitter
LanguageEnglish

Related product manuals