EasyManua.ls Logo

Quality Water Treatment Fleck 5600 SXT User Manual

Default Icon
14 pages
To Next Page IconTo Next Page
Page #1 background imageLoading...
Page #1 background image
Page 1 of 14
Copyright © 2009 Quality Water Treatment, All right reserved. rev. 10.29.09 www.qualitywatertreatment.com
INSTALLATION & START-UP INSTRUCTIONS
FLECK 5600 SXT Metered WATER SOFTENER
Thank you for your purchase of a new Water Softener
with Fleck 5600SXT Meter water softener from Quality
Water Treatment! We have put together these
instructions as a reference, and they are to be used as a
general installation guideline.
Pre-Installation Guide
Before you assembly your new system, be sure that the
following conditions have been met for placement of your
system:
Level, firm surface, such as concrete, on which to place the
softener tank and salt tank AKA Brine Tank
Nearby floor drain or standpipe to connect to the softener for use during each
regeneration
Standard US plug, 120v 60hz (the softener system includes a 5ft. power cord and plug. Be
sure the plug is not connected to a light switch
Make a list of all the plumbing fittings to completely install the unit
Typical is:
Two - 3/4" or 1” male adaptors
Eight - 90° elbows
Amount of pipe you need
1/2" drain line and 90° elbows
Adding the Resin to the Water Softener Tank
1. Position your new softener unit where you want it placed for use.
2. Inside the Softener tank you’ll find a 3/4" or 1" gray or white Pvc tube (called a
distributor tube.) If the tube does not already have a cap on the top use a pvc slip cap or
some duct tape to temporarily plug this tube (this is to keep the resin from going down the
tube.) If your system came with gravel, add the gravel first, then the resin. Use the included
special funnel when adding the resin. This will take about 10 minutes.
Question and Answer IconNeed help?

Do you have a question about the Quality Water Treatment Fleck 5600 SXT and is the answer not in the manual?
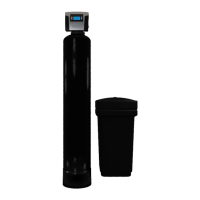
Quality Water Treatment Fleck 5600 SXT Specifications

General IconGeneral
TypeWater Softener
Control ValveFleck 5600SXT
Flow RateUp to 12 GPM
Warranty (Control Head)5 Years
Warranty (Tank)10 Years
Resin Tank MaterialFiberglass
Brine Tank MaterialPolyethylene
Tank Size10" x 54"
Resin Type8% Crosslink
Brine Tank Capacity14" x 33"
Display TypeDigital
Power Supply120V AC
DisplayDigital
Dimensions (Resin Tank)10" x 54"
Dimensions (Brine Tank)14" x 33"

Summary

Pre-Installation Requirements

Site Preparation and Utilities

Ensure a level, firm surface, nearby floor drain, and a suitable 120v 60hz power outlet.

Plumbing Fittings Checklist

List necessary fittings like male adapters, elbows, pipe, and drain line components for installation.

Resin Loading and Valve Attachment

Adding Water Softener Resin

Position the unit, plug the distributor tube, add gravel if included, then add resin using a funnel.

Securing the Control Valve

After adding resin, remove the temporary cap, clean threads, and screw the valve onto the tank by hand.

System Water Line Installation

Preparing for Connection

Turn off main water, open fixtures to drain lines, and cut a section of the water line for installation.

Attaching Bypass Valve and Adapters

Remove clamps, attach pipe to male adapters, and thread them into the bypass valve before reattaching.

Plumbing Inlet and Outlet Lines

Measure and cut pipe for main hard water line and soft water line, ensuring correct flow direction.

Drain Line and Electrical Connections

Connecting the Drain Line

Attach drain line adaptor to control, use a hose clamp for the drain hose barb, avoiding the brine tank elbow.

Power and Meter Cable Connections

Plug the power cord into a nearby outlet and connect the meter cable to the top of the black meter dome.

Brine Tank Assembly

Float Assembly Installation

Install the float assembly into the brine well, ensuring correct rod length and securing it with the nut.

Brine Tubing Connection

Slide brine tubing through the brine tank and into the brine well, connecting it to the float assembly fitting.

Water Softener Control Valve Programming

Determining Water Hardness and Iron Content

Obtain water hardness (GPG) and iron content (PPM/Mg/L) to calculate total compensated hardness.

Setting System Time

Plug in the valve and set the current time using the UP/DOWN arrow buttons.

Configuring Valve Settings

Navigate programming mode to set capacity, hardness, reserve selection, day override, and regeneration times.

Finalizing Programming Parameters

Adjust backwash, brine draw, rinse times, brine refill, and flow meter type as needed.

System Operation and Initial Fill

Filling with Water and Purging Air

Open bypass valve to fill tank, then open a faucet to purge air until water runs clear.

Adding Salt and Initial Regeneration

Add five gallons of water to brine tank, then add salt bags. Initial regeneration is not required.

Related product manuals