EasyManua.ls Logo

QUARTA RD1503+ - User Manual

QUARTA RD1503+
2 pages
Print Icon
To Next Page IconTo Next Page
Loading...
Install batteries
Open the battery compartment
on the back of the unit and insert
two (or one) AAA size batteries.
Follow the picture inside the
battery compartment for the
proper alignment.
Turn the device ON
Simply push and hold the big
button on the lower right-hand
side until the screen is on. As
soon as “RD1503+” appears, the
unit has started taking its rst
measurements.
First results
The measurements taken by
the Geiger Counter are updated
every 10 seconds.
The numbers will change
constantly - this is normal, as
the natural background radiation
uctuates. The most accurate
reading is displayed once all 4
sides of the little square graphic
are drawn (left side of the screen).
1
2
3
+ +
- -
4
5
6
Menu
To enter the options menu,
push the top-left Menu button.
The contents of the menu will
appear.
Default settings
units – μSv/h
level – 0.30 μSv/h
sound – off
back-light – on
Navigating Menu
To navigate the menu, use the
Cursor button - the one on the
lower left side of the device.
To select or change an option to
which the cursor is pointing, use
the Menu button.
Exit Menu / Switch OFF
The same large button that is
used to turn the device ON is
used to exit the Menu or to switch
the device OFF.
Note: your settings will be saved.
Quick Start Guide
1. Remove the cover of the battery compartment.
2. Install into the battery into the battery compartment as
illustrated by the graphic inside the compartment.
3. Close the battery compartment by reattaching the plastic
cover.
TIPS: For long-term measurements we recommend
using 2 batteries, otherwise a single battery is enough.
Don’t mix old and new batteries together.
If you don’t expect the unit to be used for a long time,
remove the batteries altogether.
1. LCD screen.
2. The MENU button. Has three functions: enter Menu,
Select Option, and Change Option.
3. The CURSOR Button. Used to move the cursor and to
switch between two measurement modes: NOW and
DOSE.
4. The ON/OFF Button. Also exits the menu.
5. Battery compartment.
+ +
- -
MENU
CURSOR
MENU
OFF
2 3
4
5
1
10
Installation of power elements.
1. Take off the cover of battery compartment ;
2. Install into the battery compartment
two (or one) power
elements “size AAA”
, the polarity of contacts is indicated in the
battery compartment.
3. Install the cover of battery compartment
on the body of
device.
Notes:
1. When carrying out the long-term examination, we
recommend to install two power elements, for the short-term
one it’s possible to use one power element.
2. Don’t mix the old and new power elements.
3.
If you do not expect the device to be used for a long
time, extract batteries from a battery compartment.
Question and Answer IconNeed help?

Do you have a question about the QUARTA RD1503+ and is the answer not in the manual?

Summary

Quick Start Guide

Battery Installation and Power On

Insert batteries and turn on the device by holding the main button until the screen is active.

Understanding Initial Readings

First measurements update every 10 seconds; stable readings appear when the graphic frame is complete.

Menu Navigation and Control

Access, navigate, select options using Menu and Cursor buttons, and exit/power off the device.

Device Component Identification

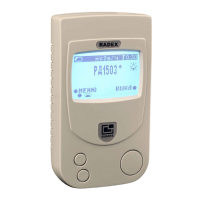
Identification of LCD screen, Menu button, Cursor button, ON/OFF button, and battery compartment.

LCD Display and Basic Operations

LCD Display Element Descriptions

Detailed explanation of LCD icons: battery charge, measurements, quantum indicator, cycle counter, background mode, and units.

Measurement Modes and Alarms

Switch between NOW and DOSE modes, understand background radiation, vibration/audio alarms, and alarm threshold levels.

Scanning for Radiation

Device automatically takes measurements upon activation. Blinking square indicates particle detection frequency.

Understanding Radiation Levels

Explanation of Sievert units and comparison of radiation levels (µSv/h) to everyday situations and safety limits.

Overview

This document describes the RADEX Geiger Counter, a device designed to measure radiation levels.

Function Description

The RADEX Geiger Counter measures radiation levels and displays them on an LCD screen. It can operate in two measurement modes:

  • NOW: Displays current radiation levels in the vicinity.
  • DOSE: Displays accumulated radiation over time.

The device provides measurements in µSv/h (micro Sieverts per hour) as a modern unit, or µRem/h (micro Roentgens per hour) as an older unit. It continuously updates measurements every 10 seconds. The device accounts for natural background radiation fluctuations, and the most accurate reading is displayed after a full measurement cycle (approximately 40 seconds).

An alarm threshold can be set, triggering an audio and/or vibration alarm when radiation levels exceed the predefined limit. The alarm level can be set from 0.10 to 0.90 µSv/h or 10 to 90 µRem/h.

The "Background Mode" feature allows the device to establish a baseline background radiation level in its immediate area after 5 consecutive readings. Subsequent readings higher than this baseline are then indicated. This mode is particularly useful when scanning specific objects in a new environment.

Important Technical Specifications

  • Measurement Units: µSv/h (micro Sieverts per hour) and µRem/h (micro Roentgens per hour).
  • Measurement Update Rate: Every 10 seconds.
  • Full Measurement Cycle: Approximately 40 seconds (4 cycles).
  • Alarm Threshold Range: 0.10 to 0.90 µSv/h or 10 to 90 µRem/h.
  • Default Alarm Level: 0.30 µSv/h or 30 µRem/h.
  • Power Source: Two (or one) AAA size batteries.
  • Default Settings:
    • Units: µSv/h
    • Level: 0.30 µSv/h
    • Sound: Off
    • Back-light: On

Usage Features

Installation and Power On:

  1. Open the battery compartment on the back of the unit.
  2. Insert one or two AAA batteries, ensuring proper alignment as indicated inside the compartment.
  3. Close the battery compartment.
  4. To turn the device ON, push and hold the lower right-hand button until the screen activates and "RD1503+" appears. The device will immediately begin taking measurements.

Navigating the Menu:

  1. To enter the options menu, push the top-left "Menu" button.
  2. Use the "Cursor" button (lower left side) to navigate through menu options.
  3. To select or change an option, push the "Menu" button.

Exiting Menu and Switching OFF:

  • The same large button used to turn the device ON is used to exit the Menu or to switch the device OFF. Settings are automatically saved.

Measurement Modes:

  • The "Cursor" button also switches between "NOW" (current radiation levels) and "DOSE" (accumulated radiation) measurement modes.

Interpreting Readings:

  • The device displays a "quantum" indicator (a blinking black square) that blinks as often as particles are detected, with the frequency proportional to the dose rate.
  • A "detection cycle counter" (a square graphic with four sides) indicates the progression of measurement cycles. The most accurate reading is displayed once all four sides of the square are drawn.
  • In Background Mode, a "+" symbol with a down arrow indicates that the current value is less than the background radiation, showing 0.00.

Alarm Features:

  • The device can be configured with an audio alarm (indicated by a speaker icon) and a vibration alarm (indicated by a vibration icon). These alarms activate when the radiation level exceeds the set threshold. The vibration alarm icon is hidden when the feature is off.

Default Settings:

  • The device comes with default settings for units (µSv/h), alarm level (0.30 µSv/h), sound (off), and back-light (on). These can be customized through the menu.

Maintenance Features

Battery Management:

  • The battery charge indicator on the LCD screen shows the battery status: fully charged, almost drained, or replace battery.
  • For long-term measurements, using two batteries is recommended for extended operation. A single battery is sufficient for shorter use.
  • Do not mix old and new batteries.
  • If the unit will not be used for a long time, remove the batteries to prevent leakage and damage.

General Care:

  • The manual does not specify cleaning instructions, but general electronic device care (keeping it dry, avoiding extreme temperatures) is implied.
  • The device saves user settings automatically when exiting the menu or switching off, reducing the need for frequent re-configuration.

QUARTA RD1503+ Specifications

General IconGeneral
BrandQUARTA
ModelRD1503+
CategoryMeasuring Instruments
LanguageEnglish

Related product manuals