EasyManua.ls Logo

Quest Engineering Q100 User Manual

Quest Engineering Q100
4 pages
To Next Page IconTo Next Page
Page #1 background imageLoading...
Page #1 background image
Canopy Set Up Instructions
Canopy Parts List
1. 12x12 Instant Up Canopy Top (1)
2. 12x12 Instant Up Canopy Frame (1)
3. 12x12 Instant Up Carry Bag (1)
4. Canopy Stakes (4)
Q100 12x12 Instant Up Canopy
Instruction Manual
1. Remove all parts from the canopy bag. 2. Place the canopy frame in the upright
standing position. Open the frame
partially using the legs.
3. Open the canopy frame using the sides
of the canopy as indicated. The canopy
locations are marked “Open Here.
5. Secure the canopy top to the canopy
frame on all four corners using the hook
and loop strips.
1. 2. 3.
4. 5. 6.
6. Open the canopy frame until all four
corners lock into place. You should hear a
click when the canopy frame has opened
and the corner has locked.
7. Turn all four sides down to cover the
side of the frame. On the inside of the
canopy, secure all four sides and ceiling
to the canopy frame using the inside
hook and loop strips.
7. 8.
8. Extend all four legs to the desired
preset height. This should be completed
by extending two legs on the same side at
the same time. Once extended to the
appropriate height, the canopy legs will
lock into place.
9. To secure the canopy to the ground, place
one canopy stake in each of the four
pre-drilled holes at the base of the canopy.
The short side of the stake should be touching
the ground. Set up for your Quest 10x10
Instant Up Canopy is now complete.
4. Place the canopy top on the opened
frame.
9.
Question and Answer IconNeed help?

Do you have a question about the Quest Engineering Q100 and is the answer not in the manual?

Quest Engineering Q100 Specifications

General IconGeneral
BrandQuest Engineering
ModelQ100
CategoryTent
LanguageEnglish

Summary

Canopy Set Up Instructions

Initial Frame Preparation

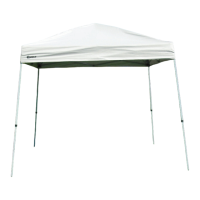
Remove all parts from the carry bag and partially open the frame using the legs.

Attaching and Securing Canopy Top

Place the canopy top on the frame and secure it using hook and loop strips on all corners.

Extending and Anchoring Legs

Extend all four legs to the desired height until they lock, then secure the canopy to the ground.

Canopy Take Down Instructions

Initial Takdown Steps

Remove stakes, clean them, and lower the canopy by pressing the release button on each leg.

Detaching and Collapsing Frame

Unstrap the canopy top, release corner pins, and begin collapsing the frame.

Packing Canopy Components

Store the frame, canopy top, and stakes in the carry bag and zip it closed.

General Canopy Safety & Guidelines

Material Properties and Hazards

Details water resistance, UV protection, fire retardancy, fume risks, and wind limitations.

Storage and Care Instructions

Guidance on proper storage, drying fabric, cleaning, and seam sealing.

Key Operational Safety Rules

Includes safe setup, multi-person use, avoiding inclement weather, and hazard avoidance.

1-Year Limited Warranty

Warranty Coverage Details

Explains what the warranty covers, exclusions, and the period of coverage.

Obtaining Warranty Service

Provides contact methods (mail, phone, email) for warranty inquiries.

Flammability Warning

Warns that fabric meets flammability standards but can burn; keep away from flame sources.

Related product manuals