Do you have a question about the Quictent Truck and is the answer not in the manual?
Creating unique spaces to meet every specific need, and become a part of America's landscape.
To keep innovating and provide a wide range of reliable shelters and shades at consumer-grade prices with customer-first service.
Customer-centric services, hassle-free warranty, and industrial-leading support team providing prompt replies.
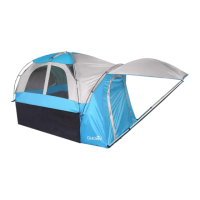
Choosing a proper campsite is of top importance in terms of safety. Select a smooth, level campsite clear of rocks, branches, and other hard or sharp objects.
Always keep all flame and heat sources away from the tent fabric. Do not use candles, matches, or open flames in or near the tent.
Poles numbered #A – #E are for the tent frame, with specific color indications for assembly.
Poles #F & #G are used to support the awning structure.
Detailed list of all tent components including part numbers, diagrams, descriptions, and quantities for assembly.
Layout the tent fabric and insert tent poles into corresponding color sleeves.
Insert poles into corresponding colored pockets and secure with clips and straps.
Reinforce the tent frame with the black pole (#C) from inside, securing with Velcro and straps.
Insert awning poles (#F) into the awning ceiling, forming an 'X', and fix with arms and straps.
Move the assembled tent structure onto your vehicle.
Fix the tent to the vehicle's body using straps (#K) and adjust for stability.
Assemble the awning arms (#G), connecting them to the awning and vehicle.
Drape and secure the rainfly (#I) over the tent, ensuring the zipper is close to the tailgate.
Suggestions for longer service life: do not twist poles, roll up awning when not in use, clean and dry tent before storing, ensure ventilation.
Keep all parts in the carry bag and store the bag in a cool, dry place.
24-month limited warranty on materials and craftsmanship under normal use.
Order number or shipping information is the only valid evidence to claim for warranty.
Provide order number, required parts details, and pictures/clips for prompt assistance.
Restructuring product or damages from severe weather conditions will void the warranty.
| Brand | Quictent |
|---|---|
| UV Protection | Yes |
| Wind Resistance | Yes |
| Material | Polyester |
| Waterproof | Yes |
| Dimensions | Varies by model |
| Weight | Varies by model |
| Color | Varies by model |
| Setup Time | Varies by model |
| Frame Material | Fiberglass poles |
| Included Accessories | Varies by model |