EasyManua.ls Logo

Quictent YS1106 - User Manual

Quictent YS1106
28 pages
Print Icon
To Next Page IconTo Next Page
Loading...
x
Question and Answer IconNeed help?

Do you have a question about the Quictent YS1106 and is the answer not in the manual?

Summary

Safety Instructions

Key Safety Precautions

Important safety guidelines for using the carport, including anchoring and fire prevention.

Warning

Usage in Severe Weather

Advice against using the product in severe weather to prevent damage and voiding the warranty.

Basic Series (Model #YS1106)

Parts List

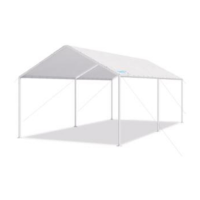
Detailed list of components included for the Basic Series carport.

Assembly Steps

Step-by-step instructions for assembling the Basic Series carport.

Classic Series (Model #1113)

Parts List

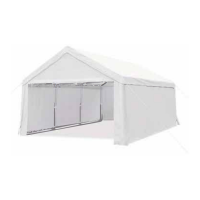
Detailed list of components included for the Classic Series carport.

Assembly Steps

Step-by-step instructions for assembling the Classic Series carport.

Upgraded Series (Model #1114)

Parts List

Detailed list of components included for the Upgraded Series carport.

Assembly Steps

Step-by-step instructions for assembling the Upgraded Series carport.

Maintenance

Maintenance Guidelines

Recommendations for keeping the carport in optimal condition and preventing damage.

Warranty

Warranty Information

Details on product warranty coverage, terms, and claim procedures.

Appendix

Shelter for Backyard, Party, Event

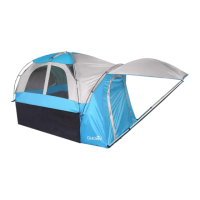
Overview of canopies and tents for outdoor events like parties and gatherings.

Overview

This document is a user manual for Quictent carports, specifically covering the Basic Series (Model #YS1106), Classic Series (Model #1113), and Upgraded Series (Model #1114) for a 10' x 20' size. It provides comprehensive instructions for assembly, maintenance, and warranty information, along with general safety guidelines and an overview of other Quictent shelter products.

Function Description

The Quictent carport serves as a temporary shelter designed to protect vehicles or other stored items from various outdoor elements. It provides a covered space that can be used for parking, storage, or as an outdoor workspace. The structure is intended to be assembled and secured to the ground, offering protection from sun, light rain, and other environmental factors. It is explicitly stated that the carport is a temporary structure and not designed for severe weather conditions like high winds, heavy rain, or heavy snows.

Usage Features

The manual outlines the assembly process for three different carport models: Basic, Classic, and Upgraded Series. Each series has a detailed parts list with diagrams, descriptions, and quantities of each component, including steel poles, various corner connectors, roof covers, L-shaped pegs, auger anchors, foot bases, screws, ropes, and bungee cords. The Classic and Upgraded series also include steel cables for added stability, sandbags, and gloves for assembly.

Assembly Steps: The assembly generally involves forming the top frame first, then attaching the roof cover, and finally assembling the mainframe (legs) and securing the entire structure to the ground.

  1. Top Frame Assembly: This step involves laying out and connecting the steel poles (#1, #2, #4) with the appropriate corner connectors (#A, #B, #C, #D). For some models, steel cables (#E or #L) are integrated into the top frame connectors to enhance stability. Built-in snaps on the poles ensure secure connections.
  2. Roof Cover Installation: The roof cover (#C or #E) is then fixed to the assembled top frame using bungee cords (#I or #K).
  3. Mainframe Assembly: The vertical poles (#3) are added to the connectors on one side, requiring several adults to lift the structure. The remaining vertical poles are then added to the other side.
  4. Securing the Structure: This crucial step involves attaching foot bases (#F) to the bottom of each pole and securing them with screws (#G or #J). L-shaped pegs (#D or #H) are inserted into the foot bases. The entire structure is then fixed to the ground using ropes (#H or #K) and auger anchors (#E or #I). The manual highly recommends inserting the anchors diagonally at a 45-degree angle for optimal stability. For the Classic and Upgraded series, sandbags (#M) are also used at the four corners to weigh down the structure.

Safety Instructions: The manual emphasizes several critical safety instructions:

  • Always weigh down the carport with sandbags, auger anchors, and/or pegs to prevent it from being lifted by wind.
  • Do NOT place heavy objects on the roof, as it is a temporary structure.
  • Do NOT light fires inside or keep any heat sources near the shelter.
  • Do NOT use the product in severe weather such as high wind, heavy rain, or heavy snows. Users are advised to take down the structure in anticipation of inclement weather, as damages from improper use are not covered by the warranty.
  • Wear gloves (#N, included with Classic and Upgraded Series) during assembly for safety.
  • Keep original packaging cartons for potential returns or exchanges.

Maintenance Features

To ensure the carport remains in optimal condition, the manual provides the following maintenance suggestions:

  • Regular Cleaning: Brush off dirt and debris from the carport when in use to prevent damage. Clean the cover and sidewalls with water and mild detergent (or non-detergent, if applicable).
  • Rust and Mildew Prevention: Before storing, clean all disassembled parts and dry them completely to prevent rust and mildew.
  • Proper Storage: Store the disassembled carport in a cool and dry place, away from animals, to preserve its condition.
  • Pre- and Post-Use Inspection: Carefully inspect the tent before and after each use for any rips, tears, or damage. If damage is found, discontinue use and contact the support team immediately with the order number, required parts (name, quantity, part number), and pictures or video clips.

Warranty Information

Quictent offers a limited warranty covering materials and craftsmanship under normal use and service conditions, effective from the purchase date. The order purchase proof (order number or shipping information on the shipping carton) is the only valid evidence for warranty claims.

  • 12-month warranty: Applies to the Steel Pole, Cover, and Zipper Door.
  • Lifetime warranty: Applies to all small accessories not mentioned above, including Connectors, Pegs, Auger Anchors, and Foot Bases.

Warranty Voidance:

  • Restructuring the product without prior written permission from Quictent will void the warranty.
  • Damages resulting from improper use in severe weather conditions (high winds, heavy rain, sleet, snow, etc.) are not covered by the warranty.

Customer Support: Users are encouraged to contact Quictent's support team via email (sales@quictents.com, maxlead.us@gmail.com) for any questions, help, or suggestions. They promise a reply within 12 hours. Users are advised to check their spam folder and email settings if a reply is not received, and to add the support email addresses to their contact list. When inquiring about parts, it is recommended to provide the order number, required parts (name, quantity, part number), and pictures or video clips.

Quictent YS1106 Specifications

General IconGeneral
ModelYS1106
Frame MaterialSteel
Water ResistantYes
UV ProtectionYes
TypePop Up Canopy Tent
Dimensions10 x 10 ft
SetupEasy Pop-Up
DoorsNo

Related product manuals