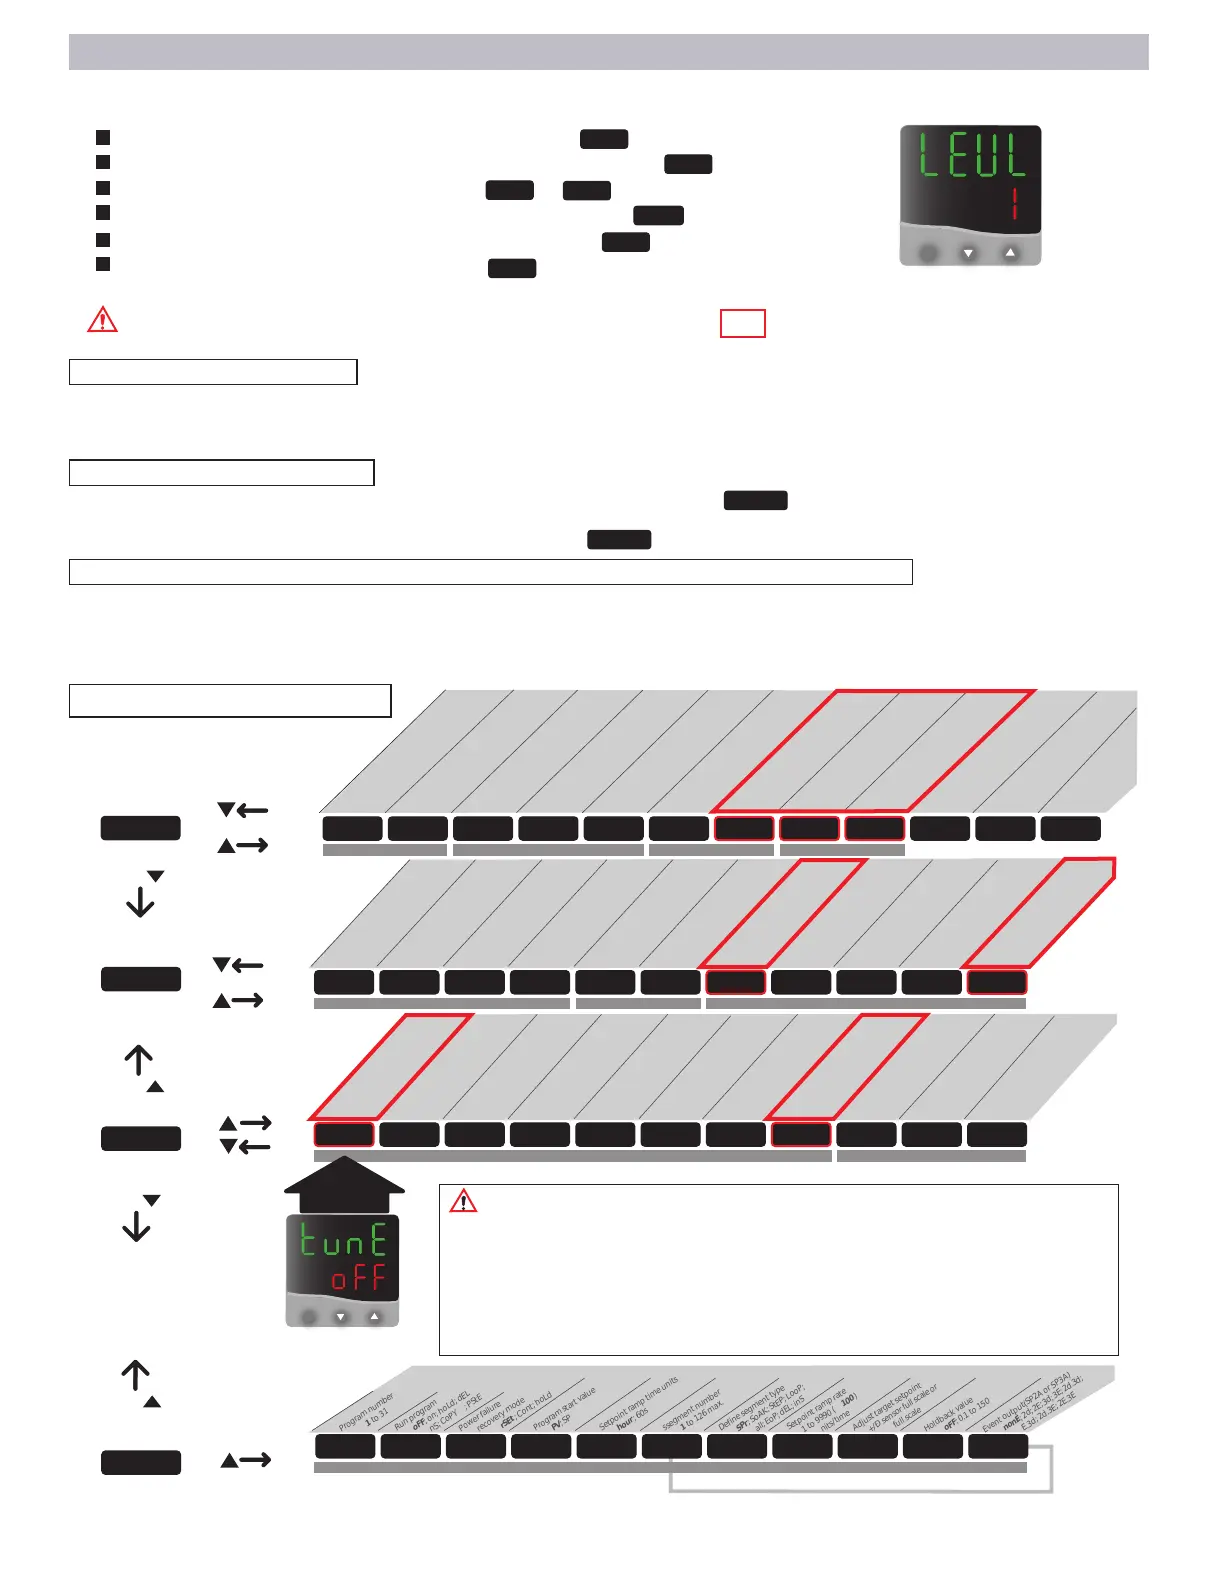
Menu Level Functions
*
(
PRESS
)
(
PRESS
)
*
(
PRESS
)
(
PRESS
)
(
PRESS
)
Functions Menu Guide
IMPORTANT NOTE
The non-high-lighted control functions within the menu levels are factory
set for the basic and safe operation of your model oven. Care should be
taken when navigating or changing user-applicable settings, outlined
in red, so as not to alter these factory settings. Factory settings for each
function are listed within the parentheses "( )" in each function tab above -
use only as a trouble-shooting reference.
To access the menu levels:
Press and hold both arrow keys until the "tune" / "off" function prompt is displayed from within LEVEL 1. When in the
function menu the LED display will alternate the function prompt with the current function setting when keys are
released. See "menu entry point" in Menu Guide below.
To navigate within the menu:
Press the down arrow to move "Left" into menu LEVEL SELECTION ( level 1) (FIG ). Use up and down arrow
keys individually to move "right" or "left" within a level. Hold star key and up or down arrow keys to move "up" or
"down" through levels 1, 2 and 3.(Note: you must be at prompt to move up/down thru levels)
To change the function setting (or to read function data - if a read only function):
Once at the desired level function prompt, press and hold the star key and press the up or down arrow key to change
a function setting or to read alternate function data. Release star key to set the function. Press and hold the up and
down keys together to return to temperature display, or control will auto-return in 60 seconds.
FUNCTION PROMPT
CHEK
SP.LK
\\
UNIT
ZERO
READ
DISP
LEVL 1
LEVL 1
SP1.D SP2.D BURN REU.D REU.L SPAN ZERO CHEK READ TECH UER RSET
LEVL 3
RELAY OUTPUT TYPE
SAFETY SETTINGS
CONTROL CALIBRATION
TEMPERATURE TRACKING
\\
SP1.P HAND PL.1 PL.2 SP2.A SP2.B DISP HI.SC LO.SC INPT UNIT
LEVL 2
MANUAL ADJUSTMENTS
AUDIBLE/ALARM MODES
RESOLUTION, RANGING, INPUT AND UNIT SELECTION
TUNE BAND INT.T DER.T DAC CYC.T OFST SP.LK SET.2 BND.2 CYC.2
LEVL 1
PID AND PERFORMANCE SETTINGS
SP2 AUDIBLE / ALARM SETTINGS
Program number
1 to 31
Run program
oFF; on; hoLd; dEL
inS; CoPY ; PStE
Power failure
recovery mode
rSEt ; Cont; hoLd
Program start value
PV; SP
Setpoint ramp time units
hour; 60s
Holdback value
oFF; 0.1 to 150
Event output(SP2A or SP3A)
nonE; 2d; 2E; 3d; 3E; 2d.3d;
2E.3d; 2d.3E; 2E.3E
PROG RUN FAIL ST.U SPRU SEG TYPE SPRR T.SP HB.V EO.P
LEVL P
RAMP & SOAK PROGRAM SETTINGS
S
segment number
1 to 126 max.
Define segment type
SPr; SoAK; StEP; LooP;
Call; EoP; dEL; inS
Setpoint ramp rate
1 to 9990 ( 100 )
units/time
Adjust target setpoint
+/Ð sensor full scale or
full scale
Press star key & up
or down arrow key
to scroll through
functions levels
Press up & down
arrow keys to
scroll back-and-
forth through
level functions
Level "P" is the Ramp
& Soak program level.
See separate Ramp &
Soak Programming
Operating Manual
*
(
PRESS
)
*
Sensor burn-out
(uP.SC), dn.sc, 1u.2d, 1d.2u
Reverse outputs
(1r.2d ), 1d.2d, 1r.2r, 1d.2r
Reverse outputs LEDs
(1n.2n ), 1i.2n, 1n.2i, 1i.2i
Primary Relay Output (heater)
none, rly, (ssd), AnLG
Secondary Relay Output (signal)
none, rly, (ssd), AnLG
Advanced Auto Tune Data
(read only / see mfgs manual)
Software Version
(read only)
Setpoint Lock Function
(oFF), on
Auto Tune Function
(oFF), on, PArk, At,SP
Derivative Approach
Control
(5.0), 0.5 to 5.0
Derivative Time (rate)
off, or 0.1 to 200 seconds
(25) or auto-tune variation
Integral Time (reset)
off, or 0.1 to 60 minutes
(5.0) or auto-tune variation
Proportional Band
0.1 to 100% of sensor max
(17) or auto-tune variation
Offset (manual reset)
(0), 0 to50% x band
Int.t = off
Cycle Time or on/off
on.of, or 0.1 to 81 seconds
(20)
Control Reset
(Do Not Reset)
Set SP2 output %
(100)% to 0%
Limit heater output %
(100)% to 0%
Read heater output %
varies 100% to 0%
read only
Set SP1 manual output
"heater" (off), 100% to 0%
Select
o
C /
o
F
NONE,
o
C, (
o
F), Bar, PSi, Ph
Thermocouple Type
none, (J), k, l, r, s
,t, rtd
Set Temperature min scale
(50) F
Display Resolution
(1) or 0.1 degree
SP2 Cycle on/off
(on.of), or 0.1 to 81
SP2 Band / Gain / Hyst.
(0.2) 0.1 to 100%
of sensor full scale
Adjust alarm set point if
SP2 configured as alarm
(0) , 1 to full scale
Configure Second mode
(none), LtCH, hold, Lt.ho
Configure main mode
(EOP), none, dV.hi,..FS.hi,..
Set Temperature max scale
(325,450,550) F per model
Temperature Tracking Monitor
on , (Off)
Read Tracking Monitor Results
VAr , hi , Lo (read only)
Sensor Span Adjustment
(0.0) to 25% of sensor's full scale
Control Calibration Adjust
varies: (-3.0 to 3.0)
TUNE
*
MENU ENTRY
POINT
*
All user-applicable functions and their menu locations are outlined in red in Menu Guide below
Access the menu levels for the following functions:
Change control to read in C or F temperature units ( in level 2).
Change to whole degree or 1/10th degree display resolution ( in level 2).
Run or Read temperature tracking /data ( or in level 3).
Lock Temperature setting against inadvertent adjustment ( in level 1).
Calibrate control temperature to an external standard ( in level 3).
Auto Tune PID performance parameters ( in level 1).
PAGE 6
FIG. 7
 Loading...