3
TRACE REAR HUB BEARING REPLACEMENT (J624/J622)
PART LIST
2x F60078: BEARING, 6902 CM
F60201, AXLE, TRACE, J-BEND, REAR, 12x148 (J624) or F60200, AXLE, TRACE, J-BEND, REAR, 12x157 (J622)
F60204, SEAL, TRACE, J-BEND, CASSETTE BODY, NDS
TOOL LIST
Plastic mallet
Small flat head screwdriver or pick
Bearing press
VAULT 34 (or Park Tool Drift 2262-2 / 2272-2)
VAULT 35 (or Park Tool Drift 2262-2 / 2272-2)
12 mm blind bearing puller or vise with soft jaws (optional)
Lint-free rag
Rubber gloves
REAR BEARING REMOVAL
1. Remove the drive side end cap and cassette body by firmly gripping and pulling the
cassette body
NOTICE: All Race Face end caps are designed to be removed by hand. Clamping end caps with vise jaws or pliers can damage them. A
rubber glove can help improve grip. A 12 mm blind bearing puller tool can be used for dicult to remove end caps.
2. Remove the cassette body 12.55 mm spacer.
TIP: This spacer can be located on the axle against the drive side hub shell bearing OR it can stick to the inner cassette body bearing
inner race.
3. Use a mallet to tap the drive-side end of the axle to eject the bearing and axle from the non-drive side.
4. Remove the non-drive side end cap, if it is not already removed. Remove the non-drive side seal and bearing from the axle. Set the seal
aside and discard the bearing.
5. Turn the axle around and insert the non-drive end of the axle into the drive side bearing. Use a mallet to tap the axle and eject the
bearing from the drive side. Remove the axle and discard the bearing.
6. Clean and inspect all parts for signs of damage and wear, including the hub shell, axle, cassette body, and seals. Check the cassette body
seal lip and non-drive side seal for tears or worn edges. Use a flathead screwdriver or pick to remove and replace the seals if they are
damaged.
REAR BEARING REPLACEMENT
IMPORTANT: Always fully install the rear drive-side bearing first for rear hubs.
1. Apply a light coat of WATERPROOF GREASE to the axle bearing surfaces.
2. Slide the bearing onto the drive side of the axle with the red seal facing out. Add the VAULT 34 onto the axle/bearing assembly. Insert
the axle/bearing/drift assembly into the drive side bearing bore.
IMPORTANT: Install/press only one bearing at a time.
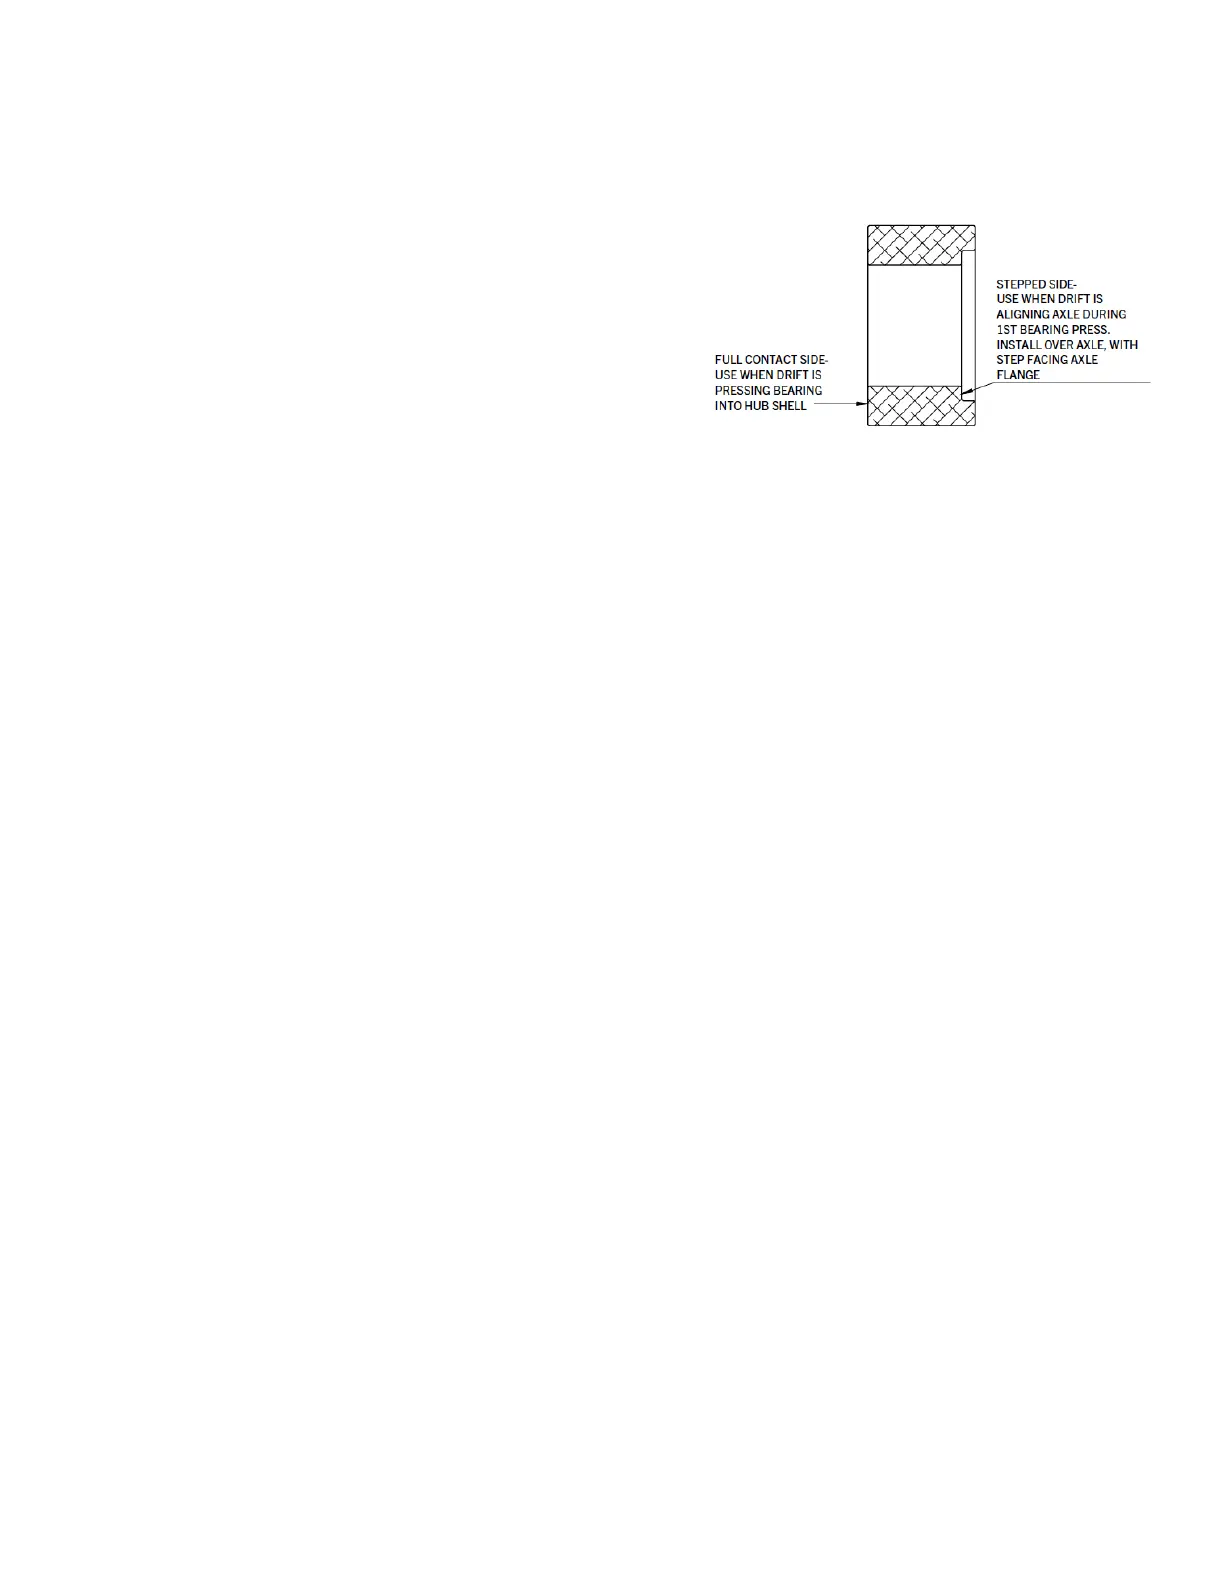
3. Insert the VAULT 35 into the non-drive side bearing bore with the stepped side facing in.
4. Insert the bearing press through the hub, all drifts, axle, and bearing. Tighten the press until the bearing is fully installed.
IMPORTANT: Use a moderate force on the handles of the bearing press. Forces too low or too high can result in excessive drag and
premature wear.
5. Remove the press from the non-drive side.
6. Slide the non-drive side bearing onto the axle with the red seal facing out.
7. Place the flat side of the VAULT 35 against the bearing.
8. Assemble the press, ensure all drifts are aligned, and tighten with low force until the non-drive side bearing is fully installed.
9. Remove the press and drifts.
10. Make sure the axle rotates smoothly. If the axle has resistance or roughness, review the bearing press alignment and determine if this
force is too high or too low. Consult your dealer for any questions or assistance in troubleshooting.
REAR HUB FINAL ASSEMBLY
1. Apply a small and even coat of LIGHT CASSETTE BODY GREASE to the non-drive side bearing face.
2. Apply LIGHT CASSETTE BODY GREASE to the inner lip of the non-drive side end cap seal. Install the seal into the non-drive side hub
shell bore with the sealing lip edge facing out. Use VAULT 34 or VAULT 35 to fully seat the non-drive side end cap seal.
3. Install the non-drive side end cap.
4. Install the cassette body 12.55 mm spacer onto the axle.
5. Grease the hub shell drive ring with a moderate layer of LIGHT CASSETTE BODY GREASE.
6. Apply OIL inside the cassette body seal lip.
7. For Shimano HG and XD cassette bodies only: Apply a thin coat of LIGHT CASSETTE BODY GREASE to inside of seal lip at the outer
cassette body bearing.
8. Slide the cassette body onto the axle. Make sure to rotate the cassette body counter-clockwise to disengage the pawls and allow the
cassette body to fully seat.
9. For Micro Spline cassette bodies only: Apply a thin coat of WATERPROOF GREASE to the outer cassette body bearing, then install the
thin steel washer.
10. Install the correct end cap onto the axle, according to your cassette body specification:
Shimano HG and XD: Install the 17.5mm long end cap, which has no logo.
Micro Spline: Install the 19.3mm long end cap, which has the Micro Spline logo.
 Loading...