EasyManua.ls Logo

RACOR PBH-1R User Manual

RACOR PBH-1R
2 pages
To Next Page IconTo Next Page
Page #1 background imageLoading...
Page #1 background image
H O M E S T O R A G E P R O D U C T S
WWW.RACORSTORAGESOLUTIONS.COM
WARNING
Please read installation instructions carefully prior to installing. Before using the product thoroughly test the fully-weighted
product (with equipment in place) to ensure the product has been installed properly. Do not allow children to play on
product. ITW Brands is not responsible for any damage resulting from improper installation, overloading or product failure.
BIKE LIFT | PBH-1R
INSTRUCTIONS
2
1
MARK MARK
3
KNOT
Measure the distance between the
handle bars and seat of the bike.
Mark that distance on ceiling
joist(s).
Feed rope through square hole on
the back lift assembly. Tie a double
knot as shown. The knotted end
will be between joist/ceiling and
lift assembly.
Use two wood screws each to
mount the back pulley and the
front pulley to the ceiling, ensuring
the distance between the two
matches the measurement made in
step 1. Predrilling 1/8 in. pilot holes
in the ceiling will make mounting
the pulleys easier.
Phillips driver
1/8” Drill bit
Drill
TOOLS REQUIRED
x1 Back lift Assembly
x1 Front lift Assembly
x2 Hook Pulleys
x1 48 foot (14.6m) rope
x1 Rope Cleat
x6 2’’ (5 cm) wood screws
Tape Measure
PARTS LIST
Question and Answer IconNeed help?

Do you have a question about the RACOR PBH-1R and is the answer not in the manual?

RACOR PBH-1R Specifications

General IconGeneral
BrandRACOR
ModelPBH-1R
CategoryBicycle Accessories
LanguageEnglish

Summary

Bike Lift Installation

Step 1: Measure and Mark

Measure distance between handlebars and seat, then mark on ceiling joists.

Step 2: Mount Pulleys

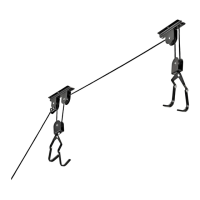
Mount pulleys to ceiling using wood screws, matching marked distance.

Step 3: Secure Rope

Feed rope through back lift assembly and tie a double knot.

Step 4: Thread Pulleys

Thread the rope through the pulleys as shown in the diagram.

Step 5: Thread Locking Mechanism

Thread the rope down through both parts of the locking mechanism.

Step 6: Mount Rope Cleat

Mount rope cleat to wall for storing excess rope when bike is raised.

Using the Bike Lift

Lifting the Bike

Hook bike handlebar and seat, pull rope to raise. Rope locks automatically.

Lowering the Bike

Pull rope to lower bike, maintaining tension to keep locking mechanism open.