Do you have a question about the RAD Cycle Products RAD MAX Prozone 1102 and is the answer not in the manual?
Customer service and product support available online at www.radcycleproducts.com.
RAD Cycle Products warrantied against defects for one year from purchase.
30-day return policy for new, unused items; 20% restocking charge applies.
Warranty void for misuse, modification, or altered products.
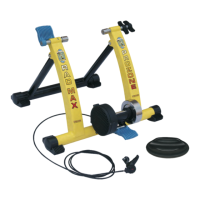
Illustration identifying key components of the Prozone Bike Trainer.
Always set up trainer on a flat, even surface; avoid uneven surfaces.
Avoid hard braking, ensure parts are tight, keep clear of pets/children.
Keep hands on handlebars, check tire inflation, and warm up before workouts.
Snap Part B into Part A and tighten the knob until snug.
Cross long bolt with washer for 28" or 26" bike attachment.
Install hex screws with plastic washers into large holes and tighten.
Push blue lever down to bring mag roller close to the rear wheel.
Adjust knob clockwise/counterclockwise for desired friction against the tire.
Push blue lever up to move mag roller away from the tire.
Repeat adjustment steps until wheel has desired friction without slipping.
Note: Excessive friction between mag roller and tire causes wear.
Ensure tires are inflated to maximum pressure for best results.
Replace bike's quick release lever with the trainer's Tightening Rod.
Use spanner and allen key to fit the Magnetic Resistance Set.
Position A for 28" wheels, Position B for 26" wheels.
Close Rake Quick Clamp firmly and tighten securing nut.
Thread control cable and mount controller within easy reach on handlebars.
Place anti-slip leveling stand under the front tire for stability.
Use bike gears with trainer's 7 resistance levels for customized workouts.
Verify cable clearance, hub security, and front wheel stability.
Always warm up and ensure tires are properly inflated.
Remove resistance controller and cable from handlebars.
Open Rake Quick Clamp and loosen the securing nut.
Unscrew end fitting and slide Tightening Rod from rear wheel.
Fold trainer for storage, being careful not to pinch fingers.
| Resistance | Magnetic |
|---|---|
| Maximum User Weight | 300 lbs |
| Drive System | Belt |
| Display Type | LCD |
| Seat Type | Padded |
| Adjustable Handlebars | Yes |
| Transport Wheels | Yes |
| Adjustable Seat | Yes |