3
#"37+%-".11-"#6"
;174"/'6'4
24'2#4#6+10
+056#..+0)"#"$#66'4;
Your meter requires one 9-volt battery (not
supplied) for power. For the best
performance and longest life, we recommend
a RadioShack alkaline battery.
WARNINGS:
• To avoid electrical shock, disconnect all
of the meter’s test leads from any
equipment before you install or replace
the meter’s battery.
• Do not use your meter until the battery is
properly installed and the battery cover
is in place and secured.
Caution:
Use only a fresh battery of the
required size and recommended type.
1. If the meter is on, rotate the function
selector to
OFF
to turn it off. Then
disconnect the test leads if they are
connected.
2. Use a Phillips screwdriver to loosen the
battery cover’s screw, then lift off the
battery cover.
3. Snap a fresh 9V battery onto the
terminals of the battery clip in the battery
compartment.
4. Replace the battery cover and secure it
with the screw.
When
~
appears on the left side of the
display or the meter stops operating properly,
replace the battery.
Warning:
Dispose of an old battery promptly
and properly. Do not burn or bury it.
Caution:
If you do not plan to use the meter
for a month or more, remove the battery.
Batteries can leak chemicals that can destroy
electronic parts.
%100'%6+0)"6*'"6'56".'#&5
The test leads (black and red) supplied with
your meter are rated for 1000 volts. Use only
test leads of the same rating with the meter.
You can order replacement leads from your
local RadioShack store.
WARNING:
ALTHOUGH THE TEST LEADS
ARE RATED FOR 1000 VOLTS. THE
MAXIMUM RATING OF THIS METER IS 600
VOLTS DC/600 VOLTS RMS AC. DO NOT
TRY TO MEASURE VOLTAGE GREATER
THAN 600 VOLTS DC/600 VOLTS RMS AC.
Plug the black test lead’s right-angled end
into
–COM
(common) on the front of the
meter, then plug the red test lead’s right-
angled end into
+ V.Ω.mA
. If you want to
measure current higher than 400mA, plug
the red test lead’s right-angled end into
+10A MAX
instead of
+ V.Ω.mA
.
Note:
The meter sounds a warning tone
when you set it to measure anything except
current and you connect a test lead to
+10A
MAX
. This reminds you not to touch the circuit
with the test leads.
75+0)"6*'"/'6'4
Caution:
When the meter is not in use,
always leave the function selector set to
OFF
.
For the most accurate reading, the
temperature should be between 65
°
F and
83
°
F (18
°
C and 28
°
C), with a maximum of
75% relative humidity.
6740+0)"6*'"/'6'4"1011((1
6'56+0)"6*'"&+52.#;
To turn on the meter, rotate the function
selector to any function except
OFF
.
To turn
off the meter, rotate the function selector to
OFF
.
Note:
If the function selector is not set to
OFF
and nothing appears on the display, the
meter might be in its auto power shut-off
mode. Press any button to turn on the meter.
If the meter remains off, set the function
selector to
OFF
and then set it to any function
except
OFF.
If the meter still remains off,
replace the battery (see “Installing a Battery”
on Page 3).
To test the meter’s display, turn off the meter,
then hold down
HOLD
while turning on the
meter. The meter turns on and all segments
on the display appear. Release
HOLD
to turn
off the test.
$'(14'";17"56#46
Follow these steps to familiarize yourself with
the meter’s operation before you use it for the
first time.
Warning:
Always turn off power to the circuit
you are about to measure before you probe
the test leads into high-voltage points.
Caution:
Be sure to select the correct
function before you touch the test leads to the
circuit or component to be tested.
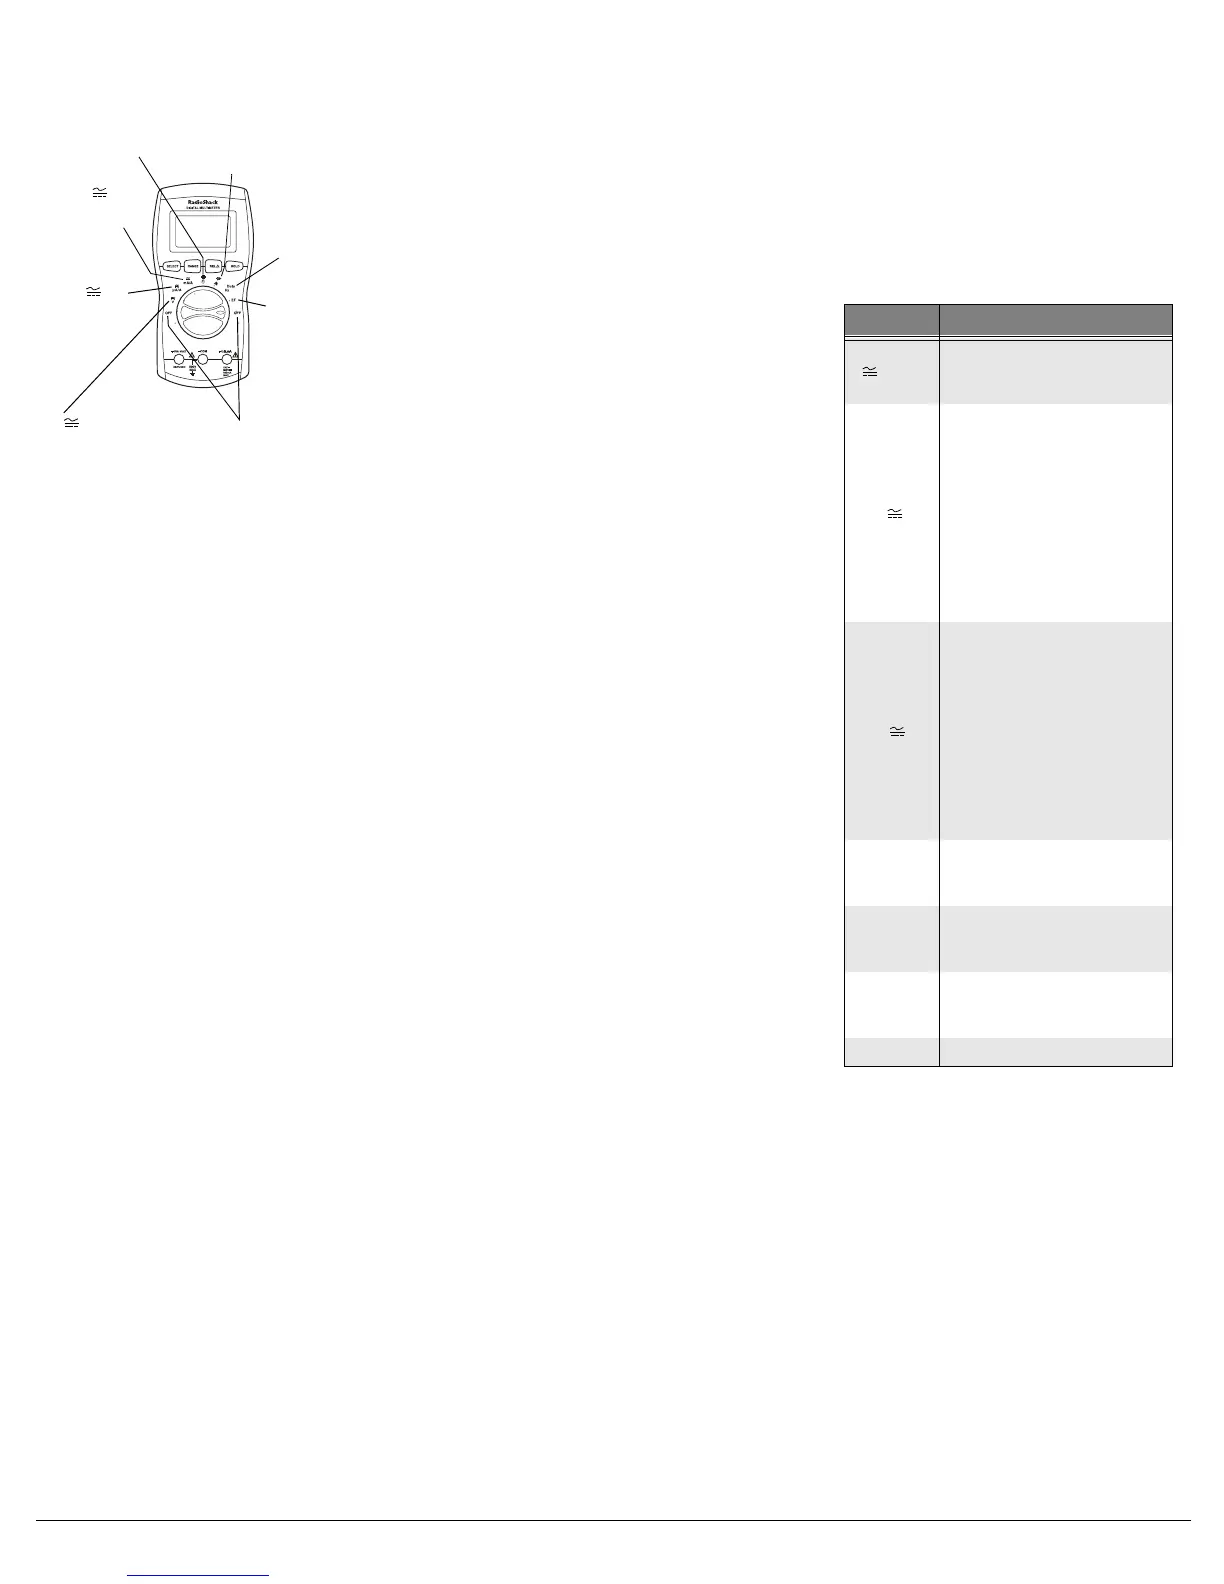
1. Rotate the function selector to select one
of the following functions, then
repeatedly press
SELECT
to select the
function you want.
For example, to measure a diode, rotate
the function selector to
–
/
„
then press
SELECT
.
„
appears.
Your meter automatically enters the auto
range mode when you turn on the meter.
In the auto range mode,
7KJE
7KJE7KJE
7KJE
appears
and the meter automatically selects the
next higher or lower range (if available)
when the measurement causes the
display to overflow (the meter tries to
display 4001 or more units) or underflow
(the meter tries to display 379 or fewer
units).
2.
.
If nothing appears on the display, press
any button to turn on the meter.
OFF — turns the
meter off.
V — measures DC
and AC voltages.
µ
A/A —
measures
amperage.
mA/A —
measures
amperage.
• — measures
resistance and
capacitance.
–
/„ — measures
continuity and diodes.
Hz/Duty —
measures
frequency and
duty cycle.
EF —
measures
electrical fields.
2QUKVKQP &GUETKRVKQP
V
1. Measures DC volts.
2. Measures AC volts.
µ
A/A
1. Measures amperage:
• DC 0.4/4 mA
• AC 0.4/4 mA
2. Measures amperage:
• DC 4/10 A
•AC 4/10 A
mA/A
1. Measures amperage:
• DC 40/400 mA
• AC 40/400 mA
2. Measures amperage:
• DC 4/10 A
•AC 4/10 A
•
1. Measures resistance.
2. Measures capacitance.
–
/
„
1. Checks continuity.
2. Checks diodes.
Hz/Duty
1. Measures frequency.
2. Measures duty cycle.
EF
Checks electrical fields.
 Loading...