4
3. To select manual range mode, press
RANGE
while the meter is in auto-range
mode.
7KJE
7KJE7KJE
7KJE
disappears.
4. Repeatedly press
RANGE
to select
different ranges. The decimal point shifts
each time you press
RANGE
.
5. Hold down
RANGE
for about 2 seconds,
the meter exits manual range mode and
returns to its auto range mode.
6. Set the meter to the different
measurement ranges. The unit of
measure that appears on the display
shows you the range that the meter is
currently set to. For example,
cL
cLcL
cL
appears in the 400 mV range. Also, note
the position of the decimal. For example,
if
&$&&&ýL
&$&&&ýL&$&&&ýL
&$&&&ýL
appears, the meter is set to
measure less than 4 volts. If
&&&L
&&&L&&&L
&&&L
appears, the meter is set to measure up
to 600 volts.
Read the range in volts, ohms,
capacitance, or amps as indicated by
the position of the decimal point.
Note:
The display might show a
phantom reading in some DC and AC
voltage ranges when the test leads are
not connected to a circuit. This is
normal. The high input sensitivity
produces a “wandering” effect. When
you connect the test leads to a circuit, a
real measurement appears.
7. Connect the test leads to the circuit you
want to measure, To measure different
circuits, see “Making Measurements” on
Page 4.
Caution:
If
E$<
E$<E$<
E$<
(overflow) appears, the value
you are measuring exceeds the range for the
setting you selected. This is normal when
you measure resistance or a diode, or do not
have the leads connected to a component. If
you are measuring voltage or current when
E$<
E$<E$<
E$<
appears, however, immediately
disconnect the probes from the circuit.
*1.&+0)"#"/'#574'/'06
Press
HOLD
to hold all indications on the
display.
Hold
appears and the meter holds
the measured value on the display even if
you remove the probes from the circuit.
To cancel hold, press
HOLD
again or set the
selector to another setting or press
SELECT
.
Hold
disappears.
75+0)"4'.#6+8'"/'#574'/'06
You can set the meter to have it not show an
unwanted value that might appear as a result
of internal or other factors. For example, the
meter always shows a small value when you
set the selector to
•
to measure
capacitance, even when you have not
connected the test leads to a component.
(This happens because the meter measures
its own internal capacitance, which is
normal). If you set the meter in relative mode
with the small value as reference, it does not
display this value when you measure a
component.
You can also set the meter to a baseline
reference value. For example, if you are
measuring resistors with a 100 ohm rating
and you want to see the resistor’s tolerance
(the actual value in ohms above or below the
resistor’s rating), you can set the meter to a
baseline reference value of 100 ohms so it
displays only the resistor’s tolerance.
1. Set the function selector to any setting
except
–
/„
,
Duty function
, or
EF
.
2. Measure the zero offset (disconnect test
leads for capacitance function, or touch
the test leads together for other function)
if you want to remove the zero offset
from reading, or connect the test leads
to the component whose measurement
you want to use as a reference value.
3. While measuring the zero offset or with
the test leads connected to a
component, hold down
REL
€
.
Rel
€
appears. The meter is set to manual
range mode.
4. Use the meter to make a measurement.
Notes:
• If the reference value you measured in
Step 2 is greater than the value of the
measurement you made in Step 4, the
meter shows a negative value. This is
not a malfunction.
•
E$<
E$<E$<
E$<
appears if you measure values
outside of the meter’s currently set
range.
• The meter displays values greater than
4000 counts as long as the range used
is not an overflow range. (A count is the
smallest unit of measure that the meter
can measure). For example, if you store
–3.500 volts as a reference, then
measure +3.500 volts, the meter might
display 7.000 volts.
• You can not set
E$<
E$<E$<
E$<
as a reference value.
To reset a relative measurement, press
REL
€
again or set the function selector to
another setting.
#761/#6+%"219'4"1((
Your meter conserves power by
automatically turning off about 30 minutes
after the last time you changed a setting
(even if you are making measurements).
To turn the meter back on after it
automatically turns off, press any button.
75+0)"219'4".1%-
To set the meter so it does not turn off
automatically, set the function selector to
OFF
to turn it off. Hold down
HOLD
and
SELECT
at the same time, then turn on the
meter.
FBeY
FBeYFBeY
FBeY
appears until you release
HOLD
and
SELECT
. The meter sets itself to its
normal test mode and does not automatically
turn itself off.
To reset the meter so it automatically turns
itself off, turn off the meter then turn it back
on. The meter automatically turns itself off
after about 30 minutes.
/#-+0)"
/'#574'/'065
/'#574+0)"&%1#%"81.6#)'
WARNINGS:
• Never clamp a test lead to a hot wire
(usually red, black, or blue in AC wiring
circuits). If one lead is clamped to a hot
wire and you touch the meter’s other
probe, you could receive an electric
shock.
• The maximum input limit for voltage
measurement is 600 V DC/AC (RMS).
To avoid electrical shock and damage to
the meter, never try to measure a DC
voltage above 600 volts or an AC
voltage above 600 volts RMS.
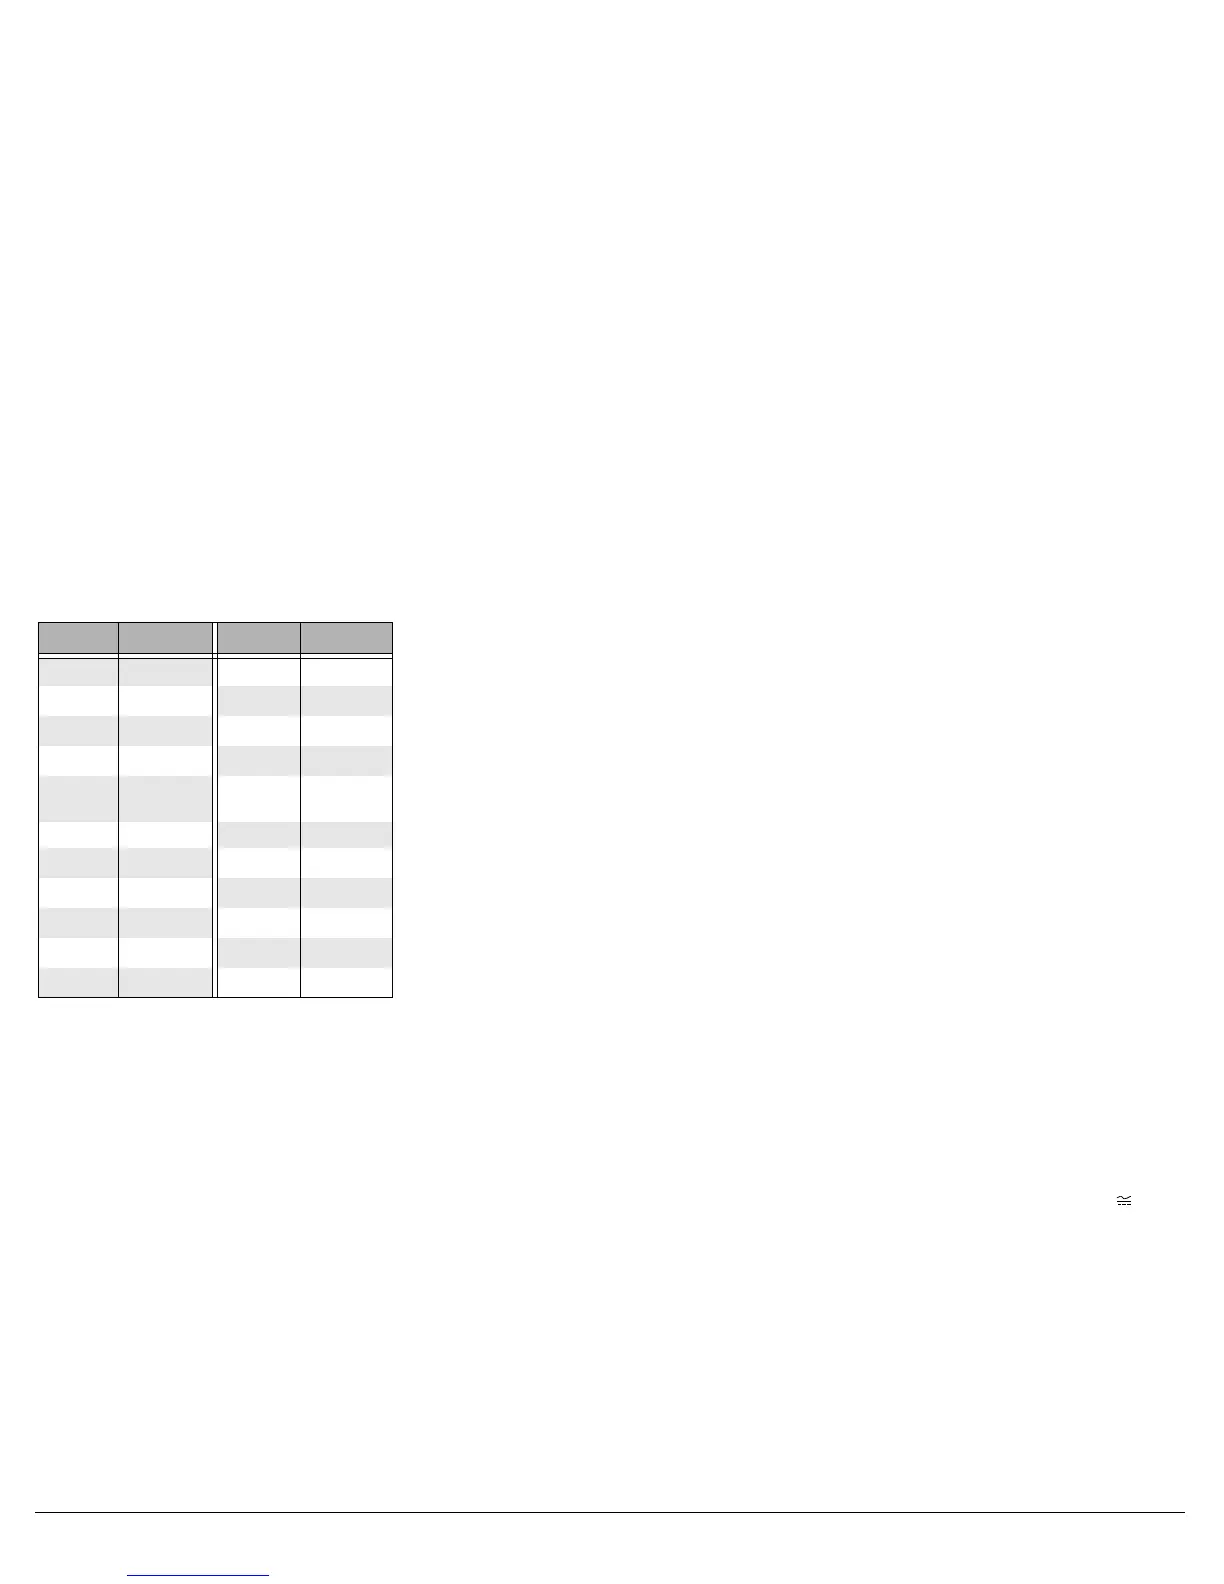
1. Rotate the function selector to
V
.
2. Repeatedly press
SELECT
to select the
function between DC voltage and AC
voltage (
~
appears on the left side of the
display for AC voltage measurement).
3. If the meter is set to automatic range
control, the meter automatically moves
to the range that gives the best reading.
4. To set manual range control, press
RANGE
then change the range (if
necessary) by repeatedly pressing
RANGE
.
4CPIG &KURNC[ 4CPIG &KURNC[
400 mV
ZZZ$ZýcL
ZZZ$ZýcLZZZ$ZýcL
ZZZ$ZýcL
400
Ω
ZZZ$Zý
ZZZ$ZýZZZ$Zý
ZZZ$Zý
Ω
4 V
Z$ZZZýL
Z$ZZZýLZ$ZZZýL
Z$ZZZýL
4 k
Ω
Z$ZZZýa
Z$ZZZýaZ$ZZZýa
Z$ZZZýa
Ω
40 V
ZZ$ZZýL
ZZ$ZZýLZZ$ZZýL
ZZ$ZZýL
40 k
Ω
ZZ$ZZýa
ZZ$ZZýaZZ$ZZýa
ZZ$ZZýa
Ω
400 V
ZZZ$ZýL
ZZZ$ZýLZZZ$ZýL
ZZZ$ZýL
400 k
Ω
ZZZ$Zýa
ZZZ$ZýaZZZ$Zýa
ZZZ$Zýa
Ω
600 V
DC/AC
ZZZýL
ZZZýLZZZýL
ZZZýL
4 M
Ω
Z$ZZZýC
Z$ZZZýCZ$ZZZýC
Z$ZZZýC
Ω
400
µ
A ZZZ$Zý
ZZZ$ZýZZZ$Zý
ZZZ$Zý
µ
7
77
7 40 M
Ω
ZZ$ZZýC
ZZ$ZZýCZZ$ZZýC
ZZ$ZZýC
Ω
4 mA
Z$ZZZýc7
Z$ZZZýc7Z$ZZZýc7
Z$ZZZýc7
4 nF
Z$ZZZýd<
Z$ZZZýd<Z$ZZZýd<
Z$ZZZýd<
40 mA
ZZ$ZZýc7
ZZ$ZZýc7ZZ$ZZýc7
ZZ$ZZýc7
40 nF
ZZ$ZZýd<
ZZ$ZZýd<ZZ$ZZýd<
ZZ$ZZýd<
400 mA
ZZZ$Zýc7
ZZZ$Zýc7ZZZ$Zýc7
ZZZ$Zýc7
400 nF
ZZZ$Zýd<
ZZZ$Zýd<ZZZ$Zýd<
ZZZ$Zýd<
4 A
Z$ZZZý7
Z$ZZZý7Z$ZZZý7
Z$ZZZý7
4
µ
F Z$ZZZý
Z$ZZZýZ$ZZZý
Z$ZZZý
µ
<
<<
<
10 A
ZZ$ZZý7
ZZ$ZZý7ZZ$ZZý7
ZZ$ZZý7
40
µ
F ZZ$ZZý
ZZ$ZZýZZ$ZZý
ZZ$ZZý
µ
<
<<
<
 Loading...