This document is the owner's manual for the Radley 20V Max Cordless Drill, model 1239-221. It provides comprehensive information on the drill's specifications, safety warnings, operation, maintenance, and warranty.
Function Description:
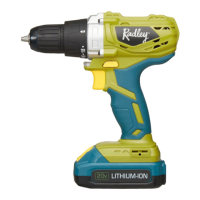
The Radley 20V Max Cordless Drill is a versatile power tool designed for drilling and driving screws into various materials. It features a variable speed trigger, adjustable torque clutch, and a forward/reverse switch for different applications. The drill is powered by a 20V Max Li-ion battery pack, offering cordless convenience. An integrated LED worklight illuminates the work area.
Important Technical Specifications:
- Model: 1239-221
- Battery: 20V Max* Li-ion, 1.5 Ah (Maximum charged battery voltage, measured without load, is 20V with a nominal value of 18V)
- Charger: DKYC2100400U, Class 2, approximately 3-5 hours charging time
- Variable Chuck Speed: 0-700 RPM
- Torque Clutch Positions: 19 + 1 Drill mode
- Keyless Chuck: 3/8" Single sleeve
- Maximum Drilling Capacity: 1/4" in metal, 3/4" in wood
- Weight: 2 lb. 15oz. (1.344 kg)
- Replacement Battery Part Number: 5350-547
- Replacement Charger Assembly Part Number: DKYC2100400U
Usage Features:
- Battery Charge Status Indicator: The battery pack includes an LED power indicator to check the remaining charge. Pressing the battery status button illuminates 1, 2, or 3 LEDs, indicating 1/3 or less, 1/3 - 2/3, or 2/3 - fully charged, respectively. This can be checked with the battery installed in the tool (with the ON/OFF switch OFF) or removed.
- Charging the Battery Pack: The charger (DKYC2100400U) is designed for 110-120V 60 Hz electrical outlets. When plugged in without a battery, the green LED is ON. When a discharged battery is installed, the green LED turns OFF and the red LED turns ON, indicating charging. A fully charged battery will show a green LED ON and a red LED OFF. Charging should occur between 0°C (32°F) and 45°C (113°F).
- Installing/Removing Battery: The battery slides onto matching keys in the drill handle and "clicks" into place. To remove, press the battery release button and slide the battery backward.
- Adjustable Torque Clutch: The drill features a 19+1 position torque adjustment ring. Settings 1-4 are for small screws, 5-7 for medium screws into soft materials, 8-10 for screws into soft & medium-density materials, 11-13 for screws into hardwood, and 14-19 for large screws. A drill bit icon indicates the drilling position.
- Forward/Reverse Switch: Located above the trigger switch, this switch controls the rotation direction. Pushing left for clockwise rotation (drilling) and right for counterclockwise (removing screws). The trigger switch is disabled when the forward/reverse switch is in the middle position.
- Variable-Speed Trigger Switch: Allows for precise speed control; a gentle squeeze results in slower speeds, while full depression provides maximum speed.
- LED Worklight: Automatically turns ON when the trigger switch is squeezed and OFF when released, illuminating the work area.
- Installing Drill Bits: The 3/8" single sleeve keyless chuck allows for easy bit installation. Hold the chuck collar and rotate the chuck body counterclockwise to open the jaws, insert the bit fully, then rotate clockwise to tighten. Ensure the bit is properly aligned and hand-tightened.
- Drilling: For smooth, hard surfaces, use a center punch. Secure the workpiece with a vice or clamps. Set the torque clutch to the drilling position. Hold the drill firmly with both hands, avoiding covering air vents. Start drilling by squeezing the trigger, applying enough pressure to keep the bit cutting. Use higher speeds for small holes and slower speeds for large holes.
- Driving Screws: Select the correct screwdriver bit and fasten it securely in the chuck. Set the torque clutch based on the material and screw size. Adjust the clutch setting if the screw is overdriven or not driven far enough.
- Removing the Chuck: Remove the battery. Insert a 5/16" / 8 mm hex key into the chuck and tighten the jaws. Tap the hex key sharply with a mallet in a CLOCKWISE direction to loosen the chuck screw. Remove the chuck screw (left-handed thread) using a #2 screwdriver (turn CLOCKWISE to remove). Insert the hex key again, tighten jaws, and tap COUNTERCLOCKWISE to unscrew the chuck from the spindle.
- Retightening a Loose Chuck: Remove the battery. Insert a 5/16" / 8 mm hex key into the chuck and tighten the jaws. Tap the hex key sharply with a mallet in a CLOCKWISE direction. Remove the hex key. Tighten the chuck screw using a #2 screwdriver (turn COUNTER-CLOCKWISE to tighten, as it has a left-handed thread).
Maintenance Features:
- General Cleaning: Use a clean cloth to remove dirt, dust, oil, and grease from plastic parts. Avoid using solvents like brake fluids, gasoline, petroleum-based products, acetone, lacquer thinner, or similar volatile solvents, as they can damage plastic components.
- Lubrication: All bearings are pre-lubricated for the life of the unit under normal conditions, requiring no further lubrication.
- Battery Pack Recycling: To preserve natural resources and prevent environmental pollution, recycle or dispose of batteries properly. Do not dispose of rechargeable batteries in household garbage or landfill sites. Cover battery terminals with electrical tape before disposal to prevent short circuits.
- Service: Use only identical replacement parts for servicing. Any alterations or modifications to the tool or its electrical parts should only be performed by a qualified technician to avoid safety hazards and voiding the warranty. For assistance, contact the toll-free helpline at 1-866-349-8665.
Safety Warnings (General and Specific):
- Always read the manual before use to understand applications, limitations, and potential hazards.
- Wear CSA approved eye protection (safety goggles, not just prescription glasses) at all times.
- Wear ear protection, especially during extended or noisy operation.
- Wear a dust mask when operating in dusty environments to protect against harmful chemicals found in dust from construction materials.
- Ensure the work area is clean, well-lit, and free of flammable liquids, gases, or dust.
- Keep children and bystanders away from the operating power tool.
- Match power tool plugs to outlets; do not modify plugs or use adapters with grounded tools.
- Avoid body contact with grounded surfaces.
- Do not expose power tools to rain or wet conditions.
- Do not use the cord for carrying, pulling, or unplugging. Keep it away from heat, oil, sharp edges, or moving parts.
- Use an extension cord suitable for outdoor use when operating outdoors.
- Ensure the switch is in the OFF position before connecting to power source/battery or carrying the tool.
- Remove adjusting keys or wrenches before turning the tool ON.
- Maintain proper footing and balance; do not overreach.
- Do not wear loose clothing or jewelry that could get caught in moving parts.
- Connect and properly use dust extraction/collection facilities.
- Do not force the power tool; use the correct tool for the application.
- Do not use the tool if the switch does not turn it ON and OFF.
- Disconnect power/battery before making adjustments, changing accessories, or storing.
- Store idle tools out of reach of children and untrained users.
- Maintain tools by checking for misalignment, binding, or breakage.
- Keep cutting tools sharp and clean.
- Use only manufacturer-specified charger for 20V Max Li-ion batteries.
- Do not store or carry batteries with metal objects that could cause a short circuit.
- Never attempt to open the battery. Discontinue use and do not recharge if the housing is broken or cracked.
- Do not charge a wet or corroded battery.
- Avoid contact with battery liquid; if contact occurs, wash with soap and water, neutralize with lemon juice/vinegar, and seek medical help if in eyes.
- Do not incinerate batteries.
- Plug the charger directly into an electrical outlet; do not use an extension cord.
- Use the charger only in a standard 120V, 60 Hz electrical outlet.
- Do not use the charger in wet/damp conditions or immerse it in water.
- Do not charge batteries other than the specified 20V Max cordless drill battery.
- Do not operate a damaged charger.
- Do not charge batteries below 0°C (32°F) or above 45°C (113°F).
- Unplug the charger when not in use or before cleaning.
- Do not hold the chuck body with one hand and use drill power to loosen/tighten bits.
- Do not drill material too small to be securely held.
- Keep hands out of the path of the drill bit.
- Secure the workpiece with clamps or a vice.
- Ensure no nails or foreign objects are in the workpiece.
- Remove the battery before installing/removing drill bits.
- Jog the drill switch before operation to ensure the drill bit does not wobble.
- Do not use fly cutters or multiple-part hole cutters.
- Ensure the spindle has stopped before touching the chuck or changing bits.
- Always ensure the chuck and drill bit are firmly tightened.
- Be prepared for binding and bit breakthrough during drilling, which can cause loss of control.
- When drilling metals, use light oil on the drill bit.
- If the bit jams or the drill stalls, release the trigger immediately.