EasyManua.ls Logo

Rain S050 S - User Manual

Default Icon
2 pages
Print Icon
To Next Page IconTo Next Page
Loading...
S050 S GEAR DRIVEN SPRINKLER SETTING INSTRUCTIONS
CHANGING A NOZZLE
1
REMOVING THE NOZZLE RETENTION SCREW
Use your K-Key or a small flat blade screwdriver to remove the nozzle
retention screw by turning counter-clockwise to remove and clockwise
to re-install.
2
PULL UP THE RISER
Insert the K-Key in the keyhole on the top of the nozzle turret and turn
the key 1/4 turn to insure that the key does not slip out of the keyhole
when you pull it up. Firmly pull up the entire spring-loaded riser to
access the nozzle socket. Hold the riser assembly up with one hand.
3
REMOVING THE NOZZLE
Insert the end of the K-Key, hook side up, into the tall slot along the right
side of the nozzle and pull up to pop out nozzle. NOTE: Do not
put the K-Key or any instrument into the nozzle opening.
4
INSTALLING A NOZZLE
Press the desired nozzle into the nozzle socket. Make sure the nozzle
number is visible and the nozzle “Wing” is up. Then, re-install the
nozzle retention screw. NOTE: The nozzle retention screw is also a
break-up screw and used to adjust the distance of the spray.
SETTING THE ARC ADJUSTMENT
1
FINDING THE LEFT START POSITION
Place your finger on the top center of the nozzle turret. Rotate the turret
to the right until it stops and then back to the left until it stops. Notice
the position of the nozzle arrow. This is the “Left Start” position. The
sprinkler will begin spraying from this position and rotate clockwise until
it reaches the right “Arc Stop”.
2
ORIENTING THE LEFT START POSITION
Insert the K-Key in the keyhole on the top of the nozzle turret and turn
the key 1/4 turn to insure that the key does not slip out of the keyhole
when you pull it up. Being careful not to allow the nozzle turret to turn,
firmly pull up the entire spring-loaded riser. Hold the lower riser assembly
up with one hand. Now turn only the lower riser clockwise or counter-
clockwise until the nozzle arrow is pointing where you want the sprinkler
to begin spraying.
3
CHANGING THE ARC
Insert the K-Key or a small flat blade screwdriver into the Arc Set
Adjustment slot. Turn clockwise to increase the arc or counter-clockwise
to decrease the arc.
NOTE: The arc set arrow in the center of the nozzle turret rotates
to show the current setting.
NOTE: The S050S is factory preset with a 40° arc setting, and includes a pre-installed #1.5 nozzle.
Question and Answer IconNeed help?

Do you have a question about the Rain S050 S and is the answer not in the manual?

Overview

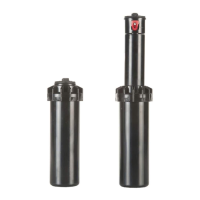
The S050S is a gear-driven sprinkler designed for irrigation, featuring a pre-installed #1.5 nozzle and a factory preset 40° arc setting. It is designed for efficient water distribution and offers various adjustment capabilities to suit different landscape needs.

Function Description:

The S050S sprinkler is designed to spray water over a specified arc, rotating clockwise from a "Left Start" position until it reaches a "Right Arc Stop." The gear-driven mechanism ensures smooth and consistent rotation. It is suitable for both residential and commercial irrigation systems.

Important Technical Specifications:

The sprinkler comes with a #1.5 nozzle pre-installed. The arc setting is factory preset to 40°, but it is adjustable from 30° to 360°. The device operates with various nozzles, each having different flow rates, radii, and pressure requirements.

  • Nozzle Performance (U.S. Standard):

    • #1.5 (Pre-installed):
      • Pressure (PSI): 20, 30, 40, 50
      • Radius (Feet): 23, 24, 25, 24
      • Flow (GPM): 1.4, 1.7, 1.9, 1.9
    • #0.75:
      • Pressure (PSI): 20, 30, 40, 50
      • Radius (Feet): 17, 18, 18, 18
      • Flow (GPM): 0.75, 0.9, 1.0, 1.0
    • #1:
      • Pressure (PSI): 20, 30, 40, 50
      • Radius (Feet): 20, 20, 21, 21
      • Flow (GPM): 0.9, 1.2, 1.3, 1.3
    • #2:
      • Pressure (PSI): 20, 30, 40, 50
      • Radius (Feet): 25, 26, 27, 27
      • Flow (GPM): 1.8, 2.1, 2.4, 2.4
    • #3:
      • Pressure (PSI): 20, 30, 40, 50
      • Radius (Feet): 28, 29, 30, 30
      • Flow (GPM): 2.7, 3.3, 3.6, 3.6
  • Nozzle Performance (Metric Standard):

    • #1.5 (Pre-installed):
      • Pressure (kPa): 138, 207, 276, 345
      • Radius (Meters): 7.0, 7.3, 7.6, 7.3
      • Flow (L/M): 5.3, 6.4, 7.2, 7.2
    • #0.75:
      • Pressure (kPa): 138, 207, 276, 345
      • Radius (Meters): 5.2, 5.5, 5.5, 5.5
      • Flow (L/M): 2.8, 3.4, 3.8, 3.8
    • #1:
      • Pressure (kPa): 138, 207, 276, 345
      • Radius (Meters): 6.1, 6.1, 6.4, 6.4
      • Flow (L/M): 3.4, 4.5, 4.9, 4.9
    • #2:
      • Pressure (kPa): 138, 207, 276, 345
      • Radius (Meters): 7.6, 7.9, 8.2, 8.2
      • Flow (L/M): 6.8, 7.9, 9.1, 9.1
    • #3:
      • Pressure (kPa): 138, 207, 276, 345
      • Radius (Meters): 8.5, 8.8, 9.1, 9.1
      • Flow (L/M): 10.2, 12.5, 13.6, 13.6

Note: Data represents test results in zero wind for S050 S. Adjust for local conditions. Radius may be reduced with nozzle retention screw.

Usage Features:

  • Changing a Nozzle:

    1. Removing the Nozzle Retention Screw: Use a K-Key or a small flat blade screwdriver to turn the nozzle retention screw counter-clockwise.
    2. Pulling Up the Riser: Insert the K-Key into the keyhole on the top of the nozzle turret and turn it 1/4 turn to secure it. Firmly pull up the entire spring-loaded riser to access the nozzle socket. Hold the riser assembly up with one hand.
    3. Removing the Nozzle: Insert the hook side of the K-Key into the tall slot along the right side of the nozzle and pull up to pop out the nozzle. Avoid inserting the K-Key or any other instrument into the nozzle opening.
    4. Installing a Nozzle: Press the desired nozzle into the nozzle socket, ensuring the nozzle number is visible and the "Wing" is up. Re-install the nozzle retention screw. This screw also functions as a break-up screw to adjust the spray distance.
  • Setting the Arc Adjustment:

    1. Finding the Left Start Position: Rotate the nozzle turret to the right until it stops, then back to the left until it stops. The position of the nozzle arrow indicates the "Left Start" position, from which the sprinkler will begin spraying clockwise.
    2. Orienting the Left Start Position: Insert the K-Key into the keyhole on the top of the nozzle turret and turn it 1/4 turn. Carefully pull up the entire spring-loaded riser, holding the lower riser assembly up with one hand. Rotate only the lower riser clockwise or counter-clockwise until the nozzle arrow points to the desired starting spray position.
    3. Changing the Arc: Insert the K-Key or a small flat blade screwdriver into the Arc Set Adjustment slot. Turn clockwise to increase the arc or counter-clockwise to decrease it. The arc set arrow in the center of the nozzle turret rotates to show the current setting, which is adjustable from 30° to 360°.
  • Installation:

    • Thread the sprinkler on the pipe. Bury the sprinkler flush to grade.
    • Important: Do not use pipe dope. Gear-driven sprinklers and pop-up sprays should not be installed on the same watering zone.

Maintenance Features:

  • Inspecting the Filter:

    • Unscrew the cap and lift the complete sprinkler assembly out of the housing can.
    • The filter is located on the bottom of the sprinkler assembly and can be easily pulled out, cleaned, and re-installed.
  • Winterization Tips:

    • When using an air compressor to remove water from the system, observe the following:
      1. Do not exceed 30 PSI.
      2. Always introduce air into the system gradually to avoid air pressure surges. Sudden release of compressed air into the sprinkler can cause damage.
      3. Each zone should run no longer than 1 minute on air. Sprinklers run 10 to 12 times faster on air than on water. Over-spinning rotors on air can cause damage to the internal components.

Rain S050 S Specifications

General IconGeneral
BrandRain
ModelS050 S
CategoryIrrigation System
LanguageEnglish

Related product manuals