Do you have a question about the Rankam GR2264401-GS-00 and is the answer not in the manual?
Specifies the appliance is for outdoor use only, emphasizing safety precautions for assembly and use.
Defines DANGER, WARNING, and CAUTION labels to communicate potential hazards and their severity.
Provides vital DANGER and WARNING instructions regarding gas leaks, flammable liquids, and LP cylinder safety.
Informs about chemicals in combustion products known to cause cancer and birth defects.
Outlines essential usage restrictions including outdoor use, clearances, and prohibited actions during operation.
Details crucial safety measures like keeping fuel lines away from heat, cooling before moving, and handling hot surfaces.
Specifies required LP cylinder capacity, valve type (Type 1), and safety features like OPD.
Provides guidelines for safe storage and handling of LP cylinders, including outdoor storage and upright positioning.
Highlights dangers of incorrect valve connections, storing spare cylinders, and obstructing ventilation.
Details safe practices for filling LP cylinders, emphasizing qualified dealers and not exceeding 80% capacity.
Instructions for closing the valve, placing the cylinder, and attaching the regulator, with safety notes.
Explains connecting the regulator, performing a leak test, and troubleshooting leaks with soap solution.
Details the steps for safely disconnecting the LP cylinder from the grill, including valve closure.
Emphasizes using manufacturer-specified regulators/hoses and protecting the valve outlet with caps.
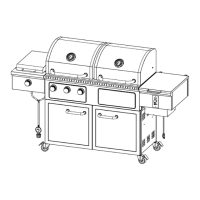
A numbered diagram of the grill parts for easy identification during assembly and maintenance.
Lists and quantifies major grill parts such as warming rack, cooking grates, flame tamers, and grill body.
Details cart components, doors, handles, and other accessories with their respective quantities.
Lists all necessary hardware, including bolts, nuts, and tools, with their quantities and identification.
Explains symbols indicating hand-tightening versus tool-tightening for assembly procedures.
Diagram illustrating detailed parts of the grill body, cart, and related assemblies with numerical references.
Provides a comprehensive list matching part numbers to their specific names for the entire grill assembly.
Connects front, rear, and side cart panels, attaches bottom panel, and secures casters.
Instructions for attaching the right cart panel and bottom cart panel, followed by fully tightening all cart bolts.
Details on installing locking casters and attaching the cart rack using specified hardware.
Instructions for attaching the left and right door assemblies and then installing door handles with bezels.
Steps for attaching the tank heat shield and carefully placing the grill body onto the cart assembly.
Instructions for attaching the right side table panel and assembly, ensuring proper alignment and clearance.
Instructions for attaching the left side table panel and assembly, ensuring proper alignment and clearance.
Details on sliding the grease collecting tray and grease cup into their designated holding brackets.
Places warming rack, cooking grates, flame tamers, and installs the battery for the igniter.
Confirms the unit is fully assembled and advises reading the manual before use.
Instructions for preparing the grill and making a soap solution before conducting the leak test.
Details the steps to check all gas connections for leaks using a soap-water mixture.
Ensures readiness by checking the hose, gas odor, regulator, and performing a leak test before lighting.
Step-by-step guide for lighting the main burners using the electronic ignition system.
Procedures for ignition failure, waiting periods, and turning burners off safely.
Instructions for lighting burners manually using the provided match holder and a lighted match.
Guide to visually checking burner flames for proper blue color and stability, indicating correct air/fuel mix.
CAUTIONary advice for keeping the area clear, ensuring ventilation, and checking for blockages in burner tubes.
Addresses causes of flashback like insect nests and provides detailed steps for cleaning burner ports.
Lists conditions that require burner inspection, such as yellow flames, uneven heating, or popping noises.
Steps to remove the flame tamer, cotter pin, fixing pin, and the burner itself from the grill body.
Instructions on correctly seating the burner valve orifice and aligning the burner for reinstallation.
Emphasizes firmly seating the valve orifice into the burner tube for correct flame characteristics.
Provides solutions for burners not lighting, fires at control knobs, yellow flames, and low flame issues.
Offers corrective actions for burners not getting hot, grills being too hot, and regulator activation issues.
Details the warranty period for different parts, types of defects covered, and exclusions like cosmetic damage.
Provides instructions for customer service, including contact information and responsibilities for shipping.