7
6. Align the riveter with the drilled hole as best as you can and insert
the rivet head into it.
7. Drive FORWARD until the mandrel is popped off of the rivet. When
you hear that the rivet is set, continue to pull the trigger for few
seconds, to be sure the mandrel comes off correctly.
8. Drive BACKWARD to release and expose the remaining rivet man-
drel. Depending on the greasing of the tool jaw pieces, the mandrel
may or may not fall out on its own.
V. Maintenance
1. Clean the components of plunger tube and re-lubricate its parts, at
least on a yearly basis.
VI. Trouble-Shooting
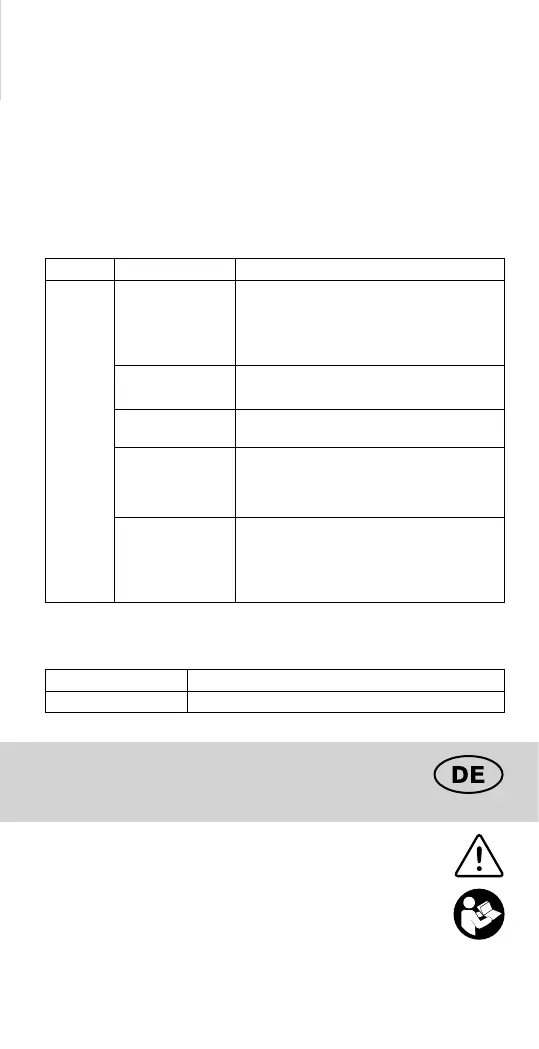
Issue Possible causes Solutions
Spent
mandrel
jam
Assembly grease
The mandrel of a spent rivet might not fall out
from grease even if correctly released. With
plunger tube in full forward position, insert
rivet several times to clear grease or blow/
clean out jaws.
Loose nosepiece
Tighten the nosepiece with included
wrench or equivalent.
Loose front tube
Tighten front tube fi rst and then tighten lock-
ing ring with included wrench or equivalent.
Spent mandrel
is loose but not
exposed enough to
grab with hands
Try to set your rivet not against the nosepiece,
leaving a 1/16-1/8” (1- 3mm) gap between
the rivet and the tool to leave the mandrel
more exposed when returned forward.
Persistent jamming
Re-tighten the nosepiece, front tube and
locking ring. Then, turn the hex shank
anti-clockwise until an audible sound comes
from the tool and shake to remove the
mandrel.
VII. Spare parts list
Follow local regulations when disposing of the tool.
Art. No Description
5001578 Jaws, Main Spring, 3x Multi nozzle
Lesen Sie die Bedienungsanleitung vor Verwendung
sorgfältig durch.
Dieser Nietvorsatz ist mit unserem Multi™ Mundstück ausges-
tattet, mit dem sich Niete Ø 3,2 mm - Ø 4 mm - Ø 4,8 mm
setzen lassen.
I. Anforderungen an das Antriebswerkzeug
1. Werkzeug muss mit einstellbarer Drehmomenteinstel-
lung ausgestattet sein. Akku-Bohrmaschine oder Akkuschrauber,
mit dem Sie zwischen mehreren Drehmomentpositionen wählen
MULTI NIETVORSATZ FÜR
AKKUSCHRAUBER : RP150 MULTI™
Betriebsanleitung- Übersetzung der ursprünglichen