This document is a user manual for the RBSM SPORTS Digital Remote Golf Trolley. It provides detailed instructions for assembly, operation, and maintenance, along with a troubleshooting guide and frequently asked questions.
Function Description
The RBSM SPORTS Digital Remote Golf Trolley is designed to assist golfers by carrying their golf bag, allowing them to concentrate on their game. It features both manual and remote control operation, offering convenience and ease of use on the golf course. The trolley is equipped with a digital display for speed and distance functions.
Important Technical Specifications
Power and Battery:
- Battery Type: 12V sealed lead-acid batteries.
- Battery Life: Rated to last on average for 36 holes or 8-10 hours of play per charge, depending on weight and course topography.
- Charging Time: 5-10 hours for a full charge; an additional 2 hours recommended after the charger light indicates full. First usage requires a 12-hour charge.
- Charger: Included, with a light that changes color to indicate full charge (may vary by charger type).
- Battery Poles: Red for positive, black for negative. Incorrect connection can cause severe damage.
- Fuse: Standard 36Amp automotive fuse in the red cable of the battery leads.
Control and Operation:
- Speed Levels: 1 to 9, adjustable via a speed controller knob.
- Distance Function (Timer):
- Press once: Trolley runs 10 meters and stops.
- Press twice: Trolley runs 20 meters and stops.
- Press three times: Trolley runs 30 meters and stops.
- Cruise and Brake Function:
- ON/OFF Button: Controls power supply (press for ~2 seconds to switch ON/OFF).
- Go/Stop Button: Starts and stops the trolley. Also cancels the Timer function, returning to the former speed level.
- Remote Control:
- Stop Button (Red): Brakes the caddy.
- Timer Button: Activates 10, 20, 30-meter distance functions and Stop (same as manual control timer function).
- Left/Right Arrows: Initiate turns. Releasing the arrows stops turning and resumes straight movement at the original speed.
- Forward Arrow: Sets the caddy in forward motion. Multiple presses increase speed.
- Backward Arrow: Sets the caddy in backward motion. Multiple presses increase speed.
- ON/OFF Switch: Located on the side of the remote control.
- Safety Features:
- Controller box has a shut-down function if the battery is too low, the controller is overheating, or no signal is received from the remote for 30-40 seconds.
- Anti-Tip Wheel: Included for remote control models.
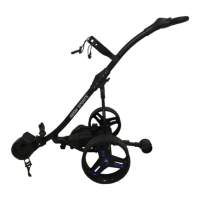
Components (Glossary):
- Handle
- Upper Bag Holder
- Upper Bag holder belt
- Battery
- Rear Wheel
- Wheel Cap
- Wheel Rubber
- Battery tray
- Lower Bag Holder
- Front Wheel
- Folding part
- Charger
- Remote control
- Anti Tip Wheel
Usage Features
Assembly:
- Unpack all items carefully and check against the packing list.
- Place the frame on a soft surface to prevent scratches.
- Unfold the frame by connecting the main frame tube at the joint and locking the Y-shape lower support structure with the frame lock mechanism.
- Attach rear wheels: Push the wheel locking button on the outside of the wheel, insert the axle extension fully until locked. Ensure the locking button is pushed in during insertion to engage the clutch. Test by pulling the wheel; it should not come out.
- Place the battery pack on the battery tray, secure with the Velcro strap, and insert the battery plug into the caddy outlet.
- Insert the anti-flip wheel into the frame (for remote control models only).
Operation:
- Turning On: Push the On/Off switch to On. The battery charge LED on the handle should light up.
- Manual Control: Hold the handle and slowly dial the speed control with your index finger. The caddy will move forward. Adjust speed as desired.
- Stopping/Slowing: Dial the speed control knob backward or use the cruise control/On/Off buttons.
- Battery Indicator: Red, yellow, and green LEDs on the handle indicate battery charge level. All lit means fully charged. Green goes off first, then yellow. If only red is on, recharge immediately.
- Remote Control Usage: Aim the remote at the caddy. Use directional arrows for movement and turning, the red button for braking, and the timer button for distance functions.
- Tracking Adjustment: If the caddy tracks to one side, check bag balance. For persistent issues, adjust the front wheel by opening the axle screw, shifting the tracking rod on the right side of the front wheel, and re-tightening.
Maintenance Features
General Maintenance:
- Cleaning: Wipe any mud or grass from the frame, wheels, and chassis with a damp cloth or paper towel after every round.
- Avoid High-Pressure Washing: Do NOT use high-pressure jet washers to prevent moisture from entering electronic systems, motors, or gearboxes.
- Wheel Maintenance: Remove rear wheels every few weeks to clear debris. Apply lubricant (e.g., WD-40) to keep moving parts smooth.
- Annual Inspection: A year of weekly golf is equivalent to four years of lawnmower use. Inspect the cart thoroughly at least once a year. Contact a golf trolley Service Center for inspection and tuning if wear symptoms are noticed.
- Battery Storage: Always disconnect the battery when storing the caddy. If storing for a month or longer, store the battery in a warm, dry place (not on a concrete floor) and charge once a week for 6 hours.
Battery Care:
- Charging Environment: Charge in a well-ventilated area, not in a sealed container or upside down. Avoid charging near heaters, direct sunshine, or where heat accumulation may occur.
- Prolonging Battery Life: Avoid complete discharge. Charge the battery after every use. For extended non-use, charge once a week.
- Safety: Do not disassemble the battery or throw it into a fire. NEVER touch the electric poles of the battery.
Troubleshooting:
- No Power: Check all wiring connections and plugs, battery charge, and ensure wheels & clutches are in order. Check the 36Amp fuse in the battery leads.
- Motor Runs, Wheels Don't Turn: Check if wheels are secured to the axle by split pins and if they are fitted over the clutch and latched to the axle. Ensure the clutch pin is visible on both sides of the axle and turns freely in one direction. Check right and left wheel position.
- Trolley Pulls Left/Right: Check if the wheel is fitted over the clutch and latched to the axle. Check if the clutch pin is visible on both sides of the axle. Check if the clutch turns freely in one direction only.
- Battery Lacks Power: Check cable connections, charger function, give a new full charge, and ensure the battery has not been completely discharged.
- Problems Attaching Wheels: Remove the outer cap and adjust the quick release catch.
- Caddy Stops by Itself: Check battery charge level. The controller box has a shut-down function for low battery, overheating, or no remote signal for 30-40 seconds.
- Remote Control Not Working: Confirm the rheostat speed knob on the caddy is in Off or Stop position. Check batteries in the remote handset (use high-powered batteries). Check connections inside the remote.
- Caddy Doesn't Respond Well to Remote: Check fit and condition of handset batteries. Do not exceed the range distance limit.
- Reprogramming Remote: Turn the caddy on, then press either forward or reverse on the new remote, aiming it at the caddy for 5-10 seconds until it tunes in and the caddy moves.