Do you have a question about the RCA 400 and is the answer not in the manual?
Lists power requirements, amplifier specs, fuses, projection, and sound lamps.
Details carrying case dimensions, unit weight, and tube configurations.
Detailed steps for threading the 16mm film through the projector mechanism.
Guides for projecting sound and silent films, including control adjustments.
Instructions for rewinding film after projection is complete.
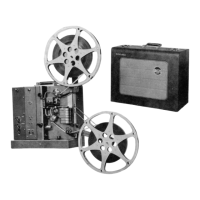
The RCA 400 is a portable 16mm motion picture equipment designed for high-quality presentation of both sound and silent motion films. It is available in two models: the "Senior" (MI-1338 or MI-1338-F) and the "Junior" (MI-1345 or MI-1345-F), with the "Senior" model offering a separate speaker carrying case and the "Junior" model integrating the speaker and accessories into a single carrying case. An auxiliary speaker (MI-1312-A) is also available for use with either model.
The RCA 400 projects 16mm films, capable of handling both sound and silent formats. For sound films, it operates at 24 frames per second, while silent films run at 16 frames per second. The equipment includes an amplifier for sound reproduction, with controls for volume and tone. It can also be used as a public address system or for record playing by connecting a microphone or phonograph pickup, either simultaneously with silent pictures or independently of projection. The projector is designed to deliver excellent quality reproduction, including full-color motion pictures.
Setting up the RCA 400 involves placing the projector on a sturdy table or stand, ensuring the distance to the screen is approximately five times the screen's width for a 2-inch projection lens. The front cover is removed to access accessories and mount the reel arms. Spring belts are attached to the reel arm pulleys, ensuring they are not twisted.
Connecting the equipment varies slightly by model. For "Senior" models, power and speaker cables are inserted into their respective receptacles on the projector, with the speaker cable connected to the speaker jack. The power cable is then plugged into a 105-125 volt, 60- or 50-cycle AC power receptacle. "Junior" models involve mounting the cable-loaded reel from the projector cover onto the lower reel arm shaft, connecting it to the speaker and the SPEAKER jack on the projector, and then plugging the power cable into the appropriate power receptacle. Speaker cables should be run conveniently to avoid obstruction.
Initial adjustments include focusing the projection lens by moving it back and forth and rotating it for fine adjustment until the lighted area on the screen is well defined. The distance to the screen is adjusted so the lighted area is slightly larger than the white portion of the screen, and the light is centered vertically using the tilting control.
Threading the projector requires placing an empty reel on the lower arm and a film reel on the upper. The film is unwound, checked for proper orientation (pictures upside down and reversed, sprocket holes to the right for sound film), and the REWIND-OPERATE lever is set to OPERATE. The film is then guided under the upper sprocket, through the picture gate, forming upper and lower loops as indicated by guide lines, and finally under the lower sprocket and snubber roller to the lower reel. Slack is taken up by rotating the reel clockwise.
For sound pictures, the amplifier's ON-OFF switch is turned ON, the VOLUME control to "0", and the TONE control to "5" (Senior) or NORMAL (Junior). The PROJ-OFF switch is set to PROJ, the SPEED SELECTOR to SOUND, and the LAMP-OFF switch to LAMP. Focusing is done by rotating the projection lens. Volume and tone are adjusted for desired effect. Framing is adjusted with the FRAMING knob. After the film, the LAMP-OFF switch is set to OFF, volume to "0", and PROJ-OFF to OFF. The THREADING LAMP on the "Senior" model can be used for threading in low light.
Silent pictures follow a similar procedure, but the speed selector is set to SILENT, and the amplifier's ON-OFF switch is left OFF unless the public address feature is used.
Rewinding involves attaching the film end from the lower reel to the upper reel, taking up slack, setting the REWIND-OPERATE lever to REWIND, and running the projector until rewound.
Packing up the "Senior" model includes removing reels and reel arms, cranking down the tilting control, disconnecting and rolling up cables, and replacing the projector cover. For "Junior" models, the cable-loaded reel is mounted on the upper reel arm shaft, the speaker cable is disconnected and wound onto the reel, and all reels and reel arms are removed before packing.
Regular maintenance is crucial for consistent performance. This includes proper lubrication, cleaning, and timely replacement of components.
Lubrication: The projector requires lubrication at various points, as detailed in the "LUBRICATION CHART." This includes the intermittent cam (Sta-put heavy oil), motor (SAE 30 Motor Oil), guide roller (SAE 10 Motor Oil), snubber roller and tension roller (soft lead pencil, graphite, or Molykote powder), shoe and side pressure shoe (soft lead pencil, graphite, or Molykote powder), pin and film shoe (SAE 10 Motor Oil), pressure roller (SAE 10 Motor Oil), oilless bearings and bushings (SAE 30 Medium Motor Oil), and all gear teeth (light grease). Periodic lubrication schedules are provided, such as every 500 or 1000 hours, or twice a year, depending on the component.
Cleaning: All optical surfaces, including the condenser lens, reflector, and projection lens, should be cleaned before each use with lens tissue. For more thorough cleaning, a good lens cleaner (not carbon tetrachloride or alcohol) can be used. The sound optical unit's glass elements should be cleaned with a lint-free cloth. Lamps (projection and sound) should be cleaned occasionally, wiping them with a cloth and avoiding fingerprints. Mechanical members, such as the aperture plate, film pressure shoe, sprockets, and sound drum pressure roller, should be cleaned to remove film dirt and emulsion particles. An orangewood stick or similar tool can be used for hardened particles.
Replacements: Spare projection and sound lamps should be kept on hand for immediate substitution. Projection lamps are replaced by pressing down, turning counterclockwise, and then installing a new lamp by aligning flanges, inserting, and turning clockwise. Sound lamps are replaced by opening the optical bracket, grasping, lifting, and turning counterclockwise, then installing a new lamp by aligning the notch and turning clockwise. Amplifier tubes can be accessed and replaced by removing the metal cover plate. The "Senior" model amplifier includes a fuse, which can be replaced by removing the rear portion of the projector case. Belts and reel arm components also have specific replacement instructions.
For service beyond the scope of the manual, the equipment should be taken to an Authorized RCA Audio-Visual Equipment Dealer or Distributor.
| Power Supply | 9V Battery |
|---|---|
| Type | Multimeter |
| Display Type | LCD |
| Dimensions | 138mm x 69mm x 31mm |
| Weight | Approx. 170g (including battery) |