EasyManua.ls Logo

RCA RS1286B

RCA RS1286B
21 pages
To Next Page IconTo Next Page
Loading...
Helpful Tips to Get You Started
Use the following information to replace the instructions in your User’s Guide.
Connecting the Speakers
When connecting the speakers, match the red wires to the red
jacks and the black wires to the black jacks. Each speaker has a
black and a red jack, one for positive and one for negative. The
top two jacks are for the right speaker, while the bottom two
jacks are for the left speaker.
Using the FM and AM Antennas
Before you use your audio system, you’ll want to make sure
both the FM and AM antennas are positioned properly. The FM
antenna is the coiled wire connected to the back of the unit.
Uncoil it, making sure it is fully extended (you may even want
to tape it to the wall behind the unit, if possible. The higher, the
better.) You’ll also need to connect the AM antenna loop to the
back of the unit if you listen to AM stations.
EQ Presets
Press the PRESET EQ button to cycle through the Flat, Rock, Pop, and Jazz presets. As you cycle through the presets,
listen carefully to how the sound changes.
Customizing the EQ Settings
You may find that customizing your EQ settings may work best for you. This feature allows you to adjust the bass
frequency for a fuller, deeper sound from bass-producing instruments, such as drums; the mid-range for more defined
vocals; and the treble for higher frequencies, such as cymbals. You can set the levels from -10 to +10 for each EQ setting
(bas, mid, tre).
1. Press and release the PRESET EQ button until CUSTOM is displayed.
2. Press the PRESET left or right button to cycle through the EQ settings.
3. While the desired setting is displayed, press the VOLUME up or down button to set the level (-10 to +10).
4. Repeat steps 2-3 for any other settings you want to adjust.
Bass Boost
For even more bass, press the BASS BOOST button.
Setting the Timer
1. Press and hold the TIMER ON/OFF button until the hour flashes.
2. To set the hour you want the timer to come on, press the PRESET left or right arrow button.
3. To change to the minutes, press TIMER ON/OFF.
4. To set the minutes, press the PRESET left or right arrow button.
5. To change to the volume setting, press TIMER ON/OFF.
6. To set the volume, press the VOLUME up or down button.
7. To change to the time you want the timer to go off, press TIMER ON/OFF.
8. To set the timer off time, repeat steps 2-3.
9. Press PROG/SET to set the timer.
Using the Remote for Tape Player Functions
Keep in mind the tape player functions of the unit are mechanical and can’t be operated by the remote.
V
O
L
U
M
E
C
O
N
T
R
O
L
P
R
E
S
E
T
E
Q
DISC SKIP
OPEN/CLOSE
CD
TUNER
TAPE
BAND
PHONES
POWER
STANDBY
PROG/SET
DEMO/
DIMMER
FM ST./
MONO
CLOCK
TIMER
ON/OFF
INTRO SHUFFLE REPEAT
BASS
BOOST
CD DIRECT PLAYPRESET
CD DIRECT PLAY
D
I
G
I
T
A
L
T
U
N
I
N
G
D
I
G
I
T
A
L
T
U
N
I
N
G
+
-
TAPE
PLAYBACK/RECORD
1
TAPE
PLAYBACK
2
AUTOMATIC RECORD LEVEL AUTO STOP MECHANISM
ONE TOUCH RECORDING
CONTINUOUS PLAY 2>1
TAPE DUBBING 2>1
S
I
M
U
L
T
A
N
E
O
U
S
P
L
A
Y
A
N
D
L
O
A
D
S
Y
S
T
E
M
D
I
S
C
1
D
I
S
C
2
D
I
S
C
3
D
I
S
C
4
D
I
S
C
5
PRESET left and
right arrow
buttons
PRESET EQ
button
TOCOM 15834200
V
O
L
U
M
E
C
O
N
T
R
O
L
P
R
E
S
E
T
E
Q
DISC SKIP
OPEN/CLOSE
CD
TUNER
TAPE
BAND
PHONES
POWER
STANDBY
PROG/SET
DEMO/
DIMMER
FM ST./
MONO
CLOCK
TIMER
ON/OFF
INTRO SHUFFLE REPEAT
BASS
BOOST
CD DIRECT PLAYPRESET
CD DIRECT PLAY
D
I
G
I
T
A
L
T
U
N
I
N
G
D
I
G
I
T
A
L
T
U
N
I
N
G
+
-
TAPE
PLAYBACK/RECORD
1
TAPE
PLAYBACK
2
AUTOMATIC RECORD LEVEL AUTO STOP MECHANISM
ONE TOUCH RECORDING
CONTINUOUS PLAY 2>1
TAPE DUBBING 2>1
S
I
M
U
L
T
A
N
E
O
U
S
P
L
A
Y
A
N
D
L
O
A
D
S
Y
S
T
E
M
D
I
S
C
1
D
I
S
C
2
D
I
S
C
3
D
I
S
C
4
D
I
S
C
5
PROG/SET
button
CLOCK button VOLUME up and
down button
BASS BOOST buttonTIMER ON/OFF button
Setting the Time
1. Press and hold the CLOCK button until the hour flashes.
2. Press the PRESET left or right arrow button to set the hour.
3. To change to the minutes, press CLOCK.
4. To set the minutes, press the PRESET left or right arrow
button.
5. When finished, press the PROG/SET button to set the time.
Using the Equalizer
To get the best sound quality from your audio system, you’ll
want to use the equalizer, or EQ. You can either use the preset
EQ settings (Flat, Rock, Pop, and Jazz), or customize the mid-
range, bass, and treble settings for your personal preference.
Question and Answer IconNeed help?

Do you have a question about the RCA RS1286B and is the answer not in the manual?

RCA RS1286B Specifications

General IconGeneral
BrandRCA
ModelRS1286B
CategoryStereo System
LanguageEnglish

Summary

Helpful Tips to Get You Started

Speaker and Antenna Setup

Covers connecting speakers and positioning antennas for optimal reception.

Equalizer and Sound Settings

Details EQ presets, custom adjustments, and bass boost for sound customization.

Time and Timer Configuration

Instructions for setting the clock and configuring the timer functions.

Remote Control Limitations

Notes on remote operation for tape player functions and other limitations.

Installation

AM Loop Antenna Connector

Identifies the connection point for the AM loop antenna.

Main Speaker Jacks

Identifies the jacks for connecting the main speakers.

FM Antenna

Identifies the connection point for the FM antenna.

Power Cord

Identifies the connection point for the power cord.

Ventilation Guidelines

Specifies required spacing for proper air circulation around the unit.

Controls & Indicators

CD Player Controls

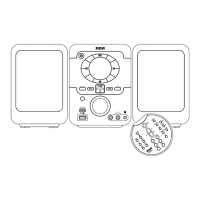
Describes CD player buttons like OPEN/CLOSE, DISC SKIP, and playback controls.

Tape Player Controls

Details buttons for tape functions like PLAY, RECORD, REWIND, and STOP/EJECT.

Remote Control Overview

Lists functions of buttons on the remote control for various operations.

System Operation Tips

Provides tips for standby mode, mode selection, and display indicators.

Display

Display Modes and Brightness

Covers demonstration mode activation and display brightness adjustment.

Clock and Timer Settings

Details setting the clock, activating the timer, and setting the timer duration.

Sleep Mode Operation

Instructions for setting the automatic power-off timer for sleep mode.

Sound Features

Preset Equalizer Curves

Explains how to use pre-programmed EQ settings like Flat, Rock, Pop, and Jazz.

Creating a Custom Curve

Details manual adjustment of bass, mid, and treble levels for custom sound.

Boosting the Bass

How to activate the bass boost feature for enhanced low frequencies.

Muting Audio

How to temporarily mute the sound output using the remote control.

CD Player Operations

Loading and Playing CDs

Procedures for inserting, playing, pausing, and stopping CDs.

Playback Modes

Covers shuffle, repeat, intro, and sampling tracks for varied playback.

CD Programming

Details setting up, displaying, and deleting custom track programs.

Disc Navigation

How to skip discs and search within tracks for easy access.

Tuner Operations

Band Selection and Tuning

Covers choosing AM/FM bands and tuning to stations manually.

Preset Station Management

Details using, setting, and auto-programming preset radio stations.

FM StereoMono Setting

How to toggle between FM stereo and mono reception for clarity.

Tape Player Functions

Basic Tape Playback

Instructions for inserting and playing cassette tapes from either deck.

Continuous and Copy Playback

Covers sequential playback and tape-to-tape copying between decks.

Recording Audio Sources

Details recording from Tuner and CD sources onto tape.

Troubleshooting Tips

Power and Sound Issues

Solutions for system not turning on and no sound output.

Radio Reception and CD Problems

Solutions for poor radio reception and CD playback errors.

Tape and Remote Control Issues

Solutions for distorted tape recordings and non-functional remote controls.

Maintenance and Cleaning

System Exterior Cleaning

How to clean the unit's outer surfaces with a soft cloth.

CD Player Maintenance

Safety precautions and lens cleaning procedures for the CD player.

Tape Player Head Cleaning

Steps for cleaning tape player internal components like heads and rollers.

More Information

Tape Handling Tips

Advice on protecting tapes and managing slack for longevity.

Safety and Usage Guidelines

Covers general safety, headset use, copyright, and legal operation.

Battery and Technical Details

Information on remote batteries and product technical specifications.

Limited Warranty (For US)

Warranty Coverage

Details what the warranty covers and for how long after purchase.

Obtaining Service

Instructions on how to get repair service under warranty.

What Warranty Does Not Cover

Lists exclusions from warranty coverage, such as misuse or normal wear.

Warranty Limitations and State Law

Legal disclaimers, limitations, and state-specific warranty rights.

Limited Warranty (For Canada)

Warranty Coverage (Canada)

Details what the warranty covers and for how long after purchase.

Obtaining Service (Canada)

Instructions on how to get repair service under warranty in Canada.

What Warranty Does Not Cover (Canada)

Lists exclusions from warranty coverage in Canada.

Provincial Laws and Warranty

Explains how provincial laws relate to warranty coverage.

Related product manuals