Programmable Antenna Rotator
VH226E User's Manual
Important Information
Important Safety Instructions
1. Read these instructions.
2. Keep these instructions.
3. Heed all warnings.
4. Follow all instructions.
5. Do not use this apparatus near water.
6. Clean only with dry cloth.
7. Do not block any ventilation openings. Install in accordance with the manufacturer’s
instructions.
8. Do not install near any heat sources such as radiators, heat registers, stoves, or other apparatus
(including ampliers) that produce heat.
9. Do not defeat the safety purpose of the polarized or grounding-type plug. A polarized plug
has two blades with one wider than the other. A grounding type plug has two blades and a
third grounding prong. e wide blade or the third prong are provided for your safety. If
the provided plug does not t into your outlet, consult an electrician for replacement of the
obsolete outlet.
10. Protect the power cord from being walked on or pinched particularly at plugs, convenience
receptacles, and the point where they exit from the apparatus.
11. Only use attachments/accessories specied by the manufacturer.
12.Use only with the cart, stand, tripod, bracket, or table specied by the manufacturer, or sold with
the apparatus. When a cart is used, use caution when moving the cart/apparatus combination to
avoid injury from tip-over.
13. Unplug this apparatus during lightning storms or when unused for long periods of time.
14. Refer all servicing to qualied service personnel. Servicing is required when the apparatus
has been damaged in any way, such as power-supply cord or plug is damaged, liquid has been
spilled or objects have fallen into the apparatus, the apparatus has been exposed to rain or
moisture, does not operate normally, or has been dropped.
Care and Maintenance
• Always use a soft cloth to clean the speaker and transmitter. Never use any product containing alcohol
or other solvents as they may damage the surface.
• Use caution when plugging the power transformers in an AC outlet to avoid the risk of electric shock.
• If the speaker are used outside on a deck or patio, make sure you take them indoors in the event of a
rainstorm to prevent possible damage.
• Do not operate or store the system in extreme temperatures.
CAUTION: Please keep the unit in a good ventilation environment. Do not install the equipment
in a conned space, such as a book case or similar unit.
For PLUGGABLE EQUIPMENT, the socket-outlet shall be installed near the equipment and shall
be easily accessible.
Do not use this apparatus near water.
e apparatus shall not be exposed to dripping or splashing or placed nearobjects lled with
liquids.
No naked ame sources, such as lighted candles, should be placed on the apparatus.
Only use attachments/accessories specied by the manufacturer.
Use only with the cart, stand, tripod, bracket, or table specied by the manufacturer, or sold
with the apparatus. When a cart or rack is used, use caution when moving the cart/apparatus
combination to avoid injury from tip-over.
WARNING: Please refer the information on exterior bottom enclosure for electrical and safety
information before installing or operating the apparatus.
FCC Statement
is device complies with Part 15 of the FCC Rules. Operation is subject to the following two conditions:
1) is device may not cause harmful interference, and 2) is device must accept any interference
received, including interference that may cause undesired operation.
Note: is equipment has been tested and found to comply with the limits for a Class B digital
device, pursuant to part 15 of the FCC Rules. ese limits are designed to provide reasonable
protection against harmful interference in a residential installation. is equipment generates,
uses, and can radiate radio frequency energy and, if not installed and used in accordance with
the instructions, may cause harmful interference to radio communication. However, there is no
guarantee that interference will not occur in a particular installation. If this equipment does cause
harmful interference to radio or television reception, which can be determined by turning the
equipment o and on, the user is encouraged to try to correct the interference by one or more of
the following measures:
• Reorient or relocate the receiving antenna.
• Increase the separation between the equipment and receiver.
• Connect the equipment into an outlet on a circuit dierent from that to which the receiver is
connected.
• Consult the dealer or an experienced radio/TV technician for help.
Caution: Changes or modications not expressly approved by VOXX Accessories Corporation
could void the user’s authority to operate the equipment.
Industry Canada Regulatory Information Avis d’Industrie Canada
CAN ICES-3 (B)/NMB-3 (B) CAN ICES-3 (B)/NMB-3 (B)
Product Information
Keep your sales receipt to obtain warranty parts and service and for proof of
purchase. Attach it here and record the serial and model numbers in case you
need them. These numbers are located on the product.
Model No.: ______________________________________________________________
Purchase Date: __________________________________________________________
Dealer/Address/Phone: ___________________________________________________
IMPORTANT SAFETY INSTRUCTIONS
PLEASE READ AND SAVE FOR FUTURE REFERENCE
is is class II equipment designed with double or reinforced insulation so it does
not require a safety connection to electrical earth (US: ground).
Plugging in for power AC OUTLET POWER SUPPLY: 120 V ~ 60 Hz
e AC power plug is polarized (one blade is wider than the other) and only ts
into AC power outlets one way. If the plug will not go into the outlet completely,
turn the plug over and try to insert it the other way. If it still does not t, contact
a qualied electrician to change the outlet, or use a dierent one. Do not attempt
to bypass this safety feature.
Installing the Outdoor Drive
Unit
Step 1: Attach cable to the drive unit
1. Run cable (not included) to the drive unit.
IMPORTANT: Up to 150’ (46m) of 22AWG 3
conductor cable may be used. For longer runs, use heavier
gauge wire.
2. Unscrew the single screw on the bottom door. Swing
the door open.
3. Insert the cable through the grommet on the side of
the drive unit.
4. Separate the cable leads for 1.5”(4cm) and strip o the
insulation for 0.5”.
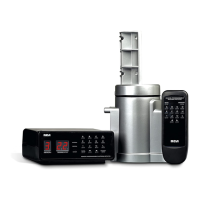
Unpacking
Make sure the following pieces are in the box:
(1) Drive unit
(1) Control unit
(1) Remote control
Hardware kit:
(2) U Bolts
(5) Rotor-Mounting Bolts
(3) Short Brackets
(1) Long Bracket (with guy-wire holes)
(10) Nuts
(8) Washers
Note: Bolts require a 10mm or adjustable wrench (not
included).
continues on next page...
e MAINS plug is used as the disconnect device, the disconnect device shall
remain readily operable.
WARNING:
TO PREVENT FIRE
OR ELECTRICAL
SHOCK HAZARD, DO
NOT EXPOSE THIS
PRODUCT TO RAIN
OR MOISTURE.