Fig 3.5
SPECIAL NOTE FOR FIRST TIME USE:
When powering up the unit for the rst time it will be necessary to
clear the memory before entering any Station (Event) times. If this is not
done the unit will not operate correctly. To do this use option 4 in the
menu. Refer to the section on “Clearing the Memory”.
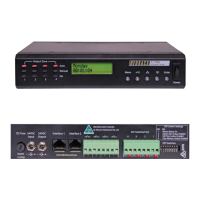
Navigate to the “Add or Edit a Station Time” Sub Menu as shown in Fig 3.3. If this is the rst time entering this menu the
screen should appear as shown in Fig 3.6. The number “1)” shown is the Station (or Event) number which is highlighted
by a ashing cursor.
3.1.2 Add or Edit A Station Time
This option allows the user to enter the Station (Event ) information which includes the event “Turn on time”, “Duration”
and “Output Zone”.
If this is the rst time an Event has been entered the memory will need to be “Cleared” rst. To do this follow the
directions in the section “Clearing the Memory”.
Start @ 00:00:00
Fig 3.6
To set a Zone manually, scroll to the desired zone using the up and down buttons as shown in Fig 3.5 and then press
“Enter” when you reach your selection. When nished scroll to the “Exit Manual Zone Selection” screen and press
“Enter” or press the “Menu” button to exit at any time. (NOTE: For the unit to continue in “AUTO MODE” you must exit
back to the Main Screen.)
SPECIAL NOTE:
If power is removed, all outputs will switch off and all zones will
return to Auto mode once power is restored.
 Loading...