Do you have a question about the Redline Tuning 21-11037 and is the answer not in the manual?
Ensure all QuickLIFT system components are present before installation begins.
Gather necessary tools, including 13mm and 10mm socket wrenches.
Mount the ball-stud assemblies on the left and right sides of the hood frame as per instructions.
Securely attach ball-studs and washers to the vehicle's fender bolt locations.
Connect the gas springs to the lower ball studs, ensuring the locking mechanism is engaged.
Firmly attach the large end of the gas springs to the hood's ball stud.
The Redline Tuning QuickLIFT system is a bolt-in solution designed to enhance the functionality and convenience of the hood on 2020+ Ford Escape vehicles. This system replaces the traditional hood prop rod with a pair of gas springs, allowing for effortless and automatic hood opening and holding.
The primary function of the QuickLIFT system is to provide a smooth, controlled, and hands-free operation for opening and holding the vehicle's hood. Instead of manually propping the hood open with a rod, the gas springs automatically lift and secure the hood in the open position, making engine bay access significantly easier and safer. This is particularly beneficial for routine maintenance, inspections, or any task requiring prolonged access to the engine compartment. The system ensures that the hood remains securely open, preventing accidental closure and potential injury. When closing the hood, the gas springs provide a controlled descent, preventing it from slamming shut.
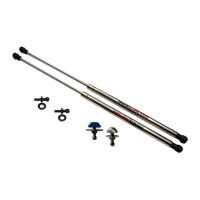
The QuickLIFT system is designed for straightforward installation and intuitive use. The installation process involves several key steps, beginning with unpacking and verifying the contents, which include two gas springs, a silver hood-insert assembly for the right side, a blue hood-insert assembly for the left side, two shock tower ball-studs/washers, and printed color instructions.
The first step in installation involves installing the hood ball-stud system. This includes threading a ball-stud approximately halfway into a ball-stud retainer, leaving 4-5 visible threads. The blue retainer is fed into the left hole on the left side of the hood's frame, ensuring it is inserted vertically and centered. The ball-stud is then hand-tightened clockwise while lightly pulling on the conical washer to prevent spinning. Finally, it is tightened to 15 ft/lbs using a 13mm socket wrench. The same process is repeated for the smaller silver insert on the right side of the hood. This meticulous process ensures a secure and properly aligned mounting point for the gas springs.
Next, the ball-studs are installed on the vehicle's fender. This requires removing the fender bolt closest to the cowl using a 10mm socket. The supplied ball-stud and washer are then securely tightened in this location using a 13mm socket. This step is also repeated for the right side of the vehicle, establishing the lower mounting points for the gas springs.
Once the ball-studs are in place, the gas springs are installed onto the lower ball-studs. This involves ensuring the slide-lock on the gas spring is in the open (up) position. The open end of the socket is then firmly pressed onto the ball-stud. To secure the gas spring, the locking mechanism is slid over the ball-stud, ensuring the locking clip slides all the way over the ball-stud. This is a critical step to prevent the gas spring from freeing itself. An important safety note is emphasized: when the hood is lowered, the sliding lock must be on top, aiming up or toward the windshield, to prevent it from dislodging. This ensures the gas spring remains securely attached even when not under tension.
The final step in installation is attaching the gas springs to the hood ball-stud. This is done by firmly snapping the large end of the gas spring onto the hood ball-stud. Once both gas springs are installed, the system is ready for use, providing automatic hood lifting.
The system is designed to be user-friendly, requiring minimal effort to open the hood. The gas springs take over the lifting, making it an ideal solution for individuals who frequently access their engine bay or those who prefer a more modern and convenient hood operation. The "bolt-in" nature of the system implies that it uses existing mounting points or requires minimal modification, making it accessible for DIY enthusiasts.
While the QuickLIFT system is generally low-maintenance, the manual provides crucial information regarding the removal of gas springs, which can be considered a maintenance-related feature or a step for potential replacement or servicing. To remove a gas spring, a small flat blade screwdriver is slid under the metal c-clip on the back of the end-fitting. The screwdriver is then slowly twisted and pulled to detach the gas spring from the ball-stud while prying the c-clip. It is explicitly stated not to remove the c-clip entirely. Once the gas spring pops off the ball-stud, the c-clip should be pressed back into position, making the gas spring ready for reinstallation. This detailed instruction ensures that removal can be performed without damaging the components, facilitating any necessary maintenance or replacement of the gas springs over time. The robust design of the ball-studs and locking mechanisms suggests a durable system built for long-term performance. Regular checks of the locking clips and ball-stud connections would be prudent to ensure continued secure operation, although not explicitly stated as a required maintenance task. The use of high-quality materials, such as the gas springs and metal fittings, contributes to the system's longevity and reduces the need for frequent maintenance.
| Placement on Vehicle | Hood |
|---|---|
| Brackets Material | Steel |
| Color | Black |
| Material | Steel |
| Installation | Bolt-on |
| Model Number | 21-11037 |
| Category | Automobile Accessories |
| Gas Spring Material | Steel |
| Finish | Black |
| Includes | Gas Springs, Brackets, Hardware |
| Warranty | Lifetime |