This document describes the H818 2.4G Wireless gaming headset, providing instructions for its operation, pairing, charging, and connection to various devices such as PC, PS4, and Xbox ONE.
The headset package includes the Pelops Headset, a Transmitter, a Type-C USB-USB cable, and a 3.5(4P)-3.5(4P) Audio cable.
Transmitter Features:
The transmitter has a simple interface with three key elements:
- Working indicator: This LED indicates the operational status of the transmitter.
- Mute indicator: This LED shows whether the microphone is muted.
- USB plug: Used for connecting the transmitter to a device.
- Red/Blue LED flashes: Indicates the transmitter is disconnecting.
- Blue LED ON: Indicates the transmitter is connected and the microphone is ready.
- Red LED ON: Indicates the microphone is muted.
- Red LED flashes: Indicates the headset is out of power.
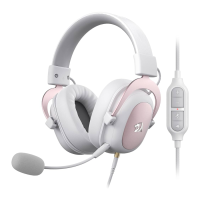
The headset features several buttons and ports for comprehensive control:
- Volume +: Increases the audio volume.
- Volume -: Decreases the audio volume.
- Stereo, Virtual 7.1 mode switch button: Toggles between stereo and virtual 7.1 surround sound modes. A single "di" tone indicates virtual 7.1 mode, while two "di" tones indicate stereo mode.
- Pairing/Microphone Mute/ON switch:
- Press and hold for 3 seconds to initiate pairing.
- Press and hold for 1 second to mute/unmute the microphone or to turn the headset ON.
- AUX 3.5mm headset port: Allows for wired connection using the 3.5mm audio cable.
- Charge indicator/working indicator: Shows the charging status and operational status of the headset.
- Type-C charging port: Used for charging the headset.
- Power button: Turns the headset ON/OFF. This button is inactive when the headset is in wired connection mode.
Charging the Headset:
To charge the headset, plug the Type-C USB-USB Cable into the charging port on the headset. Then, connect the other end of the cable to a USB port (DC 5V). The indicator at the charging port will light up red, and a full charge takes approximately 5 hours.
Pairing the Headset:
- Ensure both the headset and transmitter are turned off.
- Turn on the headset; its indicator light will flash.
- Press and hold the headset pairing button for 3 seconds; the indicator light will flash.
- Turn on the transmitter by plugging it into a PC or PS4.
- The headset and transmitter will pair automatically, and their indicators will turn solid blue.
Headset Operation:
- Connect the transmitter to a PC or PS4; the indicator light will flash.
- Turn on the headset. It will automatically pair with the transmitter. The indicators on both the headset and transmitter will light up steadily blue upon successful pairing. If pairing fails, the indicators will flash.
- Adjust volume using the Volume +/- buttons.
- The microphone is ON by default. To mute it, press the pairing/mute button (the indicator light will turn red). Press it again to unmute (the indicator light will turn blue).
- The headset defaults to stereo sound. Press button 3 to switch to virtual 7.1 sound (indicated by a single "di" tone). Press it again to switch back to stereo sound (indicated by two "di" tones).
- When the headset battery drops to 3.5V, the low power indicator will flash red, and the headset and transmitter will emit an alarm. The headset indicator will flash blue, and the transmitter indicator will flash red, signaling that it's time to charge.
Connecting to PS4:
- Plug the Type-C transmitter into the PS4 and ensure it is securely fixed to prevent disconnection.
- PS4 Audio Output Settings:
- Navigate to "Settings" on the main menu.
- Find "Device" in settings.
- Find "Audio devices" within "Device."
- Find "Output to headphones" in "Audio devices."
- Select "All audio" from "Output audio."
Connecting to Xbox ONE:
- Connect the headset to the Xbox ONE gamepad using the 3.5mm audio cable. In this wired connection status, the headset's power control button will be inactive.
- Xbox ONE Audio Output Settings:
- Click "All settings" in the main menu.
- Click "Display & sound" in settings.
- Click "Volume."
- Click "Chat mixer" for setting.
- Click "Do nothing" in the chat mixer.
Connecting to PC:
- Plug the USB adaptor into the transmitter (B+C), then plug it into the computer. Ensure there are no obstructions between the transmitter and headset.
- Windows OS Setting (e.g., Windows 7):
- Turn on the headset and pair it with the computer via the transmitter. The indicator light will turn on.
- If there is no sound when playing music from the PC, locate the "digital output" icon on the taskbar (bottom right of the desktop).
- Right-click the icon to open sound device settings.
- Click "play" (left mouse button) as shown in picture 3.
- Select "2.4G wireless headset" as shown in picture 4.
- Set the headset as "default devices" as shown in picture 5.
- Click "Record" as shown in picture 6.
- Select "2.4G wireless mouse" at the microphone setting as shown in picture 7.
- Set "2.4G wireless mouse" as the default device.
Maintenance Features:
- Charging indication: The red LED on the charging port indicates charging status.
- Low power alarm: The headset and transmitter provide visual (flashing red/blue LEDs) and audible alarms when the battery is low, prompting timely charging.
- Wired mode: The ability to connect via a 3.5mm audio cable ensures continued use even when the battery is depleted or wireless connection is not desired (e.g., with Xbox ONE). In wired mode, the power button is disabled, simplifying operation.