Do you have a question about the Redsbaby NUVO and is the answer not in the manual?
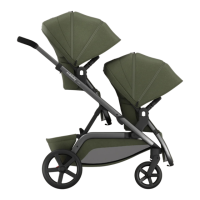
NUVO Pram grows with family across 18 configurations, from single to double and third on buggyboard.
Keep this document for future reference. It contains important information.
Regularly inspect locking devices, brakes, harness, catches, adjusters, joints, and fixings for proper working order.
Avoid alcohol-based products on leatherette. Do not use dryer. Ensure product is dry before storing.
Sponge clean plastic/metal parts with mild detergent. Rinse frame parts exposed to salt water immediately.
Redsbaby NUVO is designed to comply with AS 2088:2022 and CPN No.8 of 2007.
Read warnings, follow assembly, discard packaging, use safety features (tether, brakes, harness).
Always apply brakes when stationary, secure child, do not leave unattended, avoid moving parts, ensure fold locks.
Do not carry extra children/bags. Follow instructions. Disconnect straps when not in use.
Beware harness loops, use tether strap, avoid stairs/escalators, fire hazards, and do not mix models.
Check weight limits for buggyboard, bassinet, seat. Do not use for unsupervised sleeping.
Exercise care during folding/unfolding. Avoid overloading and non-approved accessories. Do not hang bags on handles.
NUVO can be used for three children with seats/bassinets/buggyboard. Ensure correct configuration.
Vehicle may tip on slopes. Take care on uneven surfaces. Do not allow child to stand in seat.
Load primary child first. Do not place child in lower seat without primary child. Push with two hands. Avoid stairs/escalators.
Bassinet: 9kg (19.8 lbs). Seat: 22kg (48.5 lbs).
Bassinet: 9kg. Upper seat: 20kg. Lower seat: 17kg.
Basket: 12kg. Buggyboard: 20kg. Baby capsule: 13kg.
This section details the various ways the NUVO pram can be configured for different family needs.
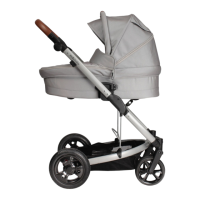
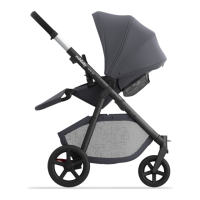
Shows bassinet in upper and middle parent-facing positions on the pram frame.
IMPORTANT: DO NOT use the capsule in the upper position in single mode as it may cause the pram to become unstable.
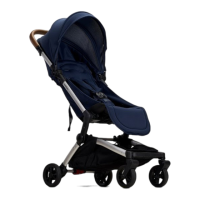
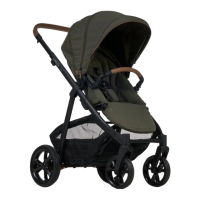
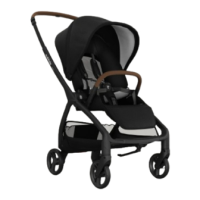
Shows seat in upper parent-facing, middle parent-facing, and middle world-facing positions.
ONLY USE THE CAPSULE IN THE MIDDLE POSITION.
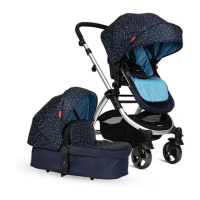
Illustrates double bassinet configurations: upper/lower parent-facing and upper parent-facing/lower world-facing.
Illustrates double seat configurations: upper/lower parent-facing and upper/lower world-facing.
Shows capsule with seat/bassinet in double mode. Note: Some capsules are not compatible.
Shows examples of triple configurations using seats, bassinets, and a buggyboard.
Lists all parts of the NUVO pram with corresponding numbers for easy identification.
Visual diagrams with numbered callouts to identify pram components.
Illustrates pram positions (Upper, Middle, Lower) and frame adaptors.
Diagram showing labels for Bumper Bar, Bassinet Apron, Base Fabrics, and Canopy.
Steps to unfold the pram frame and ensure it locks into place.
Instructions for basket attachment/removal and identification of the brake component.
Instructions for securely attaching front and rear wheels to the pram frame.
Steps to attach base fabric, support rods, mattress, and apron to the bassinet frame.
Repeat assembly steps on the head end of the bassinet frame.
Instructions to insert support rods into the keyholes on the bassinet frame.
Pull support rods backwards to lock them in place, ensuring rigidity.
Steps for positioning mattress, zipping apron, and attaching canopy and bumper bar.
Instructions for removing canopy, bumper bar, mattress, lining, and base fabric from the frame.
Steps to attach seat back fabric and foot rest fabric to the bassinet/seat frame.
Instructions to feed piping of seat fabric through channels on the bassinet/seat frame.
Feed side A of foot rest fabric through the channel on the left side of the bassinet/seat frame.
Secure press snaps on the bottom of the seat pad to the base of the seat fabric.
Instructions to remove canopy, bumper bar, harness, seat pad, and seat fabrics from the frame.
Click canopy clips into frame and secure elastic loop. Pull upwards to remove.
Click bumper bar into frame. Press buttons underneath to remove.
Warning against using single seat world-facing in upper position due to tipping risk.
Upper/middle frame adaptors do not need removal to fold the pram.
Instructions to open frame and apply brake before using adaptors.
Secure adaptors into upper or middle positions on the pram frame.
Click bassinet or seat into the attached upper/middle frame adaptors.
This section covers essential operations and features for using the NUVO pram.
Steps to place frame on ground, release fold lock, and lift handlebar until frame locks.
Instructions to put brake on, slide latches, and fold frame until lock engages.
Upper/middle frame adaptors do not need removal to fold the pram.
Ensure seat is upright, put brake on, and fold seat in half by lifting foot rest.
Slide frame latches, lower pram, use recline lever, and ensure fold lock engagement.
Always lift and carry the frame using two hands and ensure the frame fold lock is engaged.
Press brake downwards to engage. Press foot forward or flick upwards to release.
Rotate switches at the back of the front wheel housing to lock or unlock.
Push button on inside of handlebar and adjust to the desired height.
Insert harness clips into buckle to lock. Press button in middle to release.
Adjust shoulder, waist, and crotch straps to achieve a secure and proper fit for the child.
Lift the seat recline lever upwards and move the seat into the desired position.
Push connectors on frame sides and lift the bassinet/seat upwards.
Secure bassinet/seat into adaptors and check lock indicators for safety.
Remove seat, turn to desired direction, and secure back into adaptors. Check lock indicators.
Pull the foot rest lever upwards and adjust to the desired height.
Attach the tether strap to your wrist at all times when using the NUVO pram.
Product has a 24-month warranty, extendable to 36 months by online registration.
Entitled to replacement/refund for major failure and repair/replacement for unacceptable quality.
Cease use on fault, make claim within period. Redsbaby covers repairs/replacements and shipping within Australia.
Visit website to complete claim form or contact Customer Care for assistance.
Strive to use resources and make sustainable decisions to safeguard the planet for future generations.
| Adjustable Handlebar | Yes |
|---|---|
| Reversible Seat | Yes |
| Harness | 5-point |
| Maximum Weight Capacity | 22 kg |
| Frame Material | Aluminium |
| Canopy | Yes |
| Storage Basket | Yes |
| Age Range | Birth to 4 years |