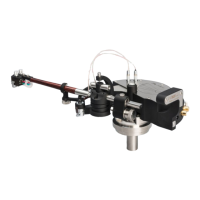
The Reed 5T is a linear tracking tonearm designed for high-fidelity audio systems, emphasizing precise tracking and minimal interference for an optimal listening experience. The device is presented as a sophisticated component for turntables, aiming to reproduce sound with exceptional clarity and detail.
Function Description
The primary function of the Reed 5T tonearm is to accurately track the grooves of a vinyl record, ensuring the stylus maintains a consistent tangent to the record's radius across its entire surface. This linear tracking mechanism minimizes tracking error, a common issue with pivoted tonearms, which can introduce distortion and wear on both the record and the stylus. By eliminating lateral tracking force, the Reed 5T aims to reduce stress on the cartridge and improve sound reproduction.
The tonearm incorporates several adjustable features to fine-tune its performance. These include Vertical Tracking Force (VTF) adjustment, Vertical Tracking Angle (VTA) adjustment, and Azimuth adjustment. These adjustments allow users to optimize the tonearm's interaction with various cartridges and records, ensuring the stylus is correctly aligned and exerting the appropriate force.
The Reed 5T also features a unique laser-based tracking system. This system uses a laser to monitor the tonearm's position relative to the record groove, providing feedback for precise linear movement. The laser sensor grid helps maintain the tonearm's tangency, and indicator lights (green for optimal, red for error) provide visual cues for correct operation and potential issues.
Important Technical Specifications
While specific numerical technical specifications like dimensions, weight, or materials are not explicitly detailed in the provided manual, the functional descriptions imply several key technical aspects:
- Linear Tracking Mechanism: The core of the Reed 5T's design, ensuring the stylus moves in a straight line across the record, eliminating tracking angle error inherent in pivoted designs.
- Laser-Based Tracking System: Utilizes a laser and sensor grid to monitor and guide the tonearm's linear movement, enhancing tracking accuracy.
- Adjustable VTA: Allows for precise vertical height adjustment of the tonearm to match the cartridge's rake angle with the record groove, crucial for optimal sound and minimizing wear. The VTA adjuster features a fixing screw and can be rotated half-turn counter-clockwise for release and full-turns for adjustment.
- Adjustable VTF: The vertical tracking force can be adjusted to suit different cartridges, ensuring the correct downforce for optimal tracking and sound. This involves adjusting a fixing bolt and a counterweight frame.
- Adjustable Azimuth: Enables fine-tuning of the cartridge's lateral tilt, ensuring the stylus is perfectly perpendicular to the record surface, which is vital for channel separation and imaging. This adjustment involves loosening and tightening screws on the armwand cylinder.
- Armwand Options: The manual mentions "pivoted armwand" and "armwand base," suggesting modularity or different configurations for the armwand itself. The armwand cylinder [3] and armwand base [2b] are key components.
- Power Supply: The Reed Source 12V power supply is required for the laser tracking system. It connects to the tonearm via cables for the Phono and Laser connectors [4a] and [4b].
- Mounting: The tonearm is designed to be mounted onto a turntable using a mounting drawing, template, and protractor. It requires drilling three 4.2 mm holes and threading them with M3 screws for secure attachment.
Usage Features
The Reed 5T offers several user-friendly features and operational guidelines:
- Unpacking and Assembly: The manual provides detailed steps for unpacking the tonearm components, including the top packaging layer, template, armwand base, and tonearm body. It emphasizes careful handling and warns against permanent damage during assembly.
- Mounting: Clear instructions are given for mounting the tonearm onto a turntable, including using a template for precise hole drilling and positioning. The template [1] is crucial for correct placement.
- VTA Adjustment: The VTA adjuster [1] can be released by turning a 2.5 mm Allen key and then adjusted by rotating it half-turn counter-clockwise for coarse adjustments and full-turns for fine-tuning. This allows users to lift or lower the tonearm body [3] until it is level.
- Tonearm Placement: The tonearm base [3a] should be freely rotating around its axis [5] when mounting holes match, indicating correct placement.
- Bearing Protection Strips: The manual highlights the importance of removing bearing protection strips [1a] and [1b] from the armwand and checking horizontal axis bearings [1c] and [1d] for correct position. It explicitly states that these strips must be placed back while transporting the tonearm to prevent damage.
- Vertical Axis Bearing Adjustment: Instructions are provided for screwing out the top bearing of the vertical axis from the bearing protection. The hex (Allen) key s=2.5 mm and screw bearing in place [1b] must be screwed in sapphire cup.
- Cable Connection: Instructions for plugging tonearm's cables to the Phono and Laser connectors [4a] and [4b] are provided, along with a warning about not applying excessive force.
- Template Ruler: A template ruler [1] with a hole [2] is used to check the tonearm setup, ensuring the tonearm is aligned with the hole with a maximum allowed deviation of +/-1mm.
- Cartridge Attachment: Instructions for attaching a cartridge to the headshell are included.
- Counterweight Adjustment: Steps for adjusting the counterweight [4] are detailed, including taking out the counterweight, adjusting the required weight (30 g or 45 g), and screwing the counterweight back onto the holder [3].
- Micro-lift: The tonearm features a micro-lift for gently raising and lowering the tonearm onto the record.
- Power On/Off: The Reed Source 12V power supply [1] is connected to the tonearm. A green light [2] indicates power to the tonearm, while a red light [2] indicates an issue. The tonearm can be turned on/off by pressing a button [1].
- Laser Tracking Feedback: Green light [2] on the tonearm indicates active guidance, while a blinking green light means the tonearm is ready but not yet actively guided. A blinking red light indicates an overload or error.
- Safety Warnings: The manual includes warnings about not applying excessive force, not touching the armtube during operation, and being careful with wire connectors. It also states that the tonearm is designed not to damage LP or cartridge, unlike conventional tonearms with antiskating mechanisms.
Maintenance Features
The Reed 5T manual outlines several maintenance and adjustment procedures:
- Armtube Replacement: Detailed steps are provided for replacing the armtube [2]. This involves taking off the counterweight [2], disconnecting the armtube cable, holding the armwand cylinder [3], unscrewing [4a] and [4b] screws, pulling out the armtube [6], inserting the new armtube, connecting the cable, and re-adjusting VTF and azimuth.
- Counterweight Holder Replacement: Instructions for replacing the counterweight holder [4] are given. This involves taking off the counterweight [2], holding the armwand cylinder [3], unscrewing [4a] and [4b] screws, pulling out the counterweight holder [4], inserting the new holder, and re-adjusting VTF.
- Loosening of Armwand Base Pad: Steps for loosening the armwand base pad [3b] are provided, involving screwing out the armwand base pad [3b] rotation limiter screw [1], making sure the thread would match tonearm body edges, and ensuring the armwand base [2b] and armwand base pad [3b] can rotate freely.
- Bearing Protection: The critical instruction to place bearing protection strips [1a] and [1b] back during transport is a key maintenance aspect to prevent damage to the delicate bearings.
- Cleaning: While not explicitly detailed, the nature of high-fidelity audio equipment implies regular cleaning of components, especially the stylus and tonearm, to maintain optimal performance.
- Troubleshooting: The manual provides guidance for interpreting the laser tracking indicator lights (green/red) as a form of self-diagnosis for operational issues. A blinking red light, for instance, indicates an overloaded tonearm operation, suggesting a need to check for obstructions or excessive force.
Overall, the Reed 5T is presented as a precision instrument for serious audiophiles, offering advanced linear tracking technology with extensive adjustability and user feedback to achieve the highest possible sound reproduction quality from vinyl records. Its design prioritizes accuracy, stability, and protection of both the record and the cartridge.