The values highlighted in grey in the table are the default settings after a reset. The speed con-
troller may have a different default setting upon delivery; in this case, observe the LED ashing
signals or the indicators on the programming card.
In addition to the ashing signal, the motor emits a short beep that is generated by a brief activa-
tion of the motor.
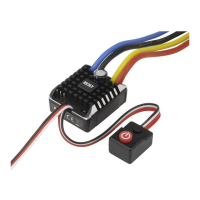
Programming special functions of the speed controller
The speed controller can be programmed using either the supplied programming card or the setup button
on the speed controller.
Depending on the vehicle in which you want to install the speed controller, you must change the
default settings.
When using LiPo rechargeable batteries to operate the vehicle, check the default setting of the
speed controller to see if the undervoltage protection is enabled. When low voltage detection is
disabled, LiPo rechargeable batteries are subject to a deep discharge that destroys them.
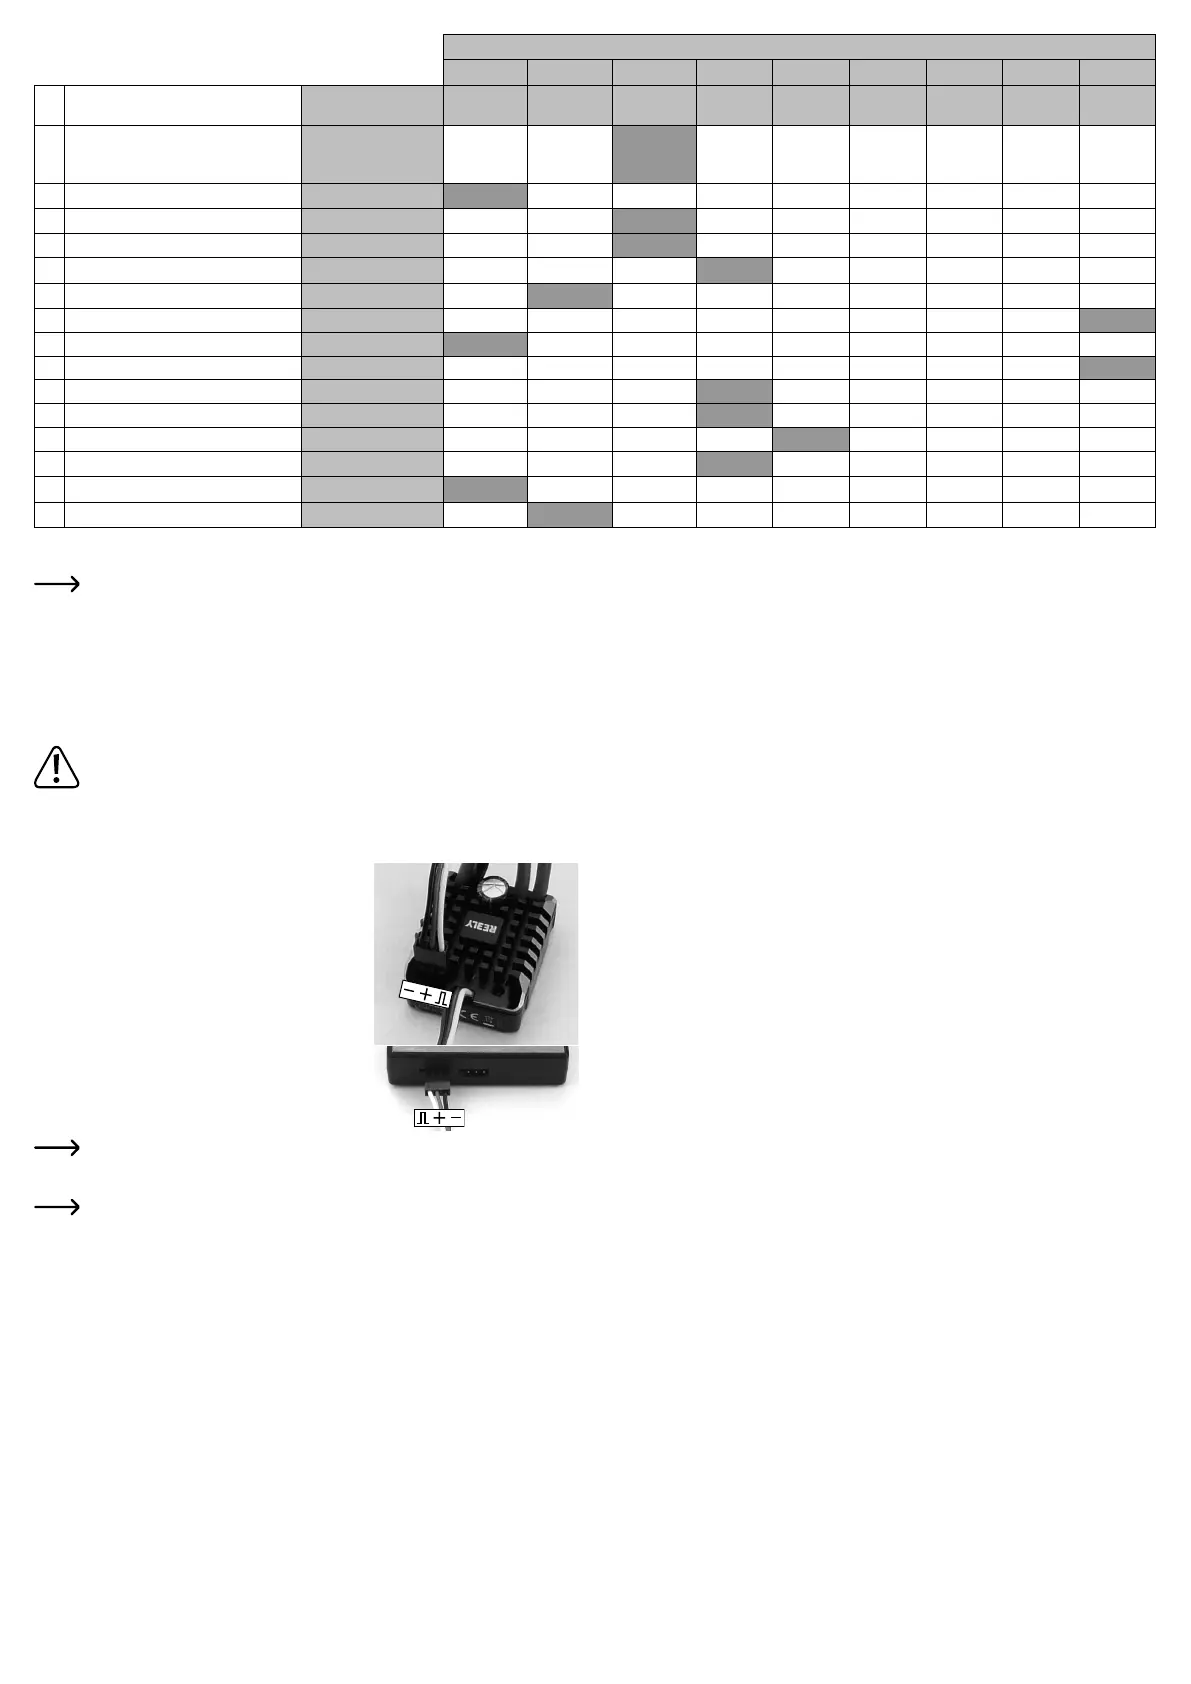
a Programming via the supplied programming card
• Connect the drive battery to the speed controller.
• Connect the three-pin header on the speed controller to the
programming card using the supplied cable.
On the speed controller, the black wire of the cable points to
the edge, on the programming card inwards, see gures on
the right.
The second three-pin connector on the programming card is
only used for power supply in cases where power is not sup-
plied via the speed controller/rechargeable battery. In this case,
you need a separate battery box (not included) with an output
voltage of 6 V/DC (4 batteries); polarity is indicated by an im-
print on the programming card.
• Turn on the speed controller (briey press the on/off button).
• The 7-segment indicators on the programming card will now
light up.
If no indicators light up on the programming card, check the connection between the speed
controller and the programming card.
• Use the “ITEM” button to select the desired programming function (1....15).
Observe the information in the table and in chapter “Overview of setup functions”.
• Use the “VALUE” button to select the setting.
• Press the “OK” button to conrm the setting.
• If you want to reset all programming functions to the default settings (highlighted in grey in the table), press
the “RESET” button.
• After you have made all settings, switch off the speed controller. Then unplug the connecting cable for the
programming card from the speed controller.
b Programming via the Setup Button
• Switch on the remote control, if not already done.
• Turn off the speed controller by pressing and holding down the on/off button for more than 0.5 seconds.
• Keep the setup button pressed and turn on the speed controller by briey pressing the on/off button.
• Keep holding down the setup button.
• The red LED on the speed controller will ash eight times and the motor will emit beeps (keep pressing
down the setup button).
• The speed controller is then in programming mode. The red LED and beeps emitted by the motor indicate
which programming function is currently selected (see table and chapter “Overview of setup functions”).
Keep the setup button pressed.
• Example: Red LED ashes twice briey and two short beeps are emitted: Select rechargeable battery
type LiPo/NiMH
• When the desired programming function you want to change is displayed (for example, select recharge-
able battery type LiPo/NiMH, red LED ashes twice briey and the motor emits two short beeps), release
the setup button.
• The red LED and the beeps now indicate the available settings.
Example: Red LED ashes once briey and one short beep is emitted: LiPo rechargeable battery type
Red LED ashes twice briey and two short beeps are emitted: NiMH rechargeable battery type
• To save the selection, turn off the speed controller by pressing and holding down the on/off button for
more than 0.5 seconds. If you then turn on the speed controller, it will be ready for operation with the
new settings.
• Follow the above steps to change the other settings.
Overview of setup functions
• Function #1, red LED ashes once briey: Driving mode
The speed controller can be switched between “forward/brake”, “forward/brake/reverse” and “forward/
reverse”. The “forward/reverse” setting is specially designed for crawler vehicles, because here you can
switch directly between forward and reverse (without applying the disturbing brake).
• Function #2, red LED ashes twice briey: Battery type
In order for the undervoltage cut-off to work properly, you must select the correct rechargeable battery
type (LiPo or NiMH).
• Function #3, red LED ashes thrice briey: Low voltage protection
If a LiPo drive rechargeable battery is used, it is essential to ensure that the low voltage protection is
enabled.
“Low” setting: NiMH voltage limit = 4.5 V/rechargeable battery pack, LiPo = 3.0 V/cell
“Medium” setting: NiMH voltage limit = 5.0 V/rechargeable battery pack, LiPo = 3.2 V/cell
“High” setting: NiMH voltage limit = 5.5 V/rechargeable battery pack, LiPo = 3.4 V/cell
If the rechargeable battery voltage falls below the specied values when the low voltage protection is
enabled, the speed controller will reduce the output power or turn off the motor. This prevents a detrimental
deep discharge.
• Function #4, red LED ashes four times briey: Start drive power when driving forward
Here you can set the amount of drive power the motor will start with when the throttle/brake lever on the
transmitter leaves the neutral position. The lower the setting, the smoother it can be started up.
• Function #5, red LED ashes once long: Maximum speed for forward drive
You can use this programming function to set the maximum speed for forward drive. For example, if you
set it at 50%, at full throttle on the transmitter the vehicle will run only about half as fast as at 100%. Espe-
cially with a crawler vehicle, this results in a very slow and sensitive driving behaviour.
• Function #6, red LED ashes once long and once briey: Maximum speed for reverse drive
You can use this programming function to set the maximum speed for reverse drive. As a rule, a speed
lower than that for forward drive is set for “normal” vehicles (buggy, monster truck...). In case of a crawler
vehicle, the same speed should be programmed for forward and reverse drive.
• Function #7, red LED ashes once long and twice briey: Maximum brake force
Higher settings can be used to achieve a greater braking delay. If the brake is disabled in function #1 (for
example, for a crawler vehicle), the setting made here is irrelevant.
• Function #8, red LED ashes once long and thrice briey: Start brake force
Here you can set the brake force for the brake function. The lower the setting, the smoother the brake is
applied. If the brake is disabled in function #1 (for example, for a crawler vehicle), the setting made here
is irrelevant.
• Function #9, red LED ashes once long and four times briey: Brake
If you release the throttle on the transmitter or move the throttle/brake lever on the transmitter back to the
neutral position, the vehicle will slow down by itself. The effect is just like the engine braking function on a
“real” car when you release the accelerator pedal without pressing the brake pedal.
• Function #10, red LED ashes twice long: Motor brake rate
Here you can set how fast the motor brake (function # 9) is applied. The lower the setting, the smoother
the motor brake is applied.
• Function #11, red LED ashes twice long and once briey: Neutral range
This programming function can be used to set the range that the electronic speed controller should detect
as the neutral position of the transmitter. The higher the setting (ms = milliseconds), the greater the neutral
range.
Available settings of the respective programming function (programming card = “VALUE” indicator)
1 2 3 4 5 6 7 8 9
#
Programming function
(programming card = “ITEM” indicator)
LED ashes (+ beeps) 1x short 2x short 3x short 4x short 1x long
1x long,
1x short
1x long,
2x short
1x long,
3x short
1x long,
4x short
1 Driving mode 1x short
Forwards/
brake
Forward/
braking/
reversing
Forward/
reverse
2 Battery type 2x short LiPo NiMH
3 Low voltage protection 3x short Off Low Middle High
4 Start drive power when driving forward 4x short 0% 2% 4% 6% 8% 10% 12% 14% 16%
5 Max. forward speed 1x long 25% 50% 75% 100%
6 Max. reverse speed 1x long, 1x short 25% 50% 75% 100%
7 Max. brake force 1x long, 2x short 0% 12.5% 25% 37.5% 50% 62.5% 75% 87.5% 100%
8 Start brake force 1x long, 3x short 0% 6.25% 12.5% 18.75% 25% 31.25% 37.5% 43.75% 50%
9 Brake 1x long, 4x short 0% 5% 10% 50% 60% 70% 80% 90% 100%
10 Motor brake rate 2x long 1 (min.) 2 3 4 5 6 7 8 9 (max.)
11 Neutral range 2x long, 1x short 0.02 ms 0.03 ms 0.04 ms 0.05 ms 0.06 ms 0.07 ms 0.08 ms 0.1 ms 0.12 ms
12 Start mode 2x long, 2x short 1 (min.) 2 3 4 5 6 7 8 9 (max.)
13 PWM frequency 2x long, 3x short 1 kHz 2 kHz 4 kHz 8 kHz 16 kHz
14 BEC voltage 2x long, 4x short 6 V 7.4 V
15 Free wheel 3x long On Off
 Loading...