UK
52
12. Next, you must accept the "Terms of Use", "Privacy Settings" and "Promotional
Information". After reading them carefully, navigate to "Accept" and press the [ ]
button.
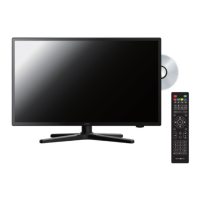
INPUT SOURCES
1. Press the [ ] key to open the "Input Source Menu".
2. Use the [ , ] keys to select the different input sources.
3. Press the [ ] key to confirm the selection.
4. The following connections are available.
ATV, DVB-T, DVB-C, DVB-S, AV, HDMI1 (ARC), HDMI2
Select this menu item if you have connected an analogue cable system
or DVB-T antenna to the connection [DVB-T2/C].
Select this menu item if you have connected a digital DVB-T antenna to
the connection [DVB-T2/C].
Select this menu item if you have connected a digital DVB-C cable
system to the connection [DVB-T2/C].
Select this menu item if you have connected a digital DVB-S antenna to
the [DVB-S2] connection.
Select this menu item if you have connected an external device (e.g.
video recorder) to the [AV OUT] connection.
(Mini AV adapter not included).
Select this menu item if you have connected an external HDMI device
(e.g. Blu Ray player) to the [HDMI1 ARC] connection.
Select this menu item if you have connected an external HDMI device
(e.g. Blu Ray player) to the connection [HDMI2].
START STATION SEARCH
1. Press the [ ] button on the remote control.
2. Select the appropriate reception mode and confirm with the [ ] key.
DVB-T
DVB-C
DVB-S
3. Now press the [ ] key and select the menu item [Program]. Then press the [ ]
key to enter the menu.
4. Navigate to the menu item [Auto Search] and press the [ ] key.
5. Select the settings according to your TV connection.
Satellite system (DVB-S): The [Preset Scan] scan mode is recommended here).