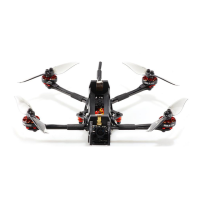
The Rekon3 FPV Racing Drone is a compact and lightweight racing drone designed for FPV (First Person View) flying, particularly suited for long-range applications. This manual provides comprehensive instructions for setup, configuration, and troubleshooting, ensuring users can effectively operate and maintain their drone.
Function Description:
The Rekon3 FPV Racing Drone is built for high-performance FPV racing and long-range flights. It integrates a flight controller, video transmitter (VTX), and motors into a durable frame, allowing for agile maneuvers and stable flight. The drone supports various receiver types and offers extensive customization options through Betaflight, a popular flight control software. Key functions include real-time video transmission, remote control via a transmitter, and the ability to adjust flight parameters, OSD (On-Screen Display) settings, and LED configurations. The drone is designed to be user-friendly, with clear instructions for driver installation, firmware flashing, and sensor calibration.
Important Technical Specifications:
- Model: Rekon3 VTX FPV Racing Drone
- Frame Kit: Rekon3 Frame Kit
- Flight Controller: Zeus5 AIO Flight Controller
- VTX: Zeus nano 350mW
- Motor: 1202.5 Motor, 1S KV11600
- Support Receiver: SBUS, DSMX, CRSF
- Input Voltage: 1S Lipo
- Weight: 62.5g
Usage Features:
Product Specifications:
The drone is a Rekon3 VTX FPV Racing Drone, featuring a Rekon3 Frame Kit, Zeus5 AIO Flight Controller, Zeus nano 350mW VTX, and 1202.5 Motors with 1S KV11600. It supports SBUS, DSMX, and CRSF receivers and operates on a 1S Lipo battery, with a total weight of 62.5g.
Interface Description:
The manual provides a detailed diagram of the flight controller's interfaces, including connections for LED, VTX, motors (MOTOR1, MOTOR2, MOTOR3, MOTOR4), camera (CAM), receiver (SBUS, S.PORT, IBUS, PPM), and power input (XT30 1S-2S LIPO INPUT). Specific pinouts for Frsky XM+, Frsky R-XSR, Frsky R9MM & R9Mini, FlySky FSA8S V2, and TBS Crossfire Nano RX receivers are illustrated.
Check the Flight Control Drive:
To ensure proper communication with the flight controller, users must install the necessary drivers. This involves:
- Long-pressing the BOOT button while connecting the USB cable to allow the system to automatically install the driver.
- If the driver fails to install, downloading and running "ImpulseRC_Driver_Fixer" to automatically install the driver.
- Opening Betaflight Configurator and entering DFU mode to proceed with firmware flashing.
Calibration Accelerometer:
Accurate accelerometer calibration is crucial for stable flight. Users should:
- Place the aircraft horizontally on a leveled surface.
- Click "Calibrate Accelerometer" in the Betaflight Setup tab.
- Click "Reset Z axis" to set the Z-axis offset.
UART Serial Port Use:
The drone utilizes UART ports for various functions:
- UART1: Used for WIFI functionality. To enable, open the CLI and enter specific commands to configure PINIO, serial settings, and pinio_config/pinio_box values, then save.
- UART2: Used for receiver connection. S5 acts as a soft serial port for video transmission (VTX) FM. CLI commands are provided to configure resource MOTOR 5 to none and resource SERIAL_TX 11 B03, then save.
WIFI Function Instruction:
The drone supports WIFI for wireless configuration via a mobile app:
- Click "Ports" in Betaflight to select ports.
- Install "Speedy Bee" on a mobile phone and connect to the drone's WIFI network (e.g., HermesXXXX).
- Connect to adjust parameters.
- A solid WIFI module light indicates a successful connection. If the light is solid but the connection is abnormal, check WIFI/Speedy Bee settings.
- Note: The Flight Controller must be powered by a battery to connect to WIFI.
Select Aircraft Model:
Users must select the correct aircraft model in Betaflight:
- Click "Configuration" and then "Mixer" to select "Quad X" as the model.
- Click "Motors" and acknowledge "I understand the risks."
- Push "Master" to check motor steering. Motor steering can be changed in BLHeliSuite.
Choose ESC Protocol:
The ESC (Electronic Speed Controller) protocol needs to be configured:
- In the ESC/Motor Features section, select "DSHOT600" as the ESC/Motor protocol.
- Options like "MOTOR_STOP" (don't spin motors when armed) and "ESC_SENSOR" (use KISS/BLHeli_32 ESC telemetry) are available.
- Set "Motor Idle Throttle Value" as needed.
Voltage and Current Parameters Setting:
Proper battery monitoring is essential:
- Click "Power & Battery" to access settings.
- Configure "Voltage Meter Source" and "Current Meter Source" (Onboard ADC).
- Set "Minimum Cell Voltage" (3.3), "Maximum Cell Voltage" (4.3), "Warning Cell Voltage" (3.5), and "Capacity (mAh)" (0).
- Adjust "Voltage Meter Scale" (110), "Divider Value" (10), and "Multiplier Value" (1).
Setting up the Receiver:
Receiver connection and configuration are critical for control:
- Refer to the receiver connection diagram for wiring SBUS, CRSF, DSMX, and PPM receivers.
- In Betaflight, click "Ports" and ensure "UART2" is enabled for "Serial Rx."
- For SBUS receivers, select "Serial-based receiver (SPEKSAT, S)" as the "Receiver Mode" and "SBUS" as the "Serial Receiver Provider."
- For CRSF receivers, select "Serial-based receiver (SPEKSAT, S)" as the "Receiver Mode" and "CRSF" as the "Serial Receiver Provider."
- Note: Configure the Serial Port via the Ports tab and choose a Serial Receiver Provider when using the RX_SERIAL feature.
VTX Serial Port Use Wiring:
The VTX (Video Transmitter) requires specific wiring and configuration:
- Refer to the 5.8G VTX connection diagram for wiring the VTX to the flight controller (RX, VID, 5V, GND, CAM).
- Enable the 5.8G VTX serial port in Betaflight, selecting the protocol according to the VTX's specifications.
- Use the OSD to adjust VTX settings, including frequency band, channel, and power level. This also allows for in-field adjustments and tuning.
Check Receiver Signal:
Verify the remote control output signal:
- Click "Receiver" in Betaflight to view real-time values for Roll, Pitch, Yaw, Throttle, and AUX channels. This helps confirm that the transmitter is communicating correctly with the drone.
Select Flight Mode Startup Mode:
Configure flight modes using the remote control switch:
- Click "Modes" in Betaflight to set up the function of remote control switches across different channels (e.g., ARM, ANGLE). Users can define ranges for each mode to activate them.
OSD Settings:
Customize the On-Screen Display (OSD) to show relevant flight information:
- Click "OSD" in Betaflight to access settings.
- Drag and drop OSD elements (e.g., Rssi Value, Main Batt Voltage, Crosshairs, Artificial Horizon, Timers, Craft Name, Vtx Channel, Current Draw, Mah Drawn, Gps Speed) onto the schematic diagram to adjust their position.
- Select "Video Format" (AUTO, PAL, NTSC) and "Units" (IMPERIAL, METRIC).
- Configure timers for "ON TIME" and "TOTAL ARMED TIME" with specified precision and alarms.
LED Settings:
Configure the drone's LED strip for visual feedback:
- Click "Configuration" and enable "LED support."
- Click "LED Strip" to access settings.
- Select "Multi-color RGB LED strip support" and "Wire Ordering Mode" as needed.
- Define LED functions, colors, and behaviors (e.g., Blink, Blink always, Larson scanner, Overlay, Warnings, Indicator, VTX).
- Set LED orientation and color.
Maintenance Features:
Troubleshooting:
The manual provides a troubleshooting section to address common issues:
- Warning: Emphasizes the importance of polarity, disconnecting power before connecting/disconnecting components, and notes the PID and Gyroscope refresh rate (up to 8K/8K).
- OSD Garbled: If characters are garbled, open Betaflight, go to "OSD," and click "Font Manager" to "Upload Font."
- Aircraft Not Passing Self-Test (No "BBB" Sound): Check if the ESC agreement is correct.
- Aircraft Keeps Spinning: Check if the propeller is correct and if the motor direction is correct.
After Sales Question:
- Product Not Working Normally (Quality Problem): Free repair service is provided if the return to the factory confirms a quality issue.
- Product Damaged Due to Improper Operation: Repair service may be provided after inspection, under the condition that it can be repaired.
- Customer Support: Domestic customers should contact after-sales service personnel, while overseas customers should contact the official website for after-sales service.
This comprehensive guide ensures that users can effectively set up, fly, and maintain their Rekon3 FPV Racing Drone, addressing both initial configuration and potential operational issues.