Do you have a question about the Remington Solar Attic Fan and is the answer not in the manual?
Lists the necessary tools for installing the Remington Solar Attic Fan.
Provides checks for initial fan operation issues like temperature and wiring.
Specific installation details for the SF20 model, including thermostat operation.
Installation notes for the SF25 model, focusing on panel tilt for sun exposure.
Installation notes for the SF30 model, a more powerful version.
Instructions for installing the SGF20 gable mount fan vertically.
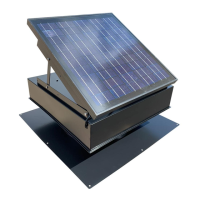
Diagram and labels identifying the parts of the solar attic fan.
Detailed instructions for installing the solar attic fan, covering hole cutting and sealing.
Provides advice on location, measurement, and sealing for best performance.
Instructions for connecting the optional 110V hybrid adapter to the fan.
Details the limited lifetime warranty for panels, housing, and motor.
Information on how to register the product and access additional installation videos.
The Remington Solar Attic Fan is a device designed to improve attic ventilation, primarily by using solar power. Its main function is to remove hot, humid air from the attic, which can help reduce cooling costs, prevent moisture buildup, and extend the life of your roof. The fan operates automatically, relying on sunlight and built-in sensors to determine when ventilation is needed.
One of the key usage features is its automatic operation. The fan is equipped with a thermostat and, in some models, a humidistat, which control when the fan turns on and off. The thermostat typically prevents the fan from operating when the outside temperature is below 82 degrees Fahrenheit (26.7 degrees Celsius), ensuring that the fan only runs when it's genuinely hot in the attic. The humidistat, a blue plastic piece, further refines this by sensing humidity levels, helping to prevent moisture-related issues. For testing purposes, especially in cooler weather, you can manually activate the fan by cupping the thermostat in your hand and breathing heavily on it, which simulates the necessary temperature increase.
Installation is designed to be straightforward, though it requires some basic tools and adherence to instructions. The fan is typically installed on the roof, preferably on the south side to maximize sun exposure, though other exposures are possible with adjustable panel models. The process involves cutting a circular hole in the roof, usually between rafters, and then securing the fan's flashing underneath the shingles. Silicone sealant is crucial for ensuring a waterproof seal around the base and fastener heads, preventing leaks. The manual provides detailed steps, including using a string or template to create the correct 14 1/2 inch diameter hole and cutting shingles with a razor knife to accommodate the flashing.
Different models offer varying features. For instance, the SF20 is a simple encased panel fan that flashes underneath the leading edge of shingles and includes both a humidistat and thermostat. It's important to remove the small plastic bag covering these sensors after installation and allow the thermostat to hang approximately 2 feet from the unit for accurate readings. The SF25 and SF30 models are more advanced, featuring a solar power panel that can be tilted. This tilt functionality is a significant usage feature, allowing users to angle the panel towards the south or west to maximize sun exposure, which is particularly useful for steep-pitched roofs or houses facing south where the fan might be on the back of the house. The SF30 is essentially a more powerful version of the SF25. The SGF20 is a gable-mount fan, designed for vertical installation, with its panel positioned in a sunny area and a power cable run through the attic.
For those who wish to ensure continuous operation regardless of sunlight, an optional 110V hybrid adapter is available. This adapter allows the fan to switch to household electricity when solar power is insufficient, such as at night or on cloudy days. Installation of the hybrid adapter involves unscrewing the fan's power cord, plugging in the adapter's two plug ends, attaching the adapter box to a rafter, and plugging it into an attic outlet. A crucial maintenance note for the hybrid adapter is to avoid leaving it plugged into the fan without also being plugged into an outlet for extended periods.
Maintenance features are relatively minimal, focusing primarily on proper installation to ensure longevity. The manual advises gently cleaning any oil residue from the flashing before installation to ensure proper sealant adhesion. Using a high-quality silicone sealant is emphasized for a good waterproof seal. Users also have the option to remove the solar attic fan's thermal switch, which would cause the fan to operate only when there is sunshine and shut off at dusk, simplifying its control mechanism if desired.
The device is built with durability in mind, reflected in its warranty, which covers manufacturing defects under normal and reasonable use. The solar panel, housing, and motor all come with a lifetime limited warranty, underscoring the manufacturer's confidence in the product's construction. However, this warranty is contingent on proper installation and maintenance, and it does not cover damage due to improper installation, misuse, or acts of God. Registering the product online within 30 days of purchase is necessary to activate the warranty.
Overall, the Remington Solar Attic Fan is designed as a set-and-forget solution for attic ventilation, leveraging solar power for energy efficiency and automatic controls for convenience. Its various models cater to different installation needs and preferences, while the optional hybrid adapter offers enhanced operational flexibility. Proper installation and adherence to the provided guidelines are key to maximizing its performance and lifespan.
| Type | Attic Fan |
|---|---|
| Power Source | Solar |
| Motor | Brushless DC Motor |
| Installation | Roof Mount |
| Color | Black |
| Voltage | 12V |
| Material | Aluminum |