Before using your Personal Groomer for the first time, charge the unit for 4 hours
for optimal performance:
1. Ensure the product is turned off.
2. Connect the Power Adaptor cord to the product. Plug into electrical outlet. The
indicator light illuminates when charging. The light stays on when fully charged.
IMPORTANT SAFETY
INSTRUCTIONS
When using an electrical appliance, basic precautions should always be
observed, including the following.
READ ALL INSTRUCTIONS BEFORE USING
THIS APPLIANCE.
DANGER
To reduce the risk of electric shock:
■ Do not reach for an appliance that has fallen into water. Unplug it immediately.
■ Do not use while bathing or in the shower.
■ Do not place or drop into water or other liquid.
■ Do not place or store this appliance where it can fall or be pulled into a tub or sink.
■ Except when charging, always unplug this appliance from the electrical outlet
immediately after using.
■ Unplug this appliance before cleaning it.
WARNING
To reduce the risk of burns, fire, electric shock or injury to persons:
■ This appliance is for household use only.
■ An appliance should never be left unattended when it’s plugged in, except when
charging a rechargeable appliance.
■ Close supervision is necessary when this appliance is used by, on, or near
children or persons with special needs or certain disabilities.
■ Use this appliance only for its intended use as described in this manual.
■ Do not use the mini shaver on your scalp.
■ Do not use attachments not recommended by Spectrum Brands, Inc.
■ Keep the cord away from heated surfaces.
■ Never operate this appliance if it has a damaged cord or plug, if it is not
working properly, if it has been dropped or damaged, or if it has been dropped
into water.
■ Never drop or insert any object into any of the appliance’s openings.
■ Do not use outdoors or operate where aerosol (spray) products are being used,
or where oxygen is being administered.
■ Always store this appliance and cord in a moisture-free area. Do not store it in
temperatures exceeding 140°F (60°C).
■ Do not use this appliance with a damaged or broken cutter unit, as injury may
occur. Always make sure blades are aligned properly.
■ Always attach plug to appliance, then adapter to outlet. To disconnect, turn all
controls to OFF, then remove adapter from outlet, then detach power cord from
the clipper for storage.
■ Do not use an extension cord or a voltage converter with this appliance.
■ Do not wrap the cord around the appliance.
SAVE THESE INSTRUCTIONS
Product Features Before Using
What Attachments to Use
Beard x x
Beard line x x
Ear x
Eyebrow x
Mustache x x
Nape of neck x x
Nose x
Sideburns x x x
Body x x
Back x
Hair length
combs
Foil
shaver
Nose/ear
trimmer
30mm wide
trimmer
Body hair
trimmer
Register Your New Product Today!
By registering your new Remington
®
product, you will receive these important benefits:
Proof of Ownership • Product Protection • Product Registration • Special Offers
Register online at: RemingtonProducts.com
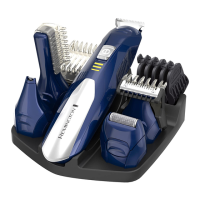
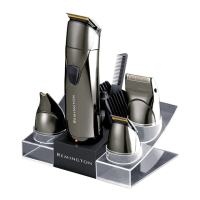
Face, Head, and Body
Lithium Grooming Kit
PG6145
Use and Care Guide
1
2
3
4
5
10
7
6
8
9
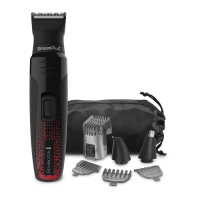
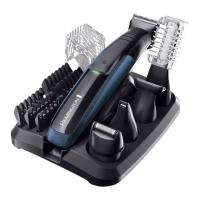
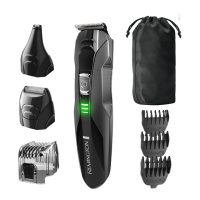
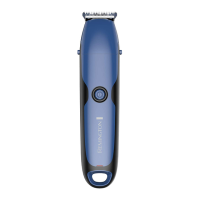
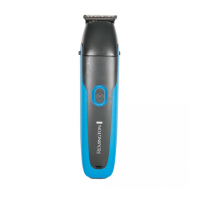
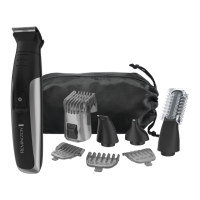
1. Full-Size Trimmer
2. Groomer Body
3. On/Off Switch
4. Charging Indicator Light
5. Beard and Stubble Combs:
3mm, 6mm, 9mm
6. Body Hair Trimmer with
Comb
7. Foil Shaver
8. Nose, Ear, and Eyebrow
Trimmer
9. 10-Length Adjustable Comb
10. Storage Stand
11. Adaptor (not shown)
NOTE: The Adjustable Comb
Attachments have various
length settings. When first
becoming familiar with the
Personal Groomer, begin with a
higher numbered setting.
Adjust cutting length, as desired.
Note: this product is for cordless use only.
• Switch the product on by pressing the on/off switch.
TO ATTACH AND REMOVE THE TRIMMING ATTACHMENTS
Note: Always ensure the groomer is switched off before changing any attachments.
• To attach, place the desired trimming head on top of the groomer and rotate
clockwise to lock into place.
• To remove, rotate the trimmer head counter-clockwise until it unlocks and then
lift off the groomer.
ATTACHING AND REMOVING FIXED GUIDE COMBS ON THE WIDE TRIMMER BLADE
To Attach
• With the trimmer blade facing away from you, hook front of comb onto blade
teeth and push back end down until it clicks into position.
To Remove
• With the trimmer blade facing away from you, carefully push the tab on the
back of the guide comb upwards and away from the trimmer blade.
ATTACHING AND REMOVING ADJUSTABLE COMB ON THE WIDE TRIMMER BLADE
• To attach line up the comb rails and slot on the groomer until firmly secured.
Pressing the adjustment button on the back of the comb will alter the cutting
length increment, this is indicated on the comb.
• To remove press and hold the adjustment button and push the comb up and
off the groomer.
BEFORE YOU BEGIN
• Comb facial hair with a fine comb before you start trimming.
• Hairs should be dry and without any waxes or lotions before using the groomer.
TO THIN AND TAPER THE BEARD/MOUSTACHE
• Attach the wide trimmer blade.
• Place either the adjustable comb or a fixed comb on the trimmer blade, select
the desired length and switch on.
• Start trimming under the chin, following the jawbone line. Work toward the ear
and upper beard line using an upward motion.
TO TRIM EDGE OF BEARD OR MOUSTACHE
• Attach the trimmer blade.
• Hold the groomer with the cutting blade facing you.
• Start with edge of beard/moustache line, and with the cutting blades resting
lightly against your skin, use slow movements to create a beard/moustache line.
TO TRIM SIDEBURNS
• Hold the groomer with the cutting blade facing you.
• Select the desired length on the adjustable comb or select the desired guide combs.
• Use light pressure and well-controlled movements to trim hair.
How To Use