EasyManua.ls Logo

Remote Control Systems I-MAX B6AC - User Manual

Remote Control Systems I-MAX B6AC
2 pages
Print Icon
To Next Page IconTo Next Page
Loading...
PO Box 1118 Bayswater, Vic. 3153 Australia
Phone: International ++614 2902 9083
Phone: Australia (cell) 04 2902 9083
Website http://www.rcs-rc.com
E-mail: info@rcs-rc.com
HOW TO USE THE I-MAX B6AC CHARGER
INSTRUCTIONS.
After testing various brands of chargers, RCS is proud to be selling the I-MAX B6 multi chemistry charger.
It can be used with either Li-Ion, Li-Po, Li-Fe, NiCd, NiMh and PB batteries. Please read the instruction manual supplied
with the charger.
I am not used to interpreting Flow Charts, so for me, the charger manual was a bit hard to follow. It took me some time to
get my head around the supplied instructions. The following should help those techno dummies like me.
This charger is supplied with a 2 amp or 5 amp 12V DC switch mode power supply. The B6 is designed to use it as is.
There is a selection of different plugs to suit various applications.
Once set up to AUTO the charger automatically detects the number of cells in the battery pack as it is starting the Charge
or Discharge cycle.
HOW TO GET TO THE INITIAL PARAMETERS SET UP. (USERS SET UP).
1. Plug in the power supply and switch the power ON.
2. The BLUE screen will light up.
3. Press the Batt Type/Stop button repeatedly until the screen shows: USER SET PROGRAM
You will have arrived at the bottom left hand pic of the flow chart on page # 7 of the charger instructions.
4 Then press the Start/Enter button briefly and the image to the right on page # 7 will appear.
5. Then repeatedly press the Inc (+) button to scroll through the menu until you have arrived at the feature you wish
to modify. For example, Safety Timer. ie. The image 2 x across and one down on page # 7.
6. Then, briefly press the Start/Enter button again and the word ON will blink. Please leave it set to ON.
7. Then, briefly press the Start/Enter button again and the time will flash 300 min.
8. Press Inc (+) or Dec (-) button depending on how long you want. We leave them set at 300 min when charging at
1 amp as 300 minutes (5 hours) will usually fill a 5,000 mah capacity battery completely.
9. Once the new value is set, briefly press Start/Enter button and the value will be stored.
10. Press the Batt Type/Stop button to exit USER SET UP mode.
BEFORE CHARGING, ADJUST THE CHARGER TO SUIT THE MAXIMUM CHARGE RATE OF YOUR BATTERY.
FOR EXAMPLE 1C = A MAXIMUM CHARGE RATE IS THE SAME AS THE BATTERY CAPACITY.
HOW TO START REGULAR CHARGING. (NiCd or NiMh/Hybrid).
1. Plug in the power supply and switch the power ON.
2. The BLUE screen will light up. If the particular charger has been supplied by RCS it will have been used to charge
the batteries in our test locos & should read for example: NIMH CHARGE Aut CURRENT 1.0 amp.
If it does, proceed to step # 9. If it does NOT show that image wording:
3. Press the Batt Type/Stop button repeatedly until the screen shows the battery type you are charging. Eg Ni-Mh.
4. Then plug in the battery to be charged.
5. Then press the Start/Enter button briefly.
6. If you wish to change the charge current press the Start/Enter button briefly again and the value will blink.
7. Press the Inc (+) or Dec (-) button depending on the value you want to set. Use only 1 amp max with AA cells.
If you wish to change the charge current from Auto to Man, do so when the value is flashing. Press Dec (-) & Inc(+)
together and hold until the charger beeps and screen changes from one to the other. Some buttons are a bit stiff and you
may also accidentally change the charge current. Simply reset the charge rate with the Dec (+) & Inc (-) button.
8. Press the Start/Enter button briefly again to set the value which will stop blinking.
If the values have already been set, you can proceed to actually charging.
9. Press and hold the Start/Enter button for at least 3 seconds to start the actual charge cycle. Whilst pressing the
Start/Enter button the charge current will blink briefly & then the screen will say BATTERY CHECK WAIT ……. Then it
will start charging.
Question and Answer IconNeed help?

Do you have a question about the Remote Control Systems I-MAX B6AC and is the answer not in the manual?

Summary

User Setup Procedure

Power On and Navigate to Setup

Connect power supply, switch on, and press Batt Type/Stop to reach User Set Program.

Modify Charger Parameters

Use Inc/Dec buttons to scroll settings and Start/Enter to confirm parameter changes.

Configure Safety Timer

Set the safety timer, typically to 300 minutes, for charging.

Store Settings and Exit

Press Start/Enter to save changes and Batt Type/Stop to exit the setup mode.

Regular Charging (NiCd;NiMh)

Prepare for Charging

Power on, select battery type (e.g., Ni-Mh), and connect the battery.

Adjust Charge Current

Press Start/Enter to blink current, use Inc/Dec to set charge rate (e.g., 1A max for AA).

Set Charge Mode

Toggle between Auto and Manual charge modes by pressing specific buttons.

Confirm and Start Charge

Press Start/Enter to confirm settings and hold for 3 seconds to begin charging.

Discharging & Re-Charging (NiCd;NiMh)

Select Battery and Set Discharge

Power on, select Ni-Mh, connect battery, and set discharge rate/voltage.

Configure Cycle Parameters

Enter cycle mode, set discharge/charge sequence and number of cycles.

Start and Monitor Cycle

Hold Start/Enter to begin; observe 'D' for discharge and 'C' for charge indicators.

Cycle Completion

Charger beeps and displays final mAh for discharge/charge; remove battery.

Charging Lithium Batteries (Li-Po)

Prepare Li-Po Charging

Follow initial steps, select Li-Po battery type, and connect the battery.

Adjust Li-Po Charge Settings

Set charge current and cell count (e.g., to AUTO) using Start/Enter and Inc/Dec.

Start Li-Po Charging

Hold Start/Enter for 3 seconds to initiate the charging cycle.

Overview

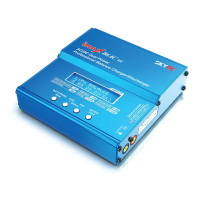
The I-MAX B6AC Charger is a versatile and reliable radio control device designed for charging various battery chemistries, including Li-Ion, Li-Po, Li-Fe, NiCd, NiMh, and PB batteries. Manufactured by Remote Control Systems, this charger aims to provide an innovative and dependable solution for battery management, drawing on expertise since 1988.

Function Description:

The primary function of the I-MAX B6AC Charger is to safely and efficiently charge and discharge a wide range of rechargeable batteries. It supports both single-cycle charging and a discharge-recharge cycle for conditioning batteries. The charger features an "AUTO" mode that automatically detects the number of cells in a battery pack at the start of a charge or discharge cycle, simplifying the setup process for users. This intelligent detection helps prevent overcharging or incorrect charging parameters, enhancing battery longevity and safety.

The device is supplied with a 2 amp or 5 amp 12V DC switch mode power supply, making it ready for immediate use. It also includes various plugs to accommodate different battery connections and applications. The charger's interface is designed to be user-friendly, with a BLUE screen display that provides clear feedback on current settings and charging status.

Usage Features:

The I-MAX B6AC Charger offers several features to enhance its usability and flexibility:

Initial Parameter Setup (User Setup):

  1. Power On: Connect the power supply and switch on the charger. The BLUE screen will illuminate.
  2. Access User Set Program: Repeatedly press the "Batt Type/Stop" button until "USER SET PROGRAM →" is displayed.
  3. Enter Setup Mode: Briefly press the "Start/Enter" button to access the setup menu.
  4. Navigate Menu: Use the "Inc (+)" button to scroll through the menu to find the desired feature to modify, such as "Safety Timer."
  5. Modify Settings: Briefly press "Start/Enter" again to make the value blink (e.g., "ON" for Safety Timer). For numerical values like time (e.g., "300 min"), use the "Inc (+)" or "Dec (-)" buttons to adjust the value.
  6. Save Settings: Briefly press "Start/Enter" to save the new value.
  7. Exit Setup: Press the "Batt Type/Stop" button to exit the "USER SET UP" mode.

Regular Charging (NiCd or NiMh/Hybrid):

  1. Power On: Connect power and switch on. The BLUE screen will light up.
  2. Check Display: If the charger displays "NIMH CHARGE Auto CURRENT 1.0 amp," proceed to step 9. Otherwise, continue with step 3.
  3. Select Battery Type: Repeatedly press "Batt Type/Stop" until the screen shows the correct battery type (e.g., "Ni-Mh").
  4. Connect Battery: Plug in the battery to be charged.
  5. Initiate Charge Setup: Briefly press "Start/Enter."
  6. Adjust Charge Current: If needed, briefly press "Start/Enter" again to make the current value blink. Use "Inc (+)" or "Dec (-)" to adjust the current (e.g., 1 amp max for AA cells).
  7. Toggle Auto/Man (Optional): While the value is flashing, press "Dec (-)" and "Inc (+)" simultaneously and hold until the charger beeps and the screen changes to switch between "Auto" and "Man" modes.
  8. Confirm Current: Briefly press "Start/Enter" to set the current value, which will stop blinking.
  9. Start Charging: Press and hold "Start/Enter" for at least 3 seconds. The charge current will blink briefly, and the screen will display "BATTERY CHECK WAIT ......." before charging begins.

Discharging & Re-Charging (NiCd or NiMh/Hybrid):

This mode allows for a discharge-only cycle or a discharge-recharge cycle to condition batteries.

  1. Power On: Connect power and switch on. The BLUE screen will light up.
  2. Check Display: If the charger displays "NIMH CHARGE Auto CURRENT 1.0 amp," proceed to step 4. Otherwise, continue with step 3.
  3. Select Battery Type: Repeatedly press "Batt Type/Stop" until the screen shows the correct battery type (e.g., "Ni-Mh").
  4. Connect Battery: Plug in the battery to be charged.
  5. Initiate Discharge Setup: Briefly press "Start/Enter." The screen will show "NIMH CHARGE Auto CURRENT 1.0 amp." Do not press "Start/Enter" again yet.
  6. Select Discharge Mode: Press "Inc (+)" to display "NIMH DISCHARGE 1.0a & 1.0v."
  7. Adjust Discharge Rate/Voltage (Optional): Briefly press "Start/Enter" to make the discharge current flash. Adjust with "Inc (+)" or "Dec (-)" (e.g., 0.5 amp max for AA cells). Briefly press "Start/Enter" again to adjust the "final voltage" (e.g., AUTO, or 1 volt x number of cells for NiMh, 0.9 volt x number of cells for NiCd).
  8. Select Cycle Mode: Press "Inc (+)" to display "NIMH CYCLE DCHG > CHG 1."
  9. Adjust Cycle Parameters (Optional): Briefly press "Start/Enter" to make "DCHG > CHG" flash. Toggle if needed. Briefly press "Start/Enter" again to make the number of cycles flash. Adjust with "Inc (+)" or "Dec (-)." Briefly press "Start/Enter" to embed the new values.
  10. Start Cycle: Press and hold "Start/Enter" for at least 3 seconds. The charge current will blink briefly, and the screen will display "BATTERY CHECK WAIT ......." before starting the discharge-charge cycle. The "D" blinks during discharge, and "C" blinks during charging.
  11. Cycle Completion: The charger pauses between discharge and charge. Upon completion, it will beep loudly, and the screen will show the final values (e.g., "DCHG (1) – (Value in) MAH CHG 1 (Value in) MAH").

Lithium Chemistry (Li-Po BATT) Charging:

The procedure for Lithium chemistry batteries is similar but has specific steps for cell count.

  1. Follow steps 1-3 from "Discharging & Re-Charging" to select "Li-Po BATT."
  2. Connect Battery: Plug in the battery.
  3. Initiate Charge Setup: Briefly press "Start/Enter." The screen will show "Li-Po CHARGE 1.5 A 22.2v(6S)."
  4. Adjust Charge Current (Optional): Briefly press "Start/Enter" again to make the current value blink. Use "Inc (+)" or "Dec (-)" to adjust. Briefly press "Start/Enter" to set.
  5. Adjust Cell Count (Optional): To change the cell count (e.g., from "22.2v(6S)" to "AUTO"), press "Dec (-)" until "AUTO" appears. Briefly press "Start/Enter" to set.
  6. Start Charging: Press and hold "Start/Enter" for at least 3 seconds. The charge current will blink briefly, and the screen will display "BATTERY CHECK WAIT ......." before charging begins.

Maintenance Features:

The I-MAX B6AC Charger is designed to be low-maintenance. The primary "maintenance" aspect for the user involves ensuring correct parameter settings to prevent battery damage. The charger remembers the last used settings, which simplifies repeated charging tasks for the same battery types.

  • Safety Timer: The "Safety Timer" feature, adjustable in the "USER SET PROGRAM," helps prevent overcharging by automatically stopping the charge cycle after a set duration (e.g., 300 minutes). This is a crucial safety and maintenance feature for battery health.
  • Battery Check: The "BATTERY CHECK WAIT" message indicates that the charger is performing an internal check of the battery's condition before initiating a charge or discharge cycle. This helps ensure that the battery is safe to process and that the correct parameters are applied.
  • Error Prevention: The charger's design, particularly the "AUTO" detection for cell count and the clear display of settings, helps users avoid common errors that could lead to battery damage or reduced lifespan.
  • User Support: The manufacturer, Remote Control Systems, encourages users to contact them if they encounter any problems, indicating a commitment to ongoing support and device longevity.

In summary, the I-MAX B6AC Charger is a robust and intelligent battery management device that prioritizes ease of use, safety, and versatility across multiple battery chemistries. Its intuitive interface and automated features make it suitable for both experienced users and those new to battery charging, while its built-in safety mechanisms contribute to the long-term health of rechargeable batteries.

Remote Control Systems I-MAX B6AC Specifications

General IconGeneral
Charge Current0.1-6.0A
Discharge Current0.1-2.0A
Battery Types SupportedLiPo, LiFe, LiIon, NiMH, NiCd, Pb
Max Charge Power50W
Max Discharge Power5W
LiPo/LiFe/Lilon Cells1-6 cells
NiMH/NiCd Cells1-15 cells
Pb Battery Voltage2-20V
Input Voltage100-240V AC