Setting
The time, date and alarm function can be set.
In setting mode, if you do not press a button for 8 seconds during a setting,
you will exit setting mode and the currently displayed value is saved.
a) Time setting
1. Keep the MODE/SET button (12) pressed until the hour digits ash.
2. Press the UP button (13) or DOWN button (14) to change the hour setting.
3. Press the MODE/SET button to conrm the setting. The minute digits ash.
4. Press the UP button or DOWN button to change the minute setting.
5. Press the MODE/SET button to conrm the setting.
It is not necessary to set the seconds; they are automatically reset to 00
(zero) each time the hours and minutes are set.
b) Date setting
1. Briey press the MODE/SET button (12) once to change to date mode. The currently
displayed date is displayed; the M and D symbols appear on the display.
2. Keep the MODE/SET button pressed until the year digits ash.
3. Press the UP button (13) or DOWN button (14) to change the year setting.
4. Press the MODE/SET button to conrm the setting. The month digits ash.
5. Press the UP button or DOWN button to change the month setting.
6. Press the MODE/SET button to conrm the setting. The number of the date of the
day ashes.
7. Press the UP button or DOWN button to change the day setting.
8. Press the MODE/SET button to conrm the setting.
c) Alarm setting
1. Briey press the MODE/SET button (12) once to change to alarm mode. The
currently set alarm time is displayed; the wake-up alarm symbol appears.
2. Keep the MODE/SET button pressed until the hour digits of the alarm time ash.
3. Press the UP button (13) or DOWN button (14) to change the hour setting.
4. Press the MODE/SET button to conrm the setting. The minute digits ash.
5. Press the UP button or DOWN button to change the minute setting of the alarm
time.
6. Press the MODE/SET button to conrm the setting.
Operation
a) Back-lighting of the display
1. Press the SNOOZE/LIGHT button (11) to light up the LCD for 5 seconds.
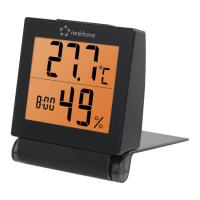
b) Selecting the temperature unit
1. Press the DOWN button (14) to change the unit of measurement of the temperature
display. Celsius or Fahrenheit is possible (°C, °F).
c) Alarm signal, snooze mode
If the wake-up signal is triggered at the set time, the wake-up alarm symbol ashes
on the LCD. The wake-up signal sounds for 2 minutes. The acoustic wake-up signal
starts with slow tones that become faster - the crescendo alarm. The wake-up signal
can be interrupted at any time (snooze function).
1. Press the UP button (13) to activate the alarm with the set alarm time. The wake-up
alarm symbol
is displayed on the LCD.
2. Press the SNOOZE/LIGHT button (11) or SNOOZE button (16) to interrupt the alarm
for 8 minutes (snooze function).
3. Press any other button to end the wake-up signal.
d) Maximum/minimum measured values
1. Press the MAX/MIN button (15) to display the saved maximum values of
temperature and humidity.
2. Press the MAX/MIN button twice to display the minimum values.
3. Press the MAX/MIN button three times to return to the normal display.
The saved maximum/minimum values of temperature and humidity are reset
to zero at 00:00 (midnight).
e) 12/24 hour display
The display of the time can be selected for the 12 hour format or the 24 hour format.
1. Keep the UP button (13) pressed for 2 seconds to change the display format of the
time. The 24 hour format is the default setting. The
symbol appears in the second
cycle of the 12 hour format.
Maintenance and cleaning
• The product does not require maintenance except for occasional cleaning. For
cleaning, use a soft, anti-static and lint-free cloth.
• Do not use abrasive or chemical cleaning agents.
• Do not immerse the product in water.
Disposal
a) Product
Electronic devices are recyclable waste and must not be disposed of in the
household waste.
At the end of its service life, dispose of the product according to the
relevant statutory regulations.
Remove any inserted (rechargeable) batteries and dispose of them
separately from the product.
b) (Rechargeable) batteries
You as the end user are required by law (Battery Ordinance) to return all used batteries/
rechargeable batteries. Disposing of them in the household waste is prohibited.
Contaminated (rechargeable) batteries are labelled with this symbol to
indicate that disposal in the domestic waste is forbidden. The designations
for the heavy metals involved are: Cd = Cadmium, Hg = Mercury, Pb = Lead
(name on (rechargeable) batteries, e.g. below the trash icon on the left).
Used (rechargeable) batteries can be returned to collection points in your
municipality, our stores or wherever (rechargeable) batteries are sold.
You thus full your statutory obligations and contribute to the protection of
the environment.
Technical data
Supply voltage .....................................2 x 1.5 V/DC batteries, type AAA
Battery service life..............................approx. 6 months
Temperature display range ...............-10 to +60 °C
Humidity display range.......................20 - 90% RH
Operating conditions ..........................0 to +50 °C, 20 - 90 % RH
Storage conditions..............................0 to +50 °C, 20 - 90 % RH
Dimension (L x W x H) ........................83 x 31 x 96 mm
Weight ..................................................118 g (without batteries)
This is a publication by Conrad Electronic SE, Klaus-Conrad-Str. 1, D-92240 Hirschau (www.conrad.com).
All rights including translation reserved. Reproduction by any method, e.g. photocopy, microlming, or the capture in electronic data
processing systems require the prior written approval by the editor. Reprinting, also in part, is prohibited. This publication represent the
technical status at the time of printing.
© Copyright 2014 by Conrad Electronic SE. V2_1114_02-HK
 Loading...