This is a publication by Conrad Electronic SE, Klaus-Conrad-Str. 1, D-92240 Hirschau (www.conrad.com).
All rights including translation reserved. Reproduction by any method (e.g. photocopying, microlming, or capture in
electronic data processing systems) requires prior written approval from the editor. Reprinting, also in part, is prohibited.
This publication represent the technical status at the time of printing.
Copyright 2018 by Conrad Electronic SE. *1604986_v2_0618_02_DS_m_4L_(1)
b) Connection
• Turn off all of the devices that you want to connect and disconnect the power adapters from
the mains.
• Connect the jack plug on the AV cable to the AV IN cinch socket (5), and then insert the other
end of the jack plug into the cinch sockets on the AV connection device (signal source, e.g.
video recorder, video camera, TV or DVD player). Pay attention to the colour of each plug.
The colours must match: red to red, yellow to yellow, and white to white.
• Connect the micro USB plug on the USB cable to the USB 2.0 port (1).
• Connect the other end of the cable to the USB-A socket on the power adapter.
• Connect the power adapter to a mains socket.
• The POWER LED (4) will turn on when the device is supplied with power.
Caution! The 3.5 mm AV IN socket (5) must not be used to connect audio devices
such as powerful ampliers.
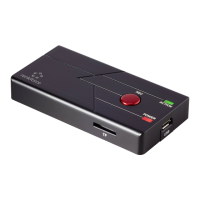
c) Inserting/removing a memory card
• Insert a memory card into the card slot (6) on the video grabber. Ensure that the card is
inserted in the correct position. Do not force the card into the slot!
• Press the card into the slot until you feel resistance and notice a click. The card should click
into place when released.
• The colour ACTION LED (3) turns on when a card is inserted and turns off when the card
is removed.
• Before removing a memory card from the card reader (or disconnecting the card reader from
the computer), wait for all read/write operations to be completed.
• Press the card into the slot until you feel resistance and notice a click. The card will be
automatically ejected when released; to remove the card, carefully pull it from the slot.
If the card is removed during a recording or when data is being read/written, the data
on the card may be corrupted and you may need to reformat the card.
d) Recording
• Press the REC button (2) to start digitising and recording the analogue A/V signal.
• The colour ACTION LED (3) will ash during the recording.
• Press the REC button to stop digitising and recording the analogue A/V signal.
• To start another recording, press the REC button again.
The video grabber must always be connected to the power adapter to ensure that
there is sufcient power to make a video recording. It must not be connected to a
computer during a video recording.
e) Playing video les
• Connect the AV grabber to a USB 2.0 port on your computer. When you connect the AV
grabber for the rst time, Windows will automatically detect new hardware and install the
necessary drivers.
• The memory card in the AV grabber can now be used as an external storage device for your
computer. You can access, play, copy, delete and edit the video recordings on the memory
card using suitable software, e.g. a video player.
Troubleshooting
• Before pressing the REC button (2) to start a video recording, ensure that the signal source
is switched on and that it is delivering an AV signal.
• Ensure that all AV cables are properly connected to the signal source and the video grabber.
• If the video grabber malfunctions, disconnect it from the power supply, wait for a few seconds,
and then reconnect it to the power supply. The video grabber will automatically restart.
• Ensure that the memory card is Speed Class 4 or higher.
Care and cleaning
• This product does not contain any components that require maintenance. Never attempt
to open or disassemble it. The product does not require servicing except for occasional
cleaning.
• Always disconnect the product from the power supply before cleaning it. Disconnect the
product from all connected devices.
• Never use aggressive detergents, rubbing alcohol or other chemical solutions, as these may
damage the casing or cause the product to malfunction.
• Use a dry, lint-free cloth to clean the product.
• Do not immerse the product in water.
Disposal
Electronic devices are recyclable waste and must not be placed in household waste.
Always dispose of the product according to the relevant statutory regulations.
You thus full your statutory obligations and contribute to the protection of the environment.
Technical data
a) Video grabber
Input voltage / current ................... 5 V/DC, 0.5 A
Supported memory cards ............. MicroSD, Micro SDHC, max. 32 GB
Supported card formats ................ FAT32
Video resolution ............................ 480p
AV cable length ............................. 95 cm
USB cable length .......................... 100 cm
Supports ....................................... Windows
®
XP (Home, Pro, with SP1, SP2, SP3) (32-bit),
Vista™ (32/64-bit), 7 (32/64-bit), 8.0 (32/64-bit),
8.1 (32/64-bit), 10 (32/64-bit), Mac OS (10.0 to 10.6)
Operating conditions ..................... 10 to +40 °C, 20–90 % relative humidity (non-condensing)
Storage conditions ........................ -10 to +50 °C, 20–80 % relative humidity (non-condensing)
Dimensions (W x H x D) ............... 85 x 12 x 43 mm
Weight .......................................... 36 g
b) Power adapter
Input voltage / current ................... 100-240 V/AC, 50/60 Hz, 0.4 A max
Output voltage/current .................. 5 V/DC, 1 A
 Loading...