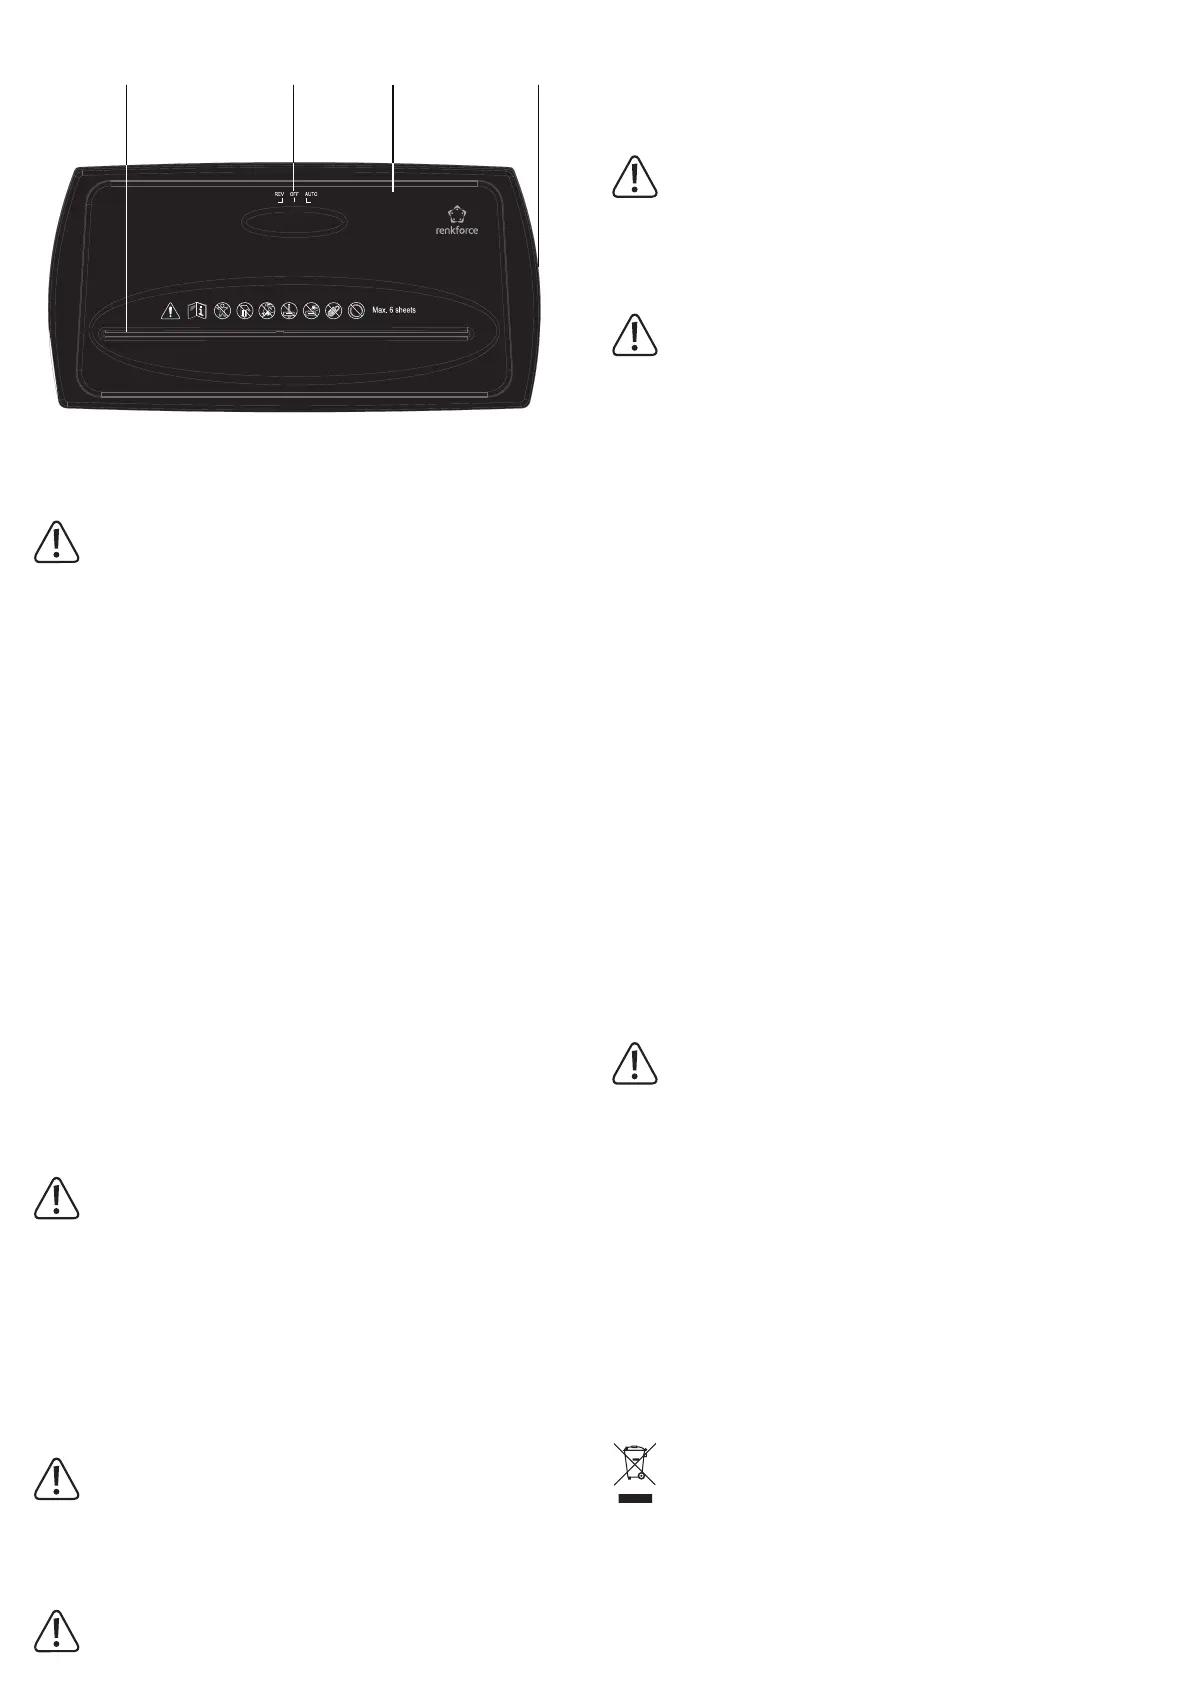
Controls
1 2 3 4
1 Insertion slot for material
being shredded
2 REV/OFF/AUTO selector
switch
3 Cutting unit
4 Collection container
Operation
Do not reach into the insertion slot.
Do not insert paper clips, staples or other metal parts into the insertion slot.
If you have long hair, ensure that you keep a sufcient distance from the insertion slot. Ties,
scarves, loose clothing and long necklaces or bracelets must be kept away from the insertion
slot.
Do not use spray bottles/cans in the immediate vicinity of the product.
Do not let the product run continuously for more than 2 minutes, as this may cause the motor
to overheat.
If the collection container becomes full before the 2 minutes have elapsed, switch the product
off.
Empty the collection container before using it again. Allow the device to rest for at least 20 to
30 minutes before you use it again.
a) Installation
• Take all parts out of their packaging and remove any plastic foil.
• Place the cutting unit (3) on the collection container (4). Pay attention to the notches on the
collection container. The cutting unit must t exactly into the notches on the collection con-
tainer. A safety mechanism prevents operation of the device until the cutting unit is properly
seated in the collection container.
• Do not place your ngers between the collection container and the cutting unit and ensure
that the mains cable is not pinched.
• Do not use plastic bags as a collection aid. The proper functioning of the shredder will most
likely be impaired.
b) Positioning and connection
• Place the product on a stable, level and heat-resistant surface.
• Ensure that the REV/OFF/AUTO selector switch (2) is in the centre OFF position.
• Connect the mains plug to a standard mains socket.
c) Shredding paper
Insert a maximum of 6 sheets of DIN A4 paper with a maximum grammage of 80 g/
m
2
into the insertion slot.
Do not shred sticky notes, envelopes or paper with sticky residue.
• Slide the REV/OFF/AUTO selector switch (2) to the right to the AUTO position.
• Carefully insert the paper into the insertion slot (1). The shredder switches on automatically.
The paper is automatically fed into the cutting unit and shredded. When shredding paper
that is smaller than the maximum insertion tray width, always insert the paper in the centre
of the paper tray.
• The shredder stops automatically when it has nished shredding.
• After you have nished shredding, move the REV/OFF/AUTO selector switch to the centre
OFF position.
d) Shredding credit cards
Shred a maximum of one credit card at a time.
• Slide the REV/OFF/AUTO selector switch (2) to the left to the REV position.
• Carefully insert a single credit card into the insertion slot (1). The credit card is automatically
fed into the cutting unit and shredded. Note that a credit card should be inserted in the
centre of the insertion slot.
Never attempt to shred a credit card together with paper.
• After you have nished, move the REV/OFF/AUTO selector switch to the centre OFF po-
sition.
e) Clearing a paper jam
If there is a paper jam, proceed as follows:
• Set the REV/OFF/AUTO selector switch (2) to REV to remedy a paper jam.
Never pull out jammed paper. This will damage the blades.
• Connect the mains plug to a standard mains socket.
• Set the REV/OFF/AUTO selector switch (2) to REV to eject the inserted sheet(s). The cut-
ting unit runs in the opposite direction and pushes the blocked paper out of the shredder.
Slide the REV/OFF/AUTO selector switch to the OFF position.
• Pull and remove the excess paper from the top of the shredder.
Keep your hand and ngers away from the insertion slot to avoid the risk of injury.
• Slide the REV/OFF/AUTO selector switch to the right AUTO position to continue shredding.
• The product is equipped with motor protection, which is triggered during continuous opera-
tion and overheating. If the motor protection has been triggered, allow the device to rest for
at least 30 to 40 minutes before using it again and try to clear the paper jam as described
above.
Troubleshooting
Error Possible cause Solution
The
cutting unit
continues to
run in AUTO
mode.
The collection container
is full. The paper from
the cutting unit cannot
slide downwards. Paper
is jammed in the centre
of the feeder.
Set the selector switch (2) to REV to eject the
paper. Using a plastic card, release the security
mechanism. Empty the container.
Power supply is not
connected.
Check the power supply and connect, if
necessary.
Voltage is low or no
power.
Switch the device off and ensure that there is
sufcient voltage.
The container is not
inserted correctly/com-
pletely.
Position the cutting unit correctly on the
container. Ensure that the safety mechanism is
properly seated and switched on.
The paper is too thin. Ensure that the paper is sturdy enough to trig-
ger the automatic start-up function. Add another
sheet of paper and try again.
The motor is overhe-
ated.
Allow the product to cool down for 30 to 40
minutes before using it again.
Paper jam Too much paper
inserted.
Set the selector switch to OFF and remove
some sheets. Then, slide the selector switch to
REV to remove the paper from the cutting unit.
Maintenance, care and cleaning
Caution! The blades are very sharp. Risk of injury.
• Before cleaning the product, switch it off and disconnect the mains socket from the mains
outlet.
• Do not immerse the product in water.
• This product does not contain any components that require maintenance. Never attempt to
open or disassemble it.
• Empty the collection container regularly.
• Never use aggressive detergents, rubbing alcohol or other chemical solutions, as these may
damage the enclosure or cause the product to malfunction.
• A dry, soft and clean cloth is sufcient for cleaning. Do not press too hard on the housing,
as this can lead to scratch marks.
• From time to time (after approx. 200 shredding operations), use a special non-ammable
shredder oil to oil the cutting unit. Spray bottles and special oil paper can be purchased
from specialist shops.
Disposal
Electronic devices are recyclable waste and must not be placed in household waste.
At the end of its service life, dispose of the product in accordance with applicable
regulatory guidelines.
You thus full your statutory obligations and contribute to environmental protection.
 Loading...