EasyManua.ls Logo

ReptiZoo HO T5 - User Manual

ReptiZoo HO T5
2 pages
Print Icon
To Next Page IconTo Next Page
Loading...
Thanks for choosing our company's products. In order to use
this product properly and ensure its service life, please read
the instructions book carefully before using it.
INSTRUCTION MANUAL OF HO T5
UVB LIGHTING COMBO KIT
AT28
This product is a simple, fashionable, efficient and energy saving T5 UVB lighting combo
kit. It provides UVB for pets, which promotes the absorption of calcium. It is suitable for
REPTI-ZOO RK glass terrariums, RHK reptile glass terrariums, AC full air screen cages
and other reptile terrariums and aquariums.
1. Lighting hood1 pc
2. T5 UVB lamp1 pc
3. Power cord 1 pc
4. Instruction manual1 pc
5. Accessories includes hanging
plate 2pcs, self-tapping screw 2pcs, M3 screw 4pcs and butterfly nut 4pcs.
1. Fashionable aluminum alloy shell and efficient heat dissipation.
2. Quick plug power cord with independent switch, it is practical and easy to disassemble.
3. A variety of installation methods. It can be installed on wooden vivariums, glass
terrariums, screen cages, etc.
4. High specular reflector can effectively improve the output efficiency, promote the
absorption of calcium for pets.
5. Built-in high quality ballast, quick to start and no flicker.
1. VoltageAC120~240V/50-60HZ
2. Power cord length: 1.5 meters
3. Size and wattage
MODEL SIZEmm) Max WATTAGEW REMARK
AT2824ST
AT2839ST
AT2854ST
575x58x42mm
875x58x42mm
1175x58x42mm
24W
39W
54W
Suitable for T5 UVB 24W lamp
Suitable for T5 UVB 39W lamp
Suitable for T5 UVB 54W lamp
Install the lamp:
Align the pins on both ends of the lamp with the notches of the lamp holder and press
them in gently, turn it clockwise or counterclockwise 90 degrees, and you will hear the “click”
sound. That means it is well installed.
Installation and fixation:
(1) Installed lighting hood outside the terrarium:
Place the strip light fixture on top of the terrarium, and keep away from water surface at
least 15mm.
(2) Installed inside the terrarium:
Choose mounting position to assemble hanging plate. First, use a self-tapping
screw (TA4.0*20) to drill holes in the mesh cover and then take them out. Then fix the
two sides of the hanging plate and the mesh cover with M3 screw and butterfly nut
respectively. After the hanging plate is fixed, push the lamp into the clamping position
of the hanging plate.
(3) Installed on the vivarium:
After install the mounting plate, use self-tapping screw (TA4.0*20) against the middle
hole of the hanging plate to firmly lock the screw onto the board. After the hanging plate
is fixed, fix the lamp into the clamping position of the hanging plate.
(4) After install lamp fixture, install negative connector plug on power cord onto the
lighting hood and positive connector plug to socket, and turn on the power.
(5)
Up to 4pcs lamp hood can be connected in series at the same time.
1.PRODUCT OVERVIEW
2.PRODUCT LIST
3.PRODUCT FEATURES
4.TECHNICAL PARAMETER
5.INSTRUCTIONS
2
3
1
5
Question and Answer IconNeed help?

Do you have a question about the ReptiZoo HO T5 and is the answer not in the manual?

Summary

Product Overview

Product List

Product Features

Technical Parameters

Installation Instructions

Lamp Installation

Align lamp pins with holder notches and turn clockwise/counterclockwise until it clicks.

Exterior Terrarium Installation

Place fixture on terrarium top, at least 15mm from water.

Interior Terrarium Installation

Fix hanging plate inside terrarium using self-tapping and M3 screws.

Vivarium Installation

Secure hanging plate to vivarium board with self-tapping screw.

Power Connection

Connect negative and positive plugs to lighting hood and socket.

Series Connection

Up to 4 lamp hoods can be connected in series.

Lamp Replacement

Reflector Instructions

Reflector Disassembly

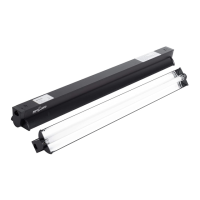
Slide reflector to expose arrow label, then pull out from aluminum alloy.

Reflector Assembly

Insert reflector into aluminum alloy slot, securing sides and middle.

Safety and Maintenance

Important Safety Information

Overview

The REPTI ZOO HO T5 UVB Lighting Combo Kit (AT28) is a simple, fashionable, efficient, and energy-saving lighting solution designed to provide essential UVB for pets, promoting calcium absorption. This product is suitable for various reptile enclosures, including REPTI-ZOO RK glass terrariums, RHK reptile glass terrariums, and AC full air screen cages.

Function Description:

The primary function of this device is to emit UVB light, which is crucial for the health of many reptiles as it aids in vitamin D3 synthesis and subsequent calcium absorption. The kit includes a lighting hood and a T5 UVB lamp, designed to work together to deliver optimal UVB output. Its high specular reflector is engineered to effectively improve output efficiency, further enhancing calcium absorption for pets. The built-in high-quality ballast ensures a quick start and flicker-free operation of the lamp.

Important Technical Specifications:

  • Model: AT28 (available in different wattages and sizes)
  • Voltage: AC120~240V/50-60HZ
  • Power Cord Length: 1.5 meters
  • Available Sizes and Wattages:
    • AT2824ST: 575x58x42mm, 24W (Suitable for T5 UVB 24W lamp)
    • AT2839ST: 875x58x42mm, 39W (Suitable for T5 UVB 39W lamp)
    • AT2854ST: 1175x58x42mm, 54W (Suitable for T5 UVB 54W lamp)
  • Construction: Fashionable aluminum alloy shell for efficient heat dissipation.
  • Reflector: High specular reflector to maximize UVB output.

Usage Features:

  • Easy Assembly: The lamp is installed by aligning its pins with the notches of the lamp holder, pressing gently, and turning it 90 degrees clockwise or counterclockwise until a "click" sound is heard, indicating secure installation.
  • Versatile Installation Methods:
    • Outside the Terrarium: The strip light fixture can be placed on top of the terrarium, ensuring it is at least 15mm away from any water surface.
    • Inside the Terrarium: A hanging plate is first secured to the mesh cover using self-tapping screws (TA4.0*20) and M3 screws with butterfly nuts. Once the plate is fixed, the lamp is pushed into the clamping position.
    • On a Vivarium: After installing the mounting plate, a self-tapping screw (TA4.0*20) is used through the middle hole of the hanging plate to firmly lock it onto the vivarium board. The lamp is then fixed into the clamping position.
  • Power Connection: After installing the lamp fixture, the negative connector plug on the power cord is connected to the lighting hood, and the positive connector plug is inserted into a socket to power on the device.
  • Daisy-Chaining Capability: Up to four lamp hoods can be connected in series at the same time, allowing for expanded lighting setups.
  • Quick Plug Power Cord: Features an independent switch for practical and easy disassembly.
  • Broad Compatibility: Can be installed on wooden vivariums, glass terrariums, and screen cages.

Maintenance Features:

  • Lamp Replacement:
    1. Power off and unplug the light fixture, allowing the lamp to cool down.
    2. Remove the lamp from the hanging plate.
    3. Rotate and remove the old lamp.
    4. Insert the new lamp, turning it clockwise or counterclockwise 90 degrees until a "click" sound confirms proper installation.
    5. Plug in the light fixture and power on.
    • Attention: Failure to follow these steps may result in electric shock, lamp burnout, or fire.
  • Reflector Disassembly and Assembly:
    • Disassembly: Push the reflector to expose the arrow label side outside the plastic cover. Pull the arrow label side reflector out of the aluminum alloy to create a finger gap, then slide it further to completely remove it from the aluminum alloy.
    • Assembly: Place the long side of the reflector into the aluminum alloy slot, then squeeze the other long side to limit more than 50% of the reflector in the slot. Squeeze the short side of the reflector into the plastic cover's slot. Finally, press the middle of the reflector until it is fully seated in the aluminum alloy slot (arrow label exposed).
  • Safety and Maintenance Guidelines:
    • Before use, inspect equipment and sensor cables for damage. If damaged, have it tested and repaired by a professional.
    • Before installation and maintenance, always hold the plastic part of the plug to pull it out of the power supply; never pull the power cord itself.
    • Do not move or pull the power cord while the product is working. If relocation is needed, turn off the power first.
    • The fixture's installation position must avoid contact with water and maintain at least 15mm distance from the water level.
    • Unplug the product from the electrical outlet when not in use.
    • This product is not suitable for children or individuals with cognitive impairments without adult supervision and guidance to ensure safe operation.
    • It is not recommended to use product accessories for other purposes, as this may lead to unsafe conditions.

Important Safety Information (Warnings):

  • Failure to follow safety instructions can result in fire, electric shock, injury, or damage to pets or property.
  • Read all safety information before using this series of lamps.
  • Handle the lamps with care. The product contains sensitive electronic components within an aluminum alloy and plastic shell.
  • This product is for indoor use only and should not be used in non-specified reptile terrariums and aquariums.
  • If the lamps or accessories are dropped, burned, squeezed, or come into contact with liquid, they may be damaged. Do not use damaged lamps.

ReptiZoo HO T5 Specifications

General IconGeneral
BrandReptiZoo
ModelHO T5
CategoryLighting Equipment
LanguageEnglish