EasyManua.ls Logo

Ress FM5 Pro - User Manual

Ress FM5 Pro
13 pages
Print Icon
To Next Page IconTo Next Page
Loading...
Question and Answer IconNeed help?

Do you have a question about the Ress FM5 Pro and is the answer not in the manual?

Overview

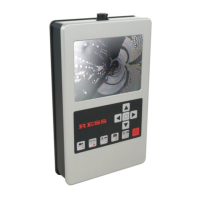
The RESS Monitor FM5 Pro (Art.-Nr. 2528) is a portable video inspection system designed for visual inspection, sweep instruments, and measuring instruments, particularly for chimney inspections. It comprises a monitor unit and a charger, with optional camera accessories like a transport bag and a roller-stand.

Function Description

The primary function of the Monitor FM5 Pro is to provide visual inspection capabilities, allowing users to view and record video and still images from a connected camera head. It is designed for tasks such as inspecting chimneys for defaults, and can be used in various environments including attics or rooftops. The system facilitates the identification and localization of issues within inspected areas.

The device features a monitor for real-time viewing, control buttons for navigation and operation, and an SD card slot for storing recorded data. It supports both video recording and photo capture, with dedicated buttons for starting/stopping recording, saving pictures, and reviewing stored media. System settings, including date, time, recording mode, recording time, brightness, contrast, saturation, and time display, can be adjusted through a dedicated menu.

Important Technical Specifications

  • Overall Dimensions (W/H/D): 135 x 220 x 73 mm
  • Weight: Approximately 1100 g
  • Casing Material: Synthetic material / Powder-coated aluminum
  • Monitor: 5 inches LCD-TFT color screen (102 x 73 mm)
  • Storage Media: 2 GB SD-card (supports 1-8 GB SD-cards)
  • Photo Resolution: 1 photo 32 kb (720x576 pixel)
  • Video Length: 300 seconds (per recording segment)
  • Power Supply: Lead acid battery 12 V/2.1 Ah
  • Voltage Monitoring: LCD-display
  • Operating Time: Approximately 2 hours (depending on the camera head used)
  • Charging Time: Approximately 2 hours
  • Certifications: Conforms to guidelines 2004/108/EG.
  • Operating Temperature for Camera Cable: Not below +5°C.

Usage Features

The Monitor FM5 Pro is designed for ease of use with a clear interface and intuitive controls.

Start-up and Connection: To begin, the monitor is connected to the cable and charging socket using a quick plug, secured by a quarter-turn clockwise. The camera's jack is then connected to the 12-pin connector on the camera head, ensuring the groove guide aligns with the socket, and secured with a threaded screw. The system is ready for use once all connections are made and the basic unit is switched on, indicated by the illumination lights inside the camera.

Basic Operation: The device is powered on/off using a dedicated switch (button 6). Video recording is initiated and stopped with button 1, while photos are saved using button 4. Stored videos can be reviewed by pressing button 3, and photos by pressing button 5.

Control Buttons:

  • Button 1: Video recording start/stop (basic function), Scroll forward (video/photo memory), Counting up (system settings).
  • Button 2: System settings (basic function), Start/stop video (video memory), Next (system settings).
  • Button 3: Selection of video memory (basic function), Scroll backward (video/photo memory), Exit menu (system settings).
  • Button 4: Photo storage (basic function), Delete (definitive delete press 2x) (video/photo memory), Back (system settings).
  • Button 5: Selection of photo memory (basic function), Backward (video/photo memory), Count down (system settings).
  • Button 6: On/Off switch.

System Settings: The system settings menu (accessed via button 2) allows adjustment of various parameters. The active setting is highlighted in yellow.

  • DATE: Set year/month/day.
  • TIME: Set hour:minutes.
  • REC MODE: Can be set to PICTURE or AVI (does not typically need changing).
  • REC TIME: Set running time for video sequences (5-300 seconds). For longer recordings, the record button must be pressed again after 300 seconds.
  • BRIGHTNESS, CONTRAST, SATURATION: Adjust display settings.
  • TIMEDISPLAY: Fade in/out the date/time display.
  • EXIT: Return to live image. The menu automatically exits after 10 seconds of inactivity.

SD Card Usage: The SD card slot is located on the top of the handset. SD cards (1-8 GB) are inserted with the writing facing up until a "click" is heard, locking the card in place. To remove, push the card again until a "click" is heard, and it will pop out. The card can then be connected to a reading device (not supplied) for data transfer.

Power Supply and Charging: The device is powered by a rechargeable lead acid battery. Upon initial purchase, the battery is empty and requires charging. A full charge takes approximately 2 hours and provides about 120 minutes of operating time, depending on the camera head used. The charger has an over-discharge protection feature, automatically switching off when the battery is full. The battery indicator on the LCD screen displays the charge as a percentage. Charging is only possible when the monitor is switched off. The charger's LED light indicates charging status: yellow when connected, orange during charging, and blinking green/orange then solid green in standby mode after charging is complete. Users are advised to charge the battery when "Batt?" appears, indicating approximately 5 minutes of operating voltage remaining.

Inspection Tips:

  • Default Inspection: To identify chimney defaults, hold the camera vertically in the center of the chimney at the lowest cleaning door. Lead the camera in a circular motion to determine the default and its direction.
  • Attic/Rooftop Inspection: Gently lower the camera head into the chimney. Using a cable with marks helps determine the camera's depth. A roller-stand (Art.-No.: 0042 / 0043) can be used for convenience.

Maintenance Features

Cleaning:

  • The monitor and housing should be cleaned with a damp, clean cloth to prevent scratches. A microfibre cloth is recommended.
  • Do not use aggressive cleansers.
  • Avoid contact with water of any kind.

Safety Precautions:

  • The video inspection system is not waterproof.
  • It is not for use in the medical field.
  • All repairs must be carried out by qualified staff (contact RESS-customer service if needed).
  • Always connect and disconnect components without power supply.
  • Switch off the system after use.
  • Avoid collisions (use the strap).
  • Do not use near strong magnetic fields.
  • Avoid temperatures above 40°C. Ensure heating is switched off during inspection.
  • The camera cable's working temperature should not fall below +5°C to prevent breakage.
  • Always turn off the camera (button 6, pressed for 3 seconds) at the end of an inspection to prevent unnecessary battery discharge.

Troubleshooting:

  • Device not turning on: Check if the battery is too low and recharge. Ensure the plug connection to the camera head is secure.
  • Rotary ball camera moving independently: The rotary ball camera cannot be used with the mini camera reel.
  • Monitor not charging or flickering: Ensure the monitor is switched off for charging. If flickering, check the charging connection.

Warranty: The warranty is void if the camera head or monitor has been opened manually.

For service and support, contact the RESS SERVICE-Hotline: +49 5208/9127-0.

Ress FM5 Pro Specifications

General IconGeneral
BrandRess
ModelFM5 Pro
CategoryAnalytical Instruments
LanguageEnglish