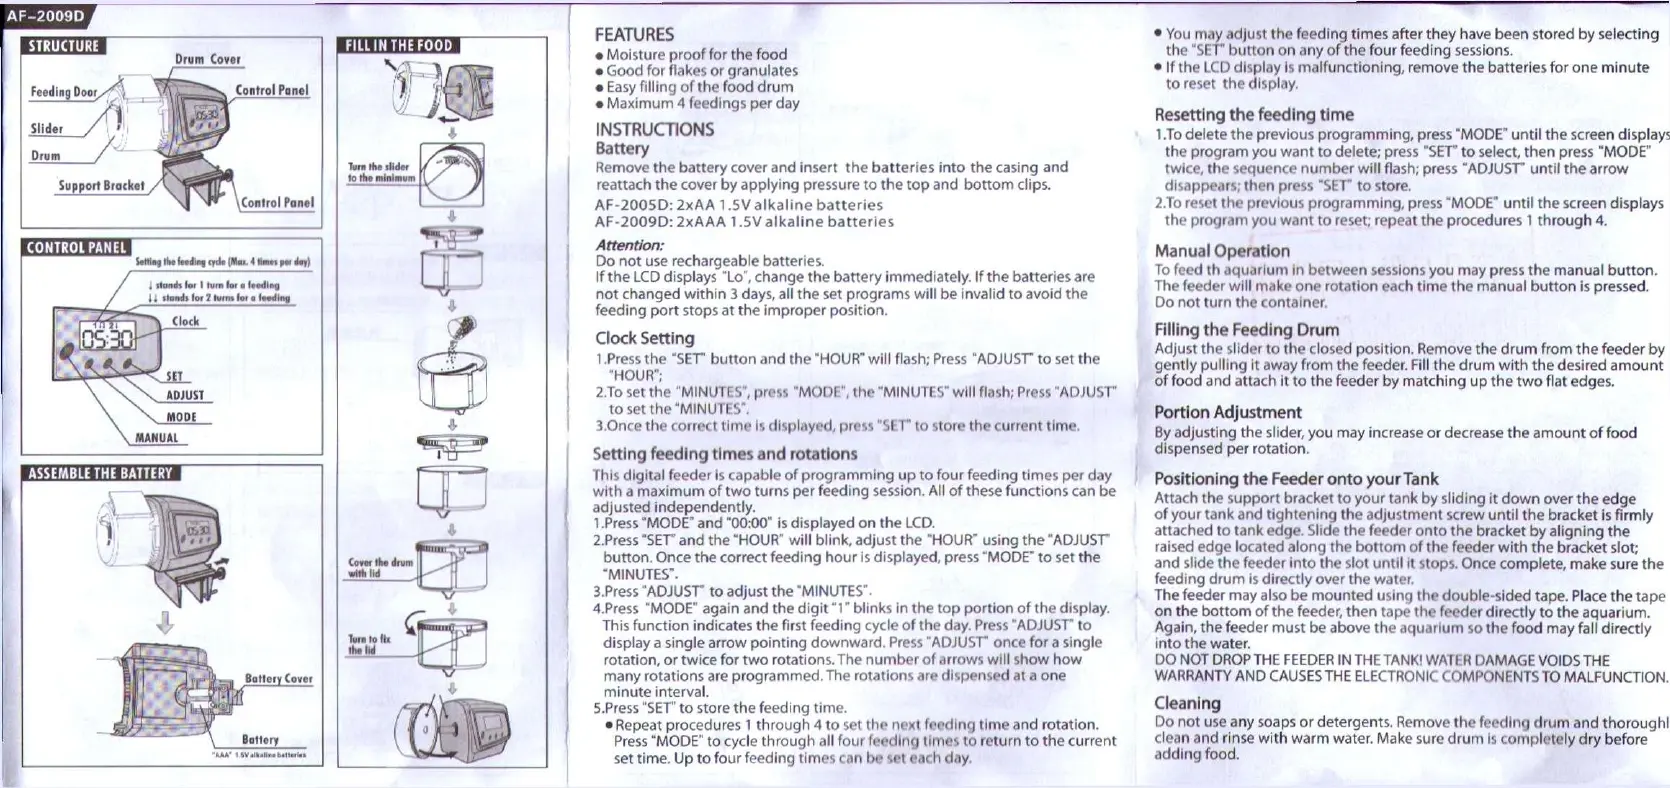
FEATURES
• Moisture proof for the food
•
Good
for flaltes or granulates
•
Easy
filling
of the food drum
• Maximum 4 feedings per day
INSTRUCTIONS
Battery
Remove
the battery cover and insert the batteries into the casing and
reattach the cover by applying pressure to the top and bottom dips.
AF-2005D:2xAA 1.5Valkaline batteries
AF-2009D:2xAAA 1.5V alkaline batteries
Attention:
Do not use rechargeable batteries.
If
the LCD displays To', change the battery immediately. If the batteries are
not
changed within 3 days, all the set programs will be invalid to avoid the
feeding port stops at the improper position.
Clock
Setting
1
.Press
the "SET button and the
'"HOUR'
will flash;
Press
"ADJUST
to set the
"HOUR";
2.To set the
"MINUTES',
press
"MODE",
the
"MINUTES"
will flash;
Press
'ADJUST"
to
set the
"MINUTES",
3.0nce
the correct time is displayed, press 'SET to
Store
the current time.
Setting
feeding
times
and
rotations
This digital feeder is capable of programming up to four feeding times per day
with
a maximum of two turns per feeding session. All of these functions can be
adjusted independently.
1
.Press
'MODE'
and "00:00" is displayed on the LCD.
2.Press
"SET' and the
"HOUR"
will blink, adjust the
"HOUR"
using the
'ADJUST
button.
Once
the correct feeding hour is displayed, press
"MODE"
to set the
"MINUTES".
B.Press
"ADJUST
to adjust the
"MINUTES".
4.
Press
"MODE"
again and the
digit
"1*
blinks in the top portion of the display.
This function indicates the
first
feeding
cycle
of the day.
Press
"ADJUST
to
display a single arrow pointing downward.
Press
"ADJUST
once for a single
rotation,
or twice for two
rotations.
The number of arrows will show how
many rotations are programmed. The rotations are dispensed at a one
minute
interval.
5.
Press
"SET to store the feeding time.
•
Repeat
procedures 1 through 4 to set the next feeding time and rotation.
Press
"MODE'
to
cycle
through all four feeding times to return to the current
set time. Up to four feeding times can be set
each
day,
• You may adjust the feeding times after they
have
been stored by selecting
the 'SET button on any of the four feeding sessions.
• If the LCD display is
malfunctioning,
remove the batteries for one minute
to
reset the display,
Resetting
the
feeding
time
1
.To delete the previous
programming,
press
"MODE"
until
the screen displays
the program you want to delete; press "SET to select, then press
"MODE"
twice,
the
sequence
number will flash; press
"ADJUST
until
the arrow
disappears; then press "SET to store,
2.To reset the previous
programming,
press
"MODE"
until
the screen displays
the program you want to reset; repeat the procedures
1
through 4.
Manual
Operation
To feed th aquarium in between sessions you may press the manual
button.
The feeder will make one rotation
each
time the manual button is pressed.
Do not turn the container.
Flliing
the
Feeding
Drum
Adjust the slider to the closed
position.
Remove
the drum from the feeder by
gently
pulling it
away
from the feeder. Fill the drum with the desired amount
of
food
and attach it to the feeder by matching up the two flat edges.
Portion
Adjustment
By adjusting the slider, you may increase or
decrease
the amount of food
dispensed per rotation.
Positioning
the
Feeder
onto
your
Tank
Attach the support bracket to your tank by sliding it down over the edge
of
your tank and
tightening
the adjustment screw
until
the bracket is firmly
attached to tank edge.
Slide
the feeder onto the bracket by aligning the
raised edge located along the bottom of the feeder with the bracket slot;
and slide the feeder into the slot
until
it stops.
Once
complete, make sure the
feeding drum is directly over the water.
The feeder may also be mounted using the double-sided tape.
Place
the tape
on the bottom of the feeder, then tape the feeder directly to the aquarium.
Again, the feeder must be
above
the aquarium so the food may fall directly
into
the water.
DO NOT
DROP
THE
FEEDER
IN THE
TANK!
WATER
DAMAGE
VOIDS
THE
WARRANTY
AND
CAUSES
THE
ELECTRONIC
COMPONENTS
TO
MALFUNCTION.
Cleaning
Do not use any
soaps
or detergents.
Remove
the feeding drum and thoroughl'
clean and rinse with warm water.
Make
sure drum is completely dry before
adding
food.
 Loading...