EasyManua.ls Logo

Resun AF-2005D - User Manual

Resun AF-2005D
2 pages
Print Icon
To Next Page IconTo Next Page
Loading...
RESUN
®
AUTO
FEEDER
AF-2005D
AF-2009D
GUANGDONG
RISHENG
GROUP
CO.,LTD.
www.resun-china.com
Question and Answer IconNeed help?

Do you have a question about the Resun AF-2005D and is the answer not in the manual?

Summary

Product Structure Overview

Drum Cover

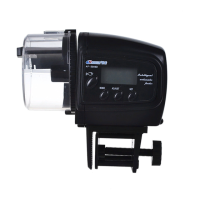
The removable cover for the food drum.

Support Bracket

Component used to attach the feeder to the tank.

Plastic Screw

Screw for adjusting the support bracket.

Control Panel Functions

Feeding Cycle Setting

Configure the number of feeding turns per cycle.

Clock Display

Shows the current time.

Manual Feed Button

Initiates a single feeding cycle manually.

Setting Controls

Buttons for adjusting time and feeding settings.

Assembly and Features

Product Features

Highlights moisture-proof design, suitability for flakes/granulates, and daily feeding capacity.

Battery Installation

Instructions for inserting batteries and attention notes.

Battery Warning

Caution against rechargeable batteries and low battery indicators.

Operational Instructions

Clock Setting Procedure

Step-by-step guide to setting the current time.

Setting Feeding Times

Programming multiple feeding cycles and rotations per day.

Manual Operation

How to feed the aquarium between scheduled times.

Filling the Feeding Drum

Procedure for opening, filling, and reattaching the food drum.

Portion Adjustment

Using the slider to control food amount per rotation.

Tank Placement

Mounting the feeder securely onto the aquarium tank edge.

Cleaning Instructions

Guidelines for cleaning the food drum and feeder components.

Overview

The device described in the manual is an automatic fish feeder, available in two models: AF-2005D and AF-2009D. It is designed to automate the feeding of fish in aquariums, ensuring consistent and timely food delivery.

Function Description:

The primary function of this device is to automatically dispense fish food at pre-set times. It features a drum that holds the food and a mechanism that rotates to release a measured portion into the aquarium. The feeder is programmable, allowing users to set multiple feeding times per day and control the amount of food dispensed per feeding. A manual feeding option is also available for immediate feeding outside of the programmed schedule.

Important Technical Specifications:

  • Models: AF-2005D and AF-2009D.
  • Feeding Cycle: Maximum of 4 times per day.
  • Rotations per Feeding: Can be set for 1 or 2 turns per feeding session.
  • Battery Type (AF-2005D): 2xAA 1.5V alkaline batteries.
  • Battery Type (AF-2009D): 2xAAA 1.5V alkaline batteries.
  • Display: LCD screen for clock display and programming settings.
  • Food Compatibility: Suitable for flakes and granulates.
  • Special Features: Moisture-proof design for the food drum, easy filling, and a warning for low battery ("Lo" on LCD).

Usage Features:

Battery Installation:

  • Remove the battery cover.
  • Insert the specified alkaline batteries (2xAA for AF-2005D, 2xAAA for AF-2009D).
  • Reattach the cover by applying pressure to the top and bottom clips.
  • Attention: Do not use rechargeable batteries. If the LCD displays "Lo," change the battery immediately. Failure to change batteries within 3 days will invalidate all set programs and may cause the feeding port to stop in an improper position.

Clock Setting:

  • Press the "SET" button; the "HOUR" will flash.
  • Press "ADJUST" to set the "HOUR."
  • Press "MODE"; the "MINUTES" will flash.
  • Press "ADJUST" to set the "MINUTES."
  • Once the correct time is displayed, press "SET" to store the current time.

Setting Feeding Times and Rotations:

  • Press "MODE"; "00:00" will be displayed on the LCD.
  • Press "SET"; the "HOUR" will blink. Adjust the "HOUR" using the "ADJUST" button.
  • Press "MODE" to set the "MINUTES."
  • Press "ADJUST" to adjust the "MINUTES."
  • Press "MODE" again; the digit "1" will blink in the top portion of the display, indicating the first feeding cycle.
  • Press "ADJUST" to display a single arrow (1 turn) or two arrows (2 turns) for the number of rotations. Rotations are dispensed at a one-minute interval.
  • Press "SET" to store the feeding time.
  • Repeat procedures 1-4 to set up to four feeding times and rotations. Press "MODE" to cycle through all four feeding times to return to the current set time.
  • Feeding times can be adjusted after being stored by selecting the "SET" button on any of the four feeding sessions.

Resetting the Feeding Time:

  • To delete a previous program: Press "MODE" until the desired program is displayed. Press "SET" to select, then press "MODE" twice. The sequence number will flash. Press "ADJUST" until the arrow disappears, then press "SET" to store.
  • To reset all previous programming: Press "MODE" until the screen displays the program to be reset, then repeat procedures 1-4 for setting feeding times.
  • If the LCD display malfunctions, remove the batteries for one minute to reset the display.

Manual Operation:

  • Press the "MANUAL" button to feed the aquarium between scheduled sessions. The feeder will make one rotation each time the button is pressed. Do not turn the container manually.

Filling the Feeding Drum:

  • Adjust the slider to the closed position (minimum).
  • Remove the drum from the feeder by gently pulling it away.
  • Fill the drum with the desired amount of food.
  • Attach the drum to the feeder by matching up the two flat edges.

Portion Adjustment:

  • Adjust the slider to increase or decrease the amount of food dispensed per rotation.

Positioning the Feeder onto your Tank:

  • Attach the support bracket to your tank by sliding it down over the edge and tightening the adjustment screw until it is firmly attached.
  • Slide the feeder onto the bracket by aligning the raised edge along the bottom of the feeder with the bracket slot and sliding it until it stops.
  • Ensure the feeding drum is directly over the water.
  • Alternatively, the feeder can be mounted using double-sided tape on the bottom of the feeder, then taped directly to the aquarium. Again, ensure the feeder is above the aquarium so food falls directly into the water.
  • Warning: Do not drop the feeder in the tank! Water damage voids the warranty and causes electronic components to malfunction.

Maintenance Features:

Cleaning:

  • Do not use any soaps or detergents.
  • Remove the feeding drum.
  • Thoroughly clean and rinse the drum with warm water.
  • Ensure the drum is completely dry before adding food.

Resun AF-2005D Specifications

General IconGeneral
BrandResun
ModelAF-2005D
CategoryPet Care Product
LanguageEnglish