B
STARTSELECT
A
B
STARTSELECT
A
INSTRUCTION MANUAL
MANUAL DE INSTRUCCIONES
GUIDE D’UTILISATION
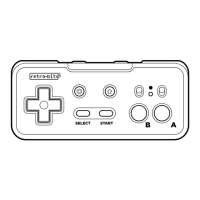
Controller Diagram Receiver Diagram
EN Button Mappings
EN Macros & Compatibility
EN Pairing Instructions
EN Support
Button A
L
Start
USB®-C
Charge Port
Turbo AHome
Button B
ZL
Select
ZR
Includes
• Origin8 2.4 GHz Wireless Controller
• USB® and NES® receivers
• 3ft/1m USB® to USB®-C charge cable
• Instruction Manual
Pairing to a Receiver
• Connect a receiver into the console’s controller port and power it on.
• Once powered, the receiver will flash red slowly if unpaired.
• Press and hold the pairing button on the receiver for a few seconds
until it flashes rapidly.
• Press Start on the controller to power it on and once more to pair it.
• Once paired, both controller and receiver will have their lights
remain on.
• Upon your next play session, you only need to power on the
controller with Start to connect to the console receiver on a powered
console.
Troubleshooting
• If you are experiencing connection issues, be sure that the controller
is fully charged.
• To reset all connections, press and hold Start + Select + R for 5
seconds.
• To reset the controller, use a thin tool (unbent paperclip) and push a
tiny button within the tiny hole on the back of the controller once -
this will reset the controller to factory default settings.
To stay up to date with the latest news,
manuals, and firmware updates, visit
retro-bit.com/support.
If you require additional help, e-mail
info@retro-bit.com.
Follow us online and stay in the conversation!
@retrobitgaming
www.retro-bit.com
To enable Turbo Function
• Flip the switch above Button A and/or B into the “up” position.
• Press and hold the designated button to experience rapid fire inputs.
Compatibility
• The NES® receiver is compatible with original and most 3rd party
clone consoles that utilize the same controller port.
• The USB® receiver is compatible with Windows® PC, Mac®,
Android®, Raspberry Pi® devices, MiSTer, Polymega®, Nintendo
Switch®, and other USB®-enabled devices and consoles.
Press and hold the button combination for 5 seconds to enable.
Controller NES® D-Input X-Input Switch
DPad DPad DPad Left Analog DPad
A A Button 2
Button 0 (B)
A
B B Button 3
Button 1 (A)
B
L - Button 7
Button 4 (LB)
L
R - Button 8
Button 5 (RB)
R
ZL - Button 6
Button 6 (LT)
ZL
ZR - Button 5
Button 7 (RT)
ZR
Capture -
Button 9
Minus (-)
Home -
Button 10
Plus (+)
Select Select
-
Capture
Start Start
-
Home
Connection
NES®
Receiver
USB® Receiver
Input Mode Description
Select + Start + R Clear Pairings
Removes all pairings from the
controller.
Start + B Input Switch
Change from D-Input to
X-Input, and vice versa.
Start + Left Left Analog
Changes DPad to act as
Left Analog
Start + Right Right Analog
Changes DPad to act as Right
Analog
Start + Up DPad
Changes the DPad back
to default
DPad
R
Turbo BCapture
Pairing
Button
Micro USB®
(Firmware Updates Only - Micro USB® cable not included)
USB® NES®
Retro-Bit is a registered trademark of Kool Brands, LLC. Mac is a
registered trademark of Apple Inc. USB is a registered trademark of
Universal Serial Bus Implementers Forum, Inc. Nintendo Switch® is a
trademark registered trademark of Nintendo of America Inc. All other
mentioned trademarks are either trademarks or registered trademarks
of their respective owners. All rights reserved. This product is not
endorsed, manufactured, produced, sponsored or licensed by Apple Inc.
or Nintendo of America Inc.
© Kool Brands, LLC.
Start
Select
-
-