EasyManua.ls Logo

RetroSound Santa Cruz User Manual

RetroSound Santa Cruz
2 pages
To Next Page IconTo Next Page
Page #1 background imageLoading...
Page #1 background image
Radio Face Quick Start Guide
What’s in the Box Installation
Santa Cruz Face
Cables
Modern Sound For Your Classic
tech@retromanufacturing.com | help.retromanufacturing.com
Refer to the user manual included in your motor box or on our website for more comprehensive instructions.
The factory radio in this vehicle is a two or three-part system consisting of: a radio controller
mounted in the upper-right side of the dash, an optional EQ or tape player located in the center
of the lower dash and the radio receiver box located under the dash just above the gas pedal
area. Before installing, disconnect the vehicle’s negative battery terminal.
1. Access the radio receiver box by removing the panel just below the steering column. Remove
the two screws located at the bottom corners of the panel, then remove the panel.
2. Locate the receiver box just above the gas pedal. Remove the three screws holding the receiver
box in place. Unplug the radio controller, EQ/cassette unit and main harnesses. Remove the
antenna plug, and then the receiver box.
3. Next locate the controller in the dashboard (located to the upper right of the instrument panel)
Remove the four screws holding the trim bezel, and carefully remove it from around the gauges.
Carefully remove the four screws holding the controller in place, then remove the controller from
the dash.
4. Connect the Face to Body Cable to the Santa Cruz Radio Face and route it from the controller
location to the receiver box location through the opening in the dash.
5. Next, connect the Santa Cruz Radio Face to the RetroSound® radio body (Motor). Plug in the
Face to Body Cable by connecting the ribbon cable to the front of the radio body and the shaft
plugs to the sides of the radio body. While looking down at the radio body with the cables coming
out the back, the imprinted “RetroSound” will be on the top of the radio body chassis. The cable
marked “R” plugs into the input to the right of “RetroSound” on the radio body, and the cable
marked “L” plugs into the left side.
6. Connect the GM Adapter Harness and Antenna Adapter to the Radio Motor. Refer to the Instal-
lation and Assembly Manual on our website for wiring instructions.
7. Using the backstrap, mount your radio body into the receiver box location above the gas pedal.
8. Mount the Santa Cruz Radio Face into the controller location. Reconnect the vehicle’s battery
and test the system to ensure everything is connected properly.
9. Replace the trim, bezel and lower dash panel to complete the installation.
Face to Body Cable662 Antenna Adapter
661 GM Adapter Harness

Other manuals for RetroSound Santa Cruz

Question and Answer IconNeed help?

Do you have a question about the RetroSound Santa Cruz and is the answer not in the manual?

RetroSound Santa Cruz Specifications

General IconGeneral
BrandRetroSound
ModelSanta Cruz
CategoryRadio
LanguageEnglish

Summary

Installation Guide

Access Receiver Box Panel

Remove the panel below the steering column to access the radio receiver box.

Remove Receiver Box

Locate and disconnect the receiver box, unplugging main harnesses and antenna.

Remove Controller Trim and Controller

Remove dash trim bezel and screws to access and remove the radio controller.

Connect Face to Body Cable

Route the Face to Body Cable from the controller location to the receiver box location.

Connect Radio Face to Radio Body

Connect the Santa Cruz Radio Face to the RetroSound radio body using specified cables.

Connect Adapter Harnesses

Connect GM Adapter Harness and Antenna Adapter to the Radio Motor.

Mount Radio Body

Use the backstrap to mount the radio body into the receiver box location.

Mount Radio Face and Test System

Mount the Santa Cruz Radio Face, reconnect battery, and test the system.

Complete Installation

Replace dash panels and trim to finish the installation process.

Control Layout and Operation

Radio Presets

Instructions for setting and recalling preset radio stations using the designated buttons.

Power On/Off

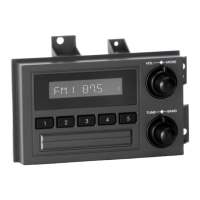
Procedure to power the unit on and off using the top-front knob.

Volume Control

How to adjust the audio volume by rotating the top-front knob.

Changing Source Modes

Cycle through available audio source modes using the top-rear knob.

Changing Radio Bands

Switch between radio bands (e.g., FM, AM) using the bottom-rear knob.

Tuning Stations

Scroll through radio stations by rotating the bottom-front knob.

Mute On/Off

Toggle audio mute on and off by pressing the bottom-front knob.

Equalizer (EQ) Adjustment

Access and adjust EQ settings via the tone control sub-menu.

Setting the Clock

Enter system settings to adjust the clock hours and minutes.

Display Color Selection

Cycle through display color options within the system settings.

Beep On/Off Setting

Enable or disable audible beeps for button presses in system settings.